Ever finished a quilt top and felt like something was just slightly off?
Nine times out of ten, it is the border. Quilt borders do more than frame your work; they pull the entire design together, balance the colors, and give your quilt that clean, finished look that turns a good project into a great one.
Getting them right is less about luck and more about knowing a few simple techniques that most quilters never get taught.
Here are the best quilt border ideas, tips, and step-by-step guidance to help you add borders that look polished, lie flat, and do your quilt justice.
What are Quilt Borders Really For?
Growing up around fabric scraps and half-finished projects, I used to think quilt borders were just the last strip you sewed on before calling it done. It took a few lopsided quilts and one very honest grandmother to teach me otherwise.
A quilt border frames the center the way a mat frames a painting. It tells the eye where to stop, gives the design room to breathe, and pulls the whole color story together.
A well-chosen border makes the quilt look intentional. A rushed one makes even a beautifully pieced center look unfinished.
Borders add inches to a quilt top that came out smaller than planned, help with squaring up before binding, and give you space to separate a busy center from the outer edge.
Balance matters too; a border that is too wide overpowers the center, and one that is too narrow looks like an afterthought. A good starting point is half to two-thirds the size of your finished block, adjusted by eye until it feels right.
When to Skip Quilt Borders?
Not every quilt needs one. Here is when skipping makes sense:
- The quilt already hits your target size
- The edge blocks create a strong natural frame on their own
- You are making a modern or minimalist quilt where clean edges are part of the design
- A substitute fabric would not work, and the right one is not available
The Right Way to Measure Quilt Borders Before You Cut
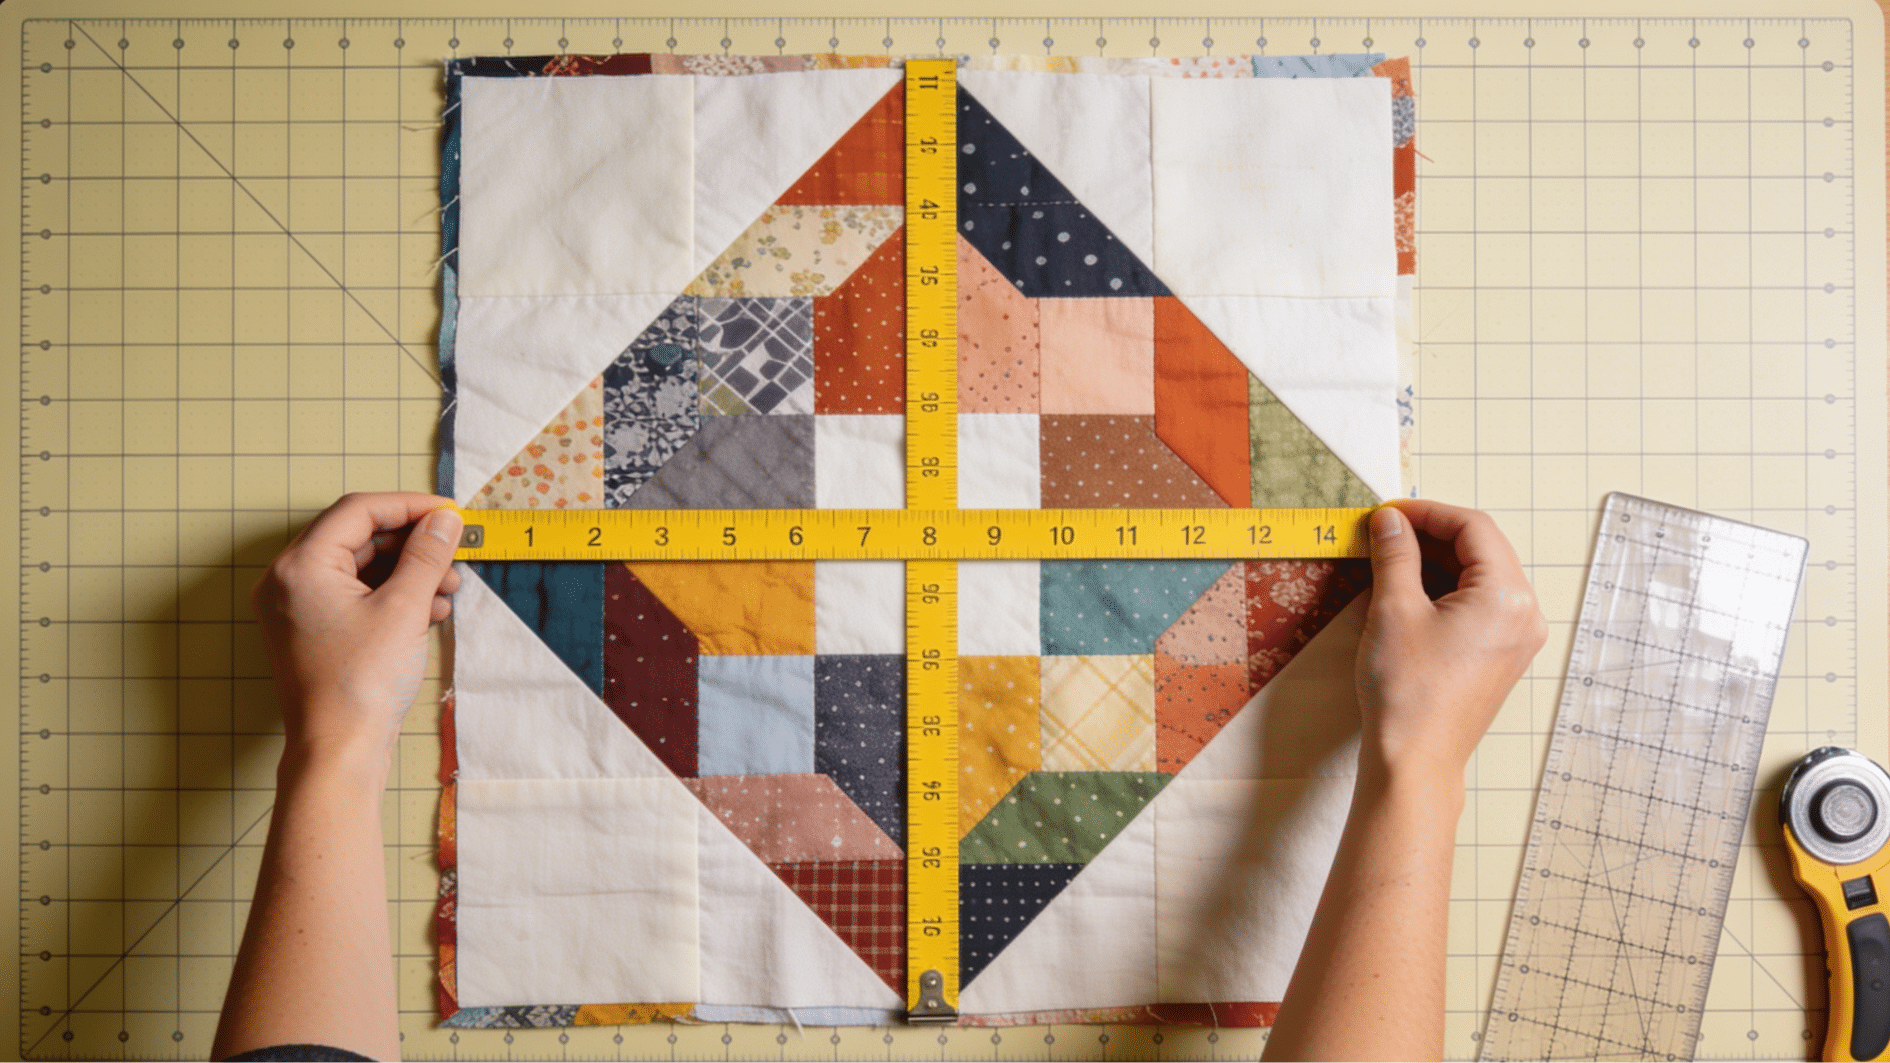
My first bordered quilt rippled so badly I had to take the whole thing off and start again. A quarter inch off on one side does not sound like much until the border is sewn on and the whole quilt top is pulling to one side.
Borders fail at the measuring stage more than anywhere else. This is how you can fix this problem:
| Measure | Through the center of the quilt, not along the edges |
| Length first | Attach side borders before the top and bottom |
| Cut to size | Match the border strip length to your center measurement |
| Pin at points | Pin at the center and quarter points to distribute ease |
| Grain line | Cut from the lengthwise grain for a more stable border |
| Piecing strips | Join on a 45-degree angle to hide seams |
| Press | Press after each border, never stretch while ironing |
| Square up | Check and trim corners to 90 degrees before the next border |
Quilt Border Ideas for Every Skill Level and Style
Not every quilt border needs to be complicated to look good. After years of finishing quilt tops, I have found that the best border is usually the one that fits the quilt’s personality; sometimes that is a clean, straight strip; sometimes it is a row of flying geese that took an afternoon to piece.
1. Simple Straight Cut Borders
The straight cut border is where most quilters start, and for good reason. It is reliable, clean, and works on almost any quilt style. Measure through the center, cut to that length, and you will get a flat, even border every time.
Materials needed:
- Border fabric cut on the lengthwise grain
- Rotary cutter and cutting mat
- Quilting ruler
- Pins
- Iron and pressing cloth
Steps:
- Measure through the center of the quilt from top to bottom and note the number.
- Cut two side border strips to that exact measurement.
- Pin each strip to the quilt side, matching centers and quarter points, then sew.
- Press seams toward the border fabric.
- Measure through the center from side to side, including the newly attached borders.
- Cut the top and bottom strips to that measurement.
- Pin, sew, and press as before.
2. Mitered Corner Borders
Mitered corners meet at a 45-degree angle, the same way a frame does. They take a little more measuring and care than straight borders, but the result looks polished and intentional. They work especially well with striped or directional fabrics where you want the pattern to flow around the corner.
Materials needed:
- Border fabric, cut longer than the quilt side to allow for the miter
- Quilting ruler with 45-degree marking
- Rotary cutter and cutting mat
- Pins
- Iron
Steps:
- Cut border strips longer than each quilt side, add twice the border width plus 3 inches to each strip.
- Sew all four borders to the quilt, leaving a quarter inch unsewn at each corner.
- Fold the quilt diagonally at one corner, right sides together.
- Align the border strips and mark a 45-degree line from the inner corner to the outer edge.
- Pin along the marked line and sew.
- Check that the corner lies flat with no tucks or gaps.
- Trim the seam to a quarter inch and press open.
- Repeat for the remaining three corners.
3. Scrappy Borders Using Fabric Leftovers
A scrappy border is one of the most useful quilt border ideas; it uses up what you already have and adds a relaxed, handmade character that suits scrap quilts especially well. No two scrappy borders look the same, which is exactly the point.
Materials needed:
- Assorted fabric scraps in coordinating or contrasting colors
- Rotary cutter and cutting mat
- Quilting ruler
- Sewing machine
- Iron
Steps:
- Cut your fabric scraps into strips of a consistent width, 2 to 3 inches is a reliable starting point.
- Sew the strips together end to end, mixing colors and prints as you go, until each pieced strip exceeds the quilt side length.
- Press all seams in one direction to keep the strip flat and stable.
- Measure through the center of the quilt and trim each pieced strip to that exact length.
- Pin at the center and quarter points and sew the strip to the quilt edge.
- Press toward the border and repeat the same process for all four sides.
4. Checkerboard Borders
A checkerboard border alternates two fabric colors in equal squares to create a graphic, high-contrast frame around the quilt. It works best when the two colors already appear somewhere in the quilt center, tying the whole design together.
Materials needed:
- Two contrasting fabrics
- Rotary cutter and cutting mat
- Quilting ruler
- Sewing machine
- Iron
Steps:
- Cut equal-width strips from both fabrics, making sure all strips are exactly the same width.
- Sew the strips together lengthwise, alternating the two colors, to create a strip set.
- Press all seams toward the darker fabric.
- Cross-cut the strip set into segments equal to the strip width to create individual rows of two squares.
- Sew the segments together end to end, alternating the color placement to build the checkerboard pattern.
- Measure through the center of the quilt and trim the checkerboard strip to that length.
- Pin at the center and quarter points, sew to the quilt, and press.
5. Flying Geese Borders
Flying geese units, each one a rectangle with two triangular corners, lined up in a row, make one of the most classic pieced quilt borders there is. They add movement and direction to the edge of the quilt and look far more complex to make than they are.
Materials needed:
- Background fabric for the triangle corners
- Feature fabric for the center rectangle
- Rotary cutter and cutting mat
- Quilting ruler
- Sewing machine and iron
Steps:
- Cut rectangles and small squares to your chosen finished size, the rectangle is always twice as wide as it is tall.
- Draw a diagonal line on the wrong side of each small square.
- Place a small square on one end of the rectangle, right sides together, and sew on the drawn line.
- Trim the seam to a quarter inch and press the triangle open.
- Repeat on the right end of the rectangle to complete the flying geese unit.
- Sew all completed units together in a row, with all geese pointing in the same direction.
- Measure the row against the quilt side, trim to fit, then pin and sew.
6. Multiple Borders with Mitered Corners
Layering two or more borders with mitered corners creates a frame within a frame. A look that suits medallion quilts and more formal designs particularly well. The key is to sew the inner and outer border strips together first, then attach them to the quilt as a single unit.
Materials needed:
- Two or more border fabrics in coordinating colors
- Quilting ruler with 45-degree marking
- Rotary cutter and cutting mat
- Pins and sewing machine
- Iron
Steps:
- Cut strips for each border layer to the correct width.
- Sew the inner and outer border strips together lengthwise to create one combined strip per side.
- Press the seam toward the outer border fabric.
- Attach each combined strip to its quilt side, leaving a quarter inch unsewn at every corner.
- Fold the quilt diagonally at one corner and align the seam lines running through the combined border strips.
- Mark the 45-degree miter line through all layers and sew carefully along it.
- Trim the seam allowance, press it open, and repeat at each remaining corner.
7. Panel Quilt Borders
A fabric panel makes a strong quilt center on its own, but adding borders is what turns it into a finished quilt top. The border width needs to be planned carefully so the finished quilt reaches a usable size without overwhelming the panel design.
Materials needed:
- Coordinating border fabric
- Rotary cutter and cutting mat
- Quilting ruler
- Sewing machine and iron
- Tape measure
Steps:
- Measure the panel carefully through the center in both directions and write down both numbers.
- Decide on your border width based on how large you need the finished quilt to be.
- Cut border strips to the center measurement on the lengthwise grain.
- Attach the side borders first, press toward the border, then remeasure through the center widthwise.
- Cut and attach the top and bottom borders to the new measurement.
- Add additional border rounds if needed to reach the target finished size.
- Square up the completed top carefully before moving to backing and batting.
8. Four Patch Block Borders
Four patch blocks, four equal squares sewn together in a two-by-two grid — make a simple and versatile pieced border. They work especially well as corner blocks when combined with straight borders, and they are a great way to use up small fabric squares left over from the quilt center.
Materials needed:
- Two coordinating fabrics cut into equal squares
- Rotary cutter and cutting mat
- Sewing machine and iron
- Quilting ruler
Steps:
- Cut squares of exactly equal size from both fabrics.
- Sew two squares of alternating colors together to make a pair, then join two pairs to complete one four-patch block.
- Press seams in alternating directions on each pair so they nest together neatly when joined.
- Make enough four-patch blocks to run along all four sides of the quilt.
- Sew the blocks into rows and hold each row against the quilt side to check the fit.
- Trim if needed and attach each row using the standard pin at the center and quarter points method.
- Press after each side is attached before moving to the next.
9. Borders That Add Size and Square Up a Quilt
Sometimes a quilt top comes out smaller than planned or slightly uneven after piecing. A border is one of the most useful ways to add the missing inches and square everything up at the same time. The border does not need to be decorative, a simple straight strip in a neutral fabric does the job cleanly.
Materials needed:
- Coordinating or neutral border fabric
- Rotary cutter and cutting mat
- Quilting ruler and tape measure
- Sewing machine and iron
Steps:
- Measure the quilt through the center in both directions and compare each number to your target finished size.
- Calculate the border width needed on each side to reach that target.
- Cut strips on the lengthwise grain to the center measurement.
- Attach the side borders first, press toward the border, and remeasure through the center.
- Cut the top and bottom strips to the new measurement and attach them the same way.
- Use a large square ruler to check that all four corners sit at exactly 90 degrees and trim if needed.
- Press the completed top flat before layering with batting and backing.
10. Decorative and Fancy Borders
Decorative borders go beyond a simple strip of fabric. They might include prairie points, folded flanges, sawtooth edges, or intricate pieced designs that frame the quilt with real visual impact. These take more time and planning but are worth it when the quilt calls for something special.
Materials needed:
- Feature border fabric
- Additional fabric for decorative elements such as prairie points or sawtooth units
- Rotary cutter, cutting mat, and quilting ruler
- Sewing machine and iron
- Pins and marking tool
Steps:
- Decide on the decorative element you want to use: prairie points, sawtooth, flange, or a pieced design.
- Calculate how many units you need to fit evenly around the full quilt perimeter before cutting anything.
- Make all decorative units completely before attaching anything to the quilt.
- Baste or pin the decorative elements to the raw edge of the quilt top, spacing them evenly.
- Lay the outer border strip over the decorative elements, right sides together, sandwiching them in place.
- Sew through all layers, then press carefully and check that every element is lying flat and evenly spaced.
- Square up and trim the completed border before moving to the next stage.
How Do You Choose the Right Quilt Border?
Choosing the right quilt border starts with looking at the quilt center, not just the fabric you have left.
I usually check the colors, block size, and overall feel first, then choose a border that supports the quilt instead of taking attention away from it.
| What To Consider | Best Border Choice | Why It Works |
|---|---|---|
| Busy Quilt Center | Solid Border | Gives the eye a place to rest and keeps the design balanced |
| Simple Quilt Center | Pieced Border | Adds detail, movement, and more visual interest |
| Scrap Quilt | Scrappy Border | Uses leftover fabric while keeping the quilt’s handmade feel |
| Small Quilt | Narrow Border | Adds a clean finish without making the quilt look heavy |
| Large Quilt | Medium Or Wide Border | Helps frame the quilt and adds size where needed |
| Striped Fabric | Mitered Border | Lets the print meet neatly at the corners |
| Panel Quilt | Multiple Borders | Builds size while framing the main panel clearly |
| Modern Quilt | Solid Or Asymmetrical Border | Keeps the layout clean and intentional |
| Traditional Quilt | Flying Geese Or Four-Patch Border | Matches classic block styles and adds structure |
| Uneven Quilt Top | Simple Straight Border | Helps square up the quilt before binding |
Final Thoughts
A good quilt border does not just finish a quilt; it completes it. From understanding why borders matter to choosing the right fabric, measuring correctly, and picking a style that suits your quilt, every decision adds up to a result you will be proud of.
I have seen a single well-chosen border transform a quilt top that felt unfinished into something that looked entirely intentional.
If you came here wondering why your borders never quite looked right, hopefully you are leaving with a clearer sense of what to do.
For another beginner-friendly quilting project, learning how to make a rag quilt can help you keep building confidence with fabric, seams, and finishing.
Take your time, trust your measuring, and let the border do what it does best: frame everything you worked so hard to make. Browse the tutorials, pick one idea, and give it a try.
Frequently Asked Questions
Can You Add a Border to an Already Finished Quilt?
Yes, but it requires carefully removing the binding, attaching the border, and rebinding. It is doable but takes more time than adding borders before finishing.
How Wide Should a Quilt Border Be?
Most borders range from 2 to 6 inches wide. Wider borders suit larger quilts. Narrower borders work better on smaller projects like wall hangings or baby quilts.
Do Quilt Borders Need to Be Prewashed?
Prewashing is recommended if the rest of your quilt fabrics were prewashed. Skipping it on borders only can cause uneven shrinkage after the first wash.
Can You Use Leftover Binding Fabric for Borders?
Yes, as long as there is enough yardage. Binding fabric is typically good-quality quilting cotton that works well as a narrow inner or accent border.