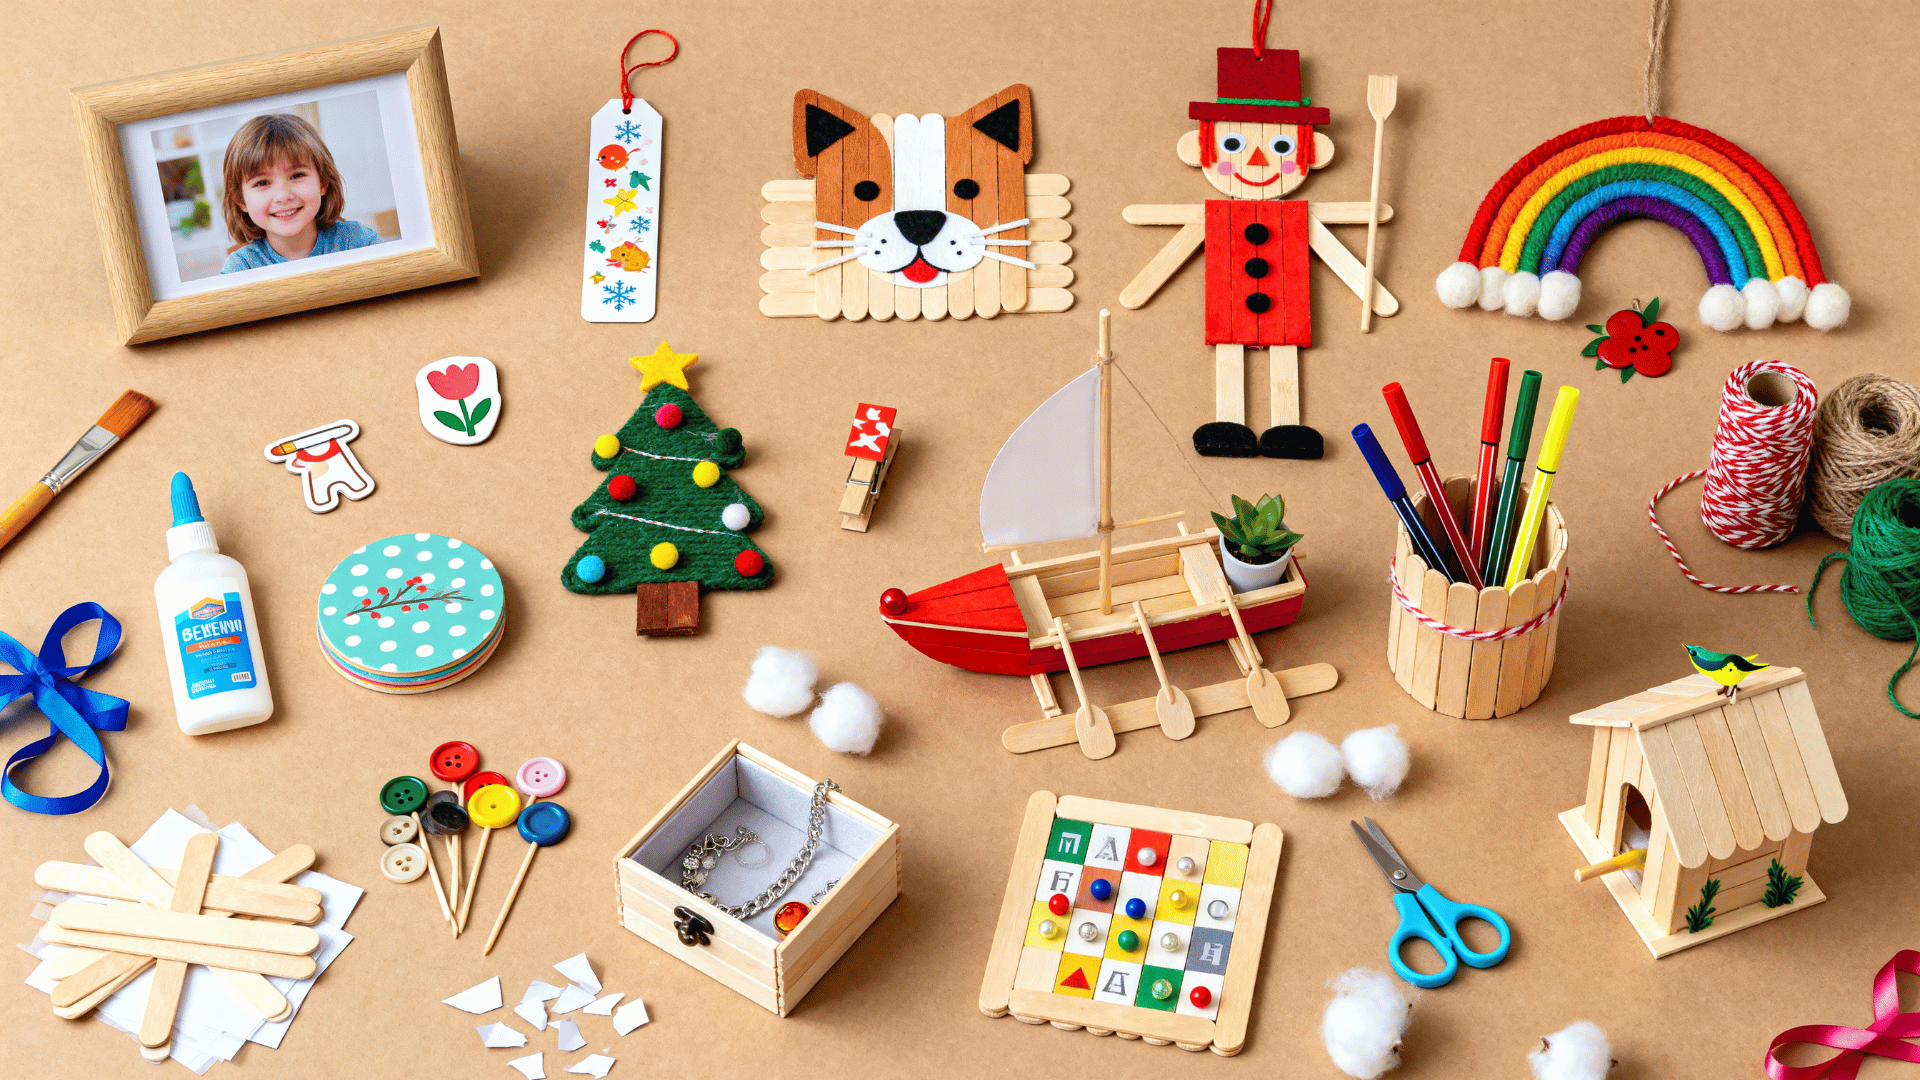
Got a pack of popsicle sticks and no idea what to make? You’re already halfway to a fun DIY project.
With just glue, paint, paper, yarn, and a few small extras, those plain sticks can turn into photo frames, puppets, ornaments, games, desk items, and cute keepsakes.
Crafts with popsicle sticks are perfect for kids, parents, teachers, and adults because they are simple, low-cost, and easy to set up.
Many of these ideas also work well in classrooms, during weekend craft time, at birthday parties, and in after-school activities.
In this blog, I’ll share fun ideas with supplies, age notes, and clear steps, so you can choose a craft that fits your time, skill level, and materials.
What No One Tells You Before Starting A Popsicle Stick Craft
Most popsicle stick project posts jump straight to the steps. But small details, like glue type, stick size, paint prep, and drying support, can decide whether a project holds together or falls apart halfway through.
I’ve learned most of these tips the fun way: sitting at the craft table with gluey fingers, crooked sticks, half-used paint bottles, and kids asking, “Can we fix it?” Those little mistakes are exactly what taught me which supplies hold up, which shortcuts work, and which ones are better to skip.
- Glue choice makes or breaks the build: Hot glue sets fast, which helps with boxes, houses, coasters, and organizers. White glue dries more slowly, but it gives kids time to adjust crooked pieces before they stay in place.
- Not all popsicle sticks are the same: Standard sticks work well for flat crafts and frames. Jumbo sticks are better for walls, sections, and heavier builds. Try not to mix both sizes in the same base because the edges can sit unevenly.
- Bare wood and paint need a little prep: A light sanding or a thin white base coat can help the paint look smoother. This is worth doing for crafts you plan to display, give as gifts, or keep.
- Heavier projects need support while drying: A box, house model, or organizer needs something firm underneath while the walls set. A flat piece of cardboard, a small book, or a clean block can help the shape stay straight.
- Small parts need extra care around young kids: buttons, gems, beads, magnets, and googly eyes can pose a choking hazard for toddlers. For kids under 3, use larger decorations and adult help.
- Outdoor crafts need sealing: Plant markers and bird feeders last longer when the painted areas are sealed. Let the sealer dry fully before placing the craft outside.
Crafts with Popsicle Sticks to Try at Home
Popsicle sticks can become keepsakes, toys, learning tools, storage pieces, seasonal decor, and useful household items. Each idea below includes the appropriate age group, best use, required craft supplies, and clear steps to follow.
1. Popsicle Stick Photo Frame
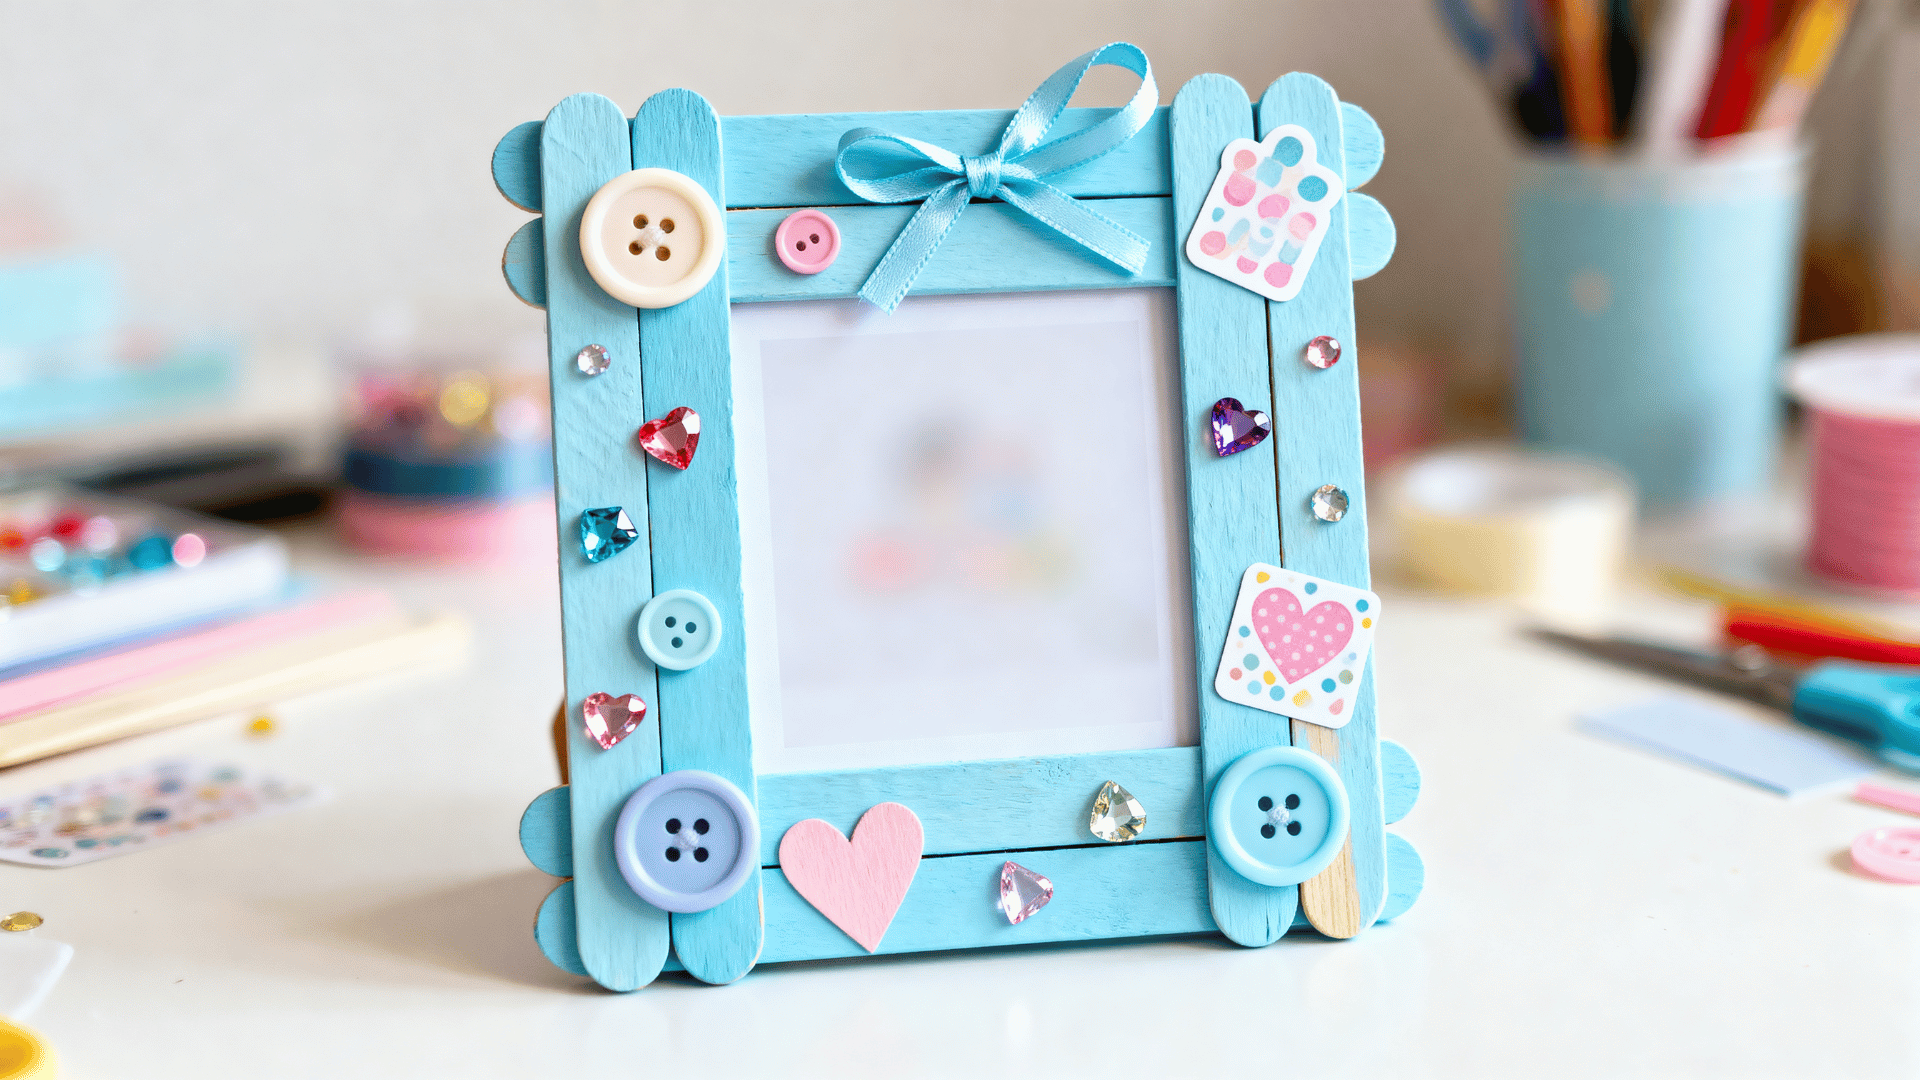
A popsicle stick photo frame is a sweet keepsake craft for family photos, school photos, birthday memories, or handmade gifts.
It works well for kids ages 5 and up because the design can stay simple with markers or feel more detailed with ribbon, buttons, stickers, gems, and layered decorations.
Craft Supplies Needed:
| Supply | Quantity / Details |
|---|---|
| Popsicle Sticks | 8 to 10 sticks |
| White Glue Or Hot Glue | For attaching the sticks and decorations |
| Paint Or Markers | For coloring the frame |
| Cardboard | For backing the photo frame |
| Small Photo | To place inside the frame |
| Ribbon | For hanging or decorating |
| Stickers, Buttons, Or Gems | For extra decoration |
Steps to Follow:
- Place two popsicle sticks vertically and two horizontally to form a square frame.
- Glue the corners where the sticks overlap.
- Add one extra stick on each side if you want a thicker frame.
- Paint the frame or color it with markers.
- Add stickers, buttons, or gems around the edges, keeping the center open.
- Cut a piece of cardboard slightly larger than the photo.
- Glue the photo onto the cardboard.
- Attach the frame over the photo so the photo shows through the center.
- Glue ribbon to the back if you want to hang the frame.
2. Popsicle Stick Bookmarks
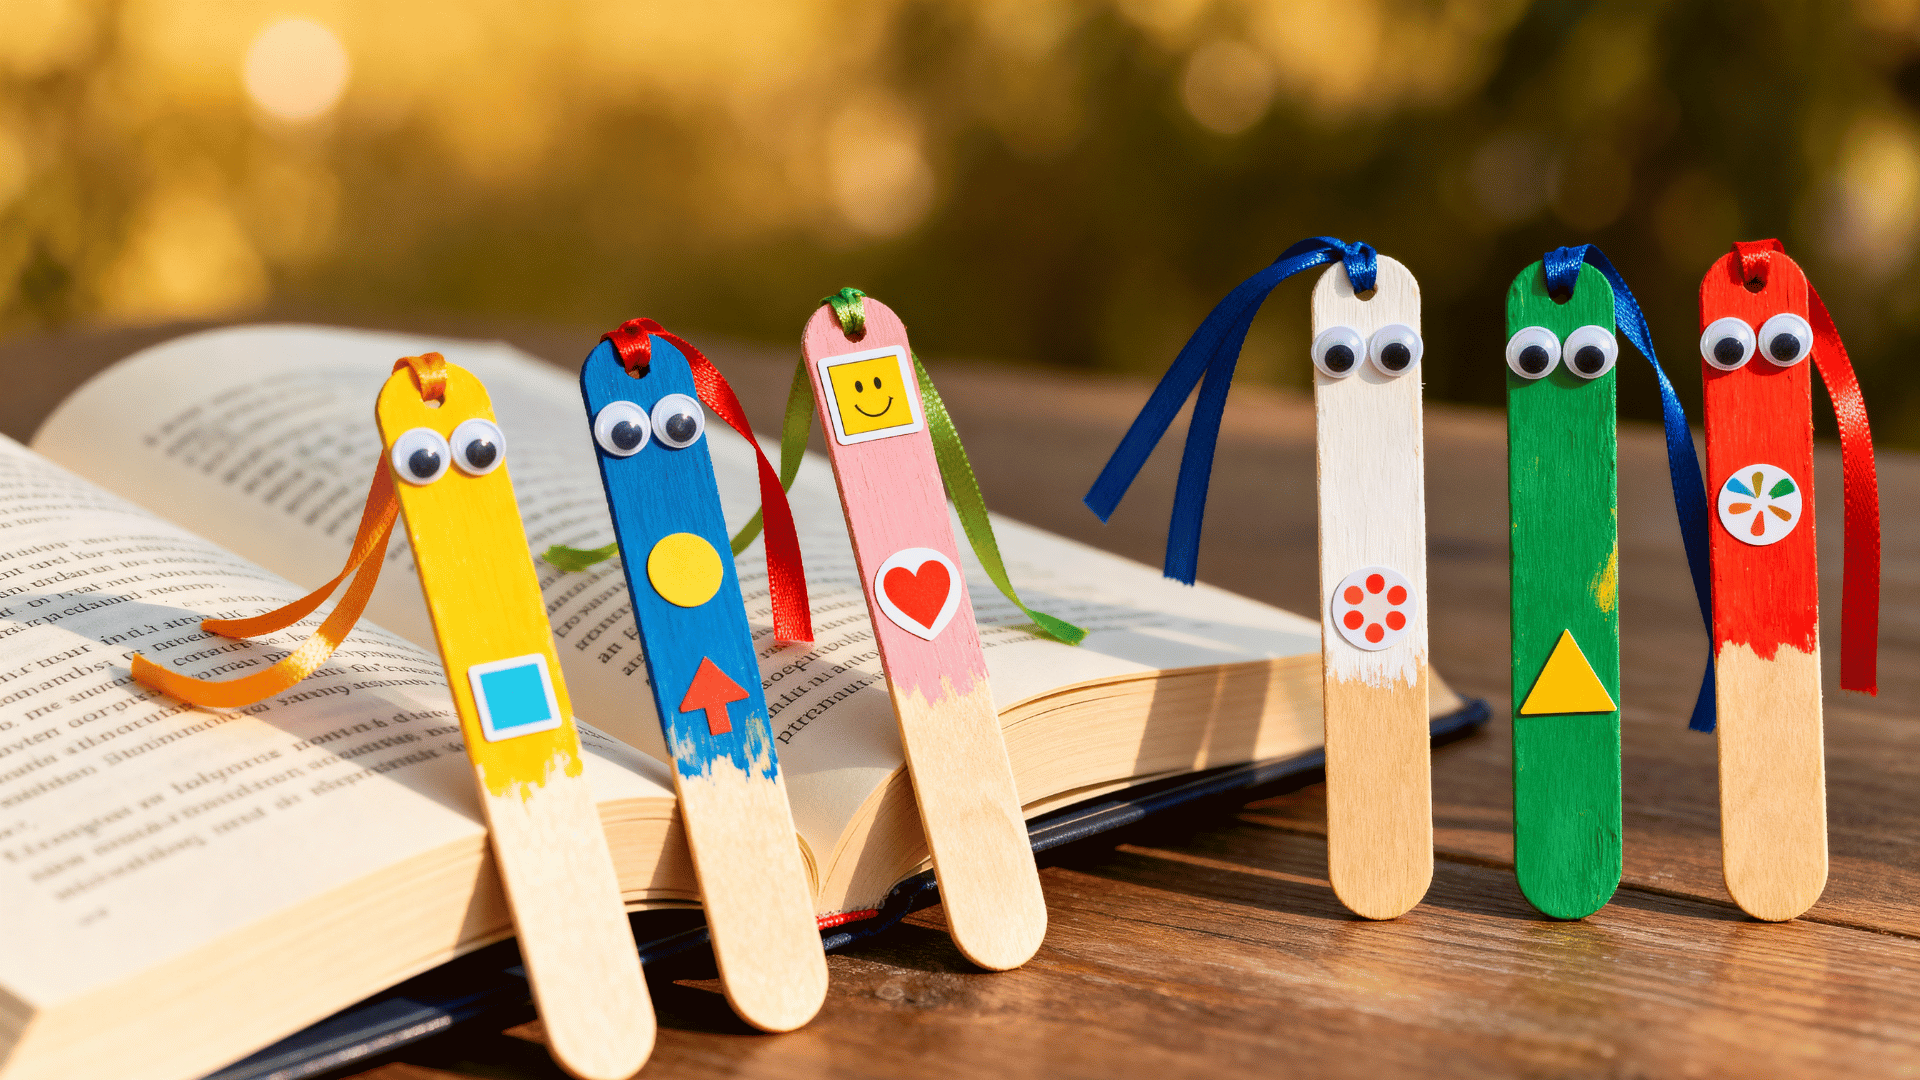
Popsicle stick bookmarks are quick, useful, and easy to personalize for reading time, classroom rewards, library crafts, or small party favors.
They work well for kids ages 4 and up because the project only needs one stick, a few small decorations, and simple drawing or coloring.
Craft Supplies Needed:
| Supply | Quantity / Details |
|---|---|
| Popsicle sticks | 1 stick per bookmark |
| Markers or paint pens | For coloring and drawing |
| Ribbon | For tying at the top |
| Stickers | For decoration |
| Googly eyes | Optional, for face bookmarks |
| Glue | For attaching ribbon, stickers, or eyes |
Steps to Follow:
- Lay one popsicle stick flat on the table.
- Write a name, short word, or simple design down the center.
- Add small stickers near the top, leaving the lower half smooth for book pages.
- Glue googly eyes at the top if you want to make a face bookmark.
- Tie a short ribbon around the upper end.
- Press the ribbon knot flat so it sits neatly in a book.
- Let all glued pieces dry before using it.
3. Animal Face Craft

An animal face craft lets kids turn a few popsicle sticks into a bear, frog, cat, dog, fish, owl, or another favorite animal.
It works well for toddlers ages 3 and up, with help, and for preschoolers, because they can practice painting, placing paper shapes, and adding simple face details.
Craft Supplies Needed:
| Supply | Quantity / Details |
|---|---|
| Popsicle sticks | 5 sticks for the face base |
| Paint | For the animal’s main color |
| Construction paper | For ears, nose, fins, whiskers, or other details |
| Googly eyes | 2 eyes per animal face |
| Glue | For attaching paper and eyes |
| Markers | For mouth, spots, stripes, or details |
| Safety scissors | For cutting paper pieces |
Steps to Follow:
- Glue 5 popsicle sticks side by side to make a flat face base.
- Paint the base in the animal’s main color, such as brown for a bear or green for a frog.
- Cut ears, a nose, fins, whiskers, or horns from construction paper.
- Place the paper pieces on the base before gluing so the face looks balanced.
- Glue each paper piece in place.
- Add googly eyes near the upper center.
- Draw the mouth, spots, stripes, or small face lines with markers.
4. Stick Puppets
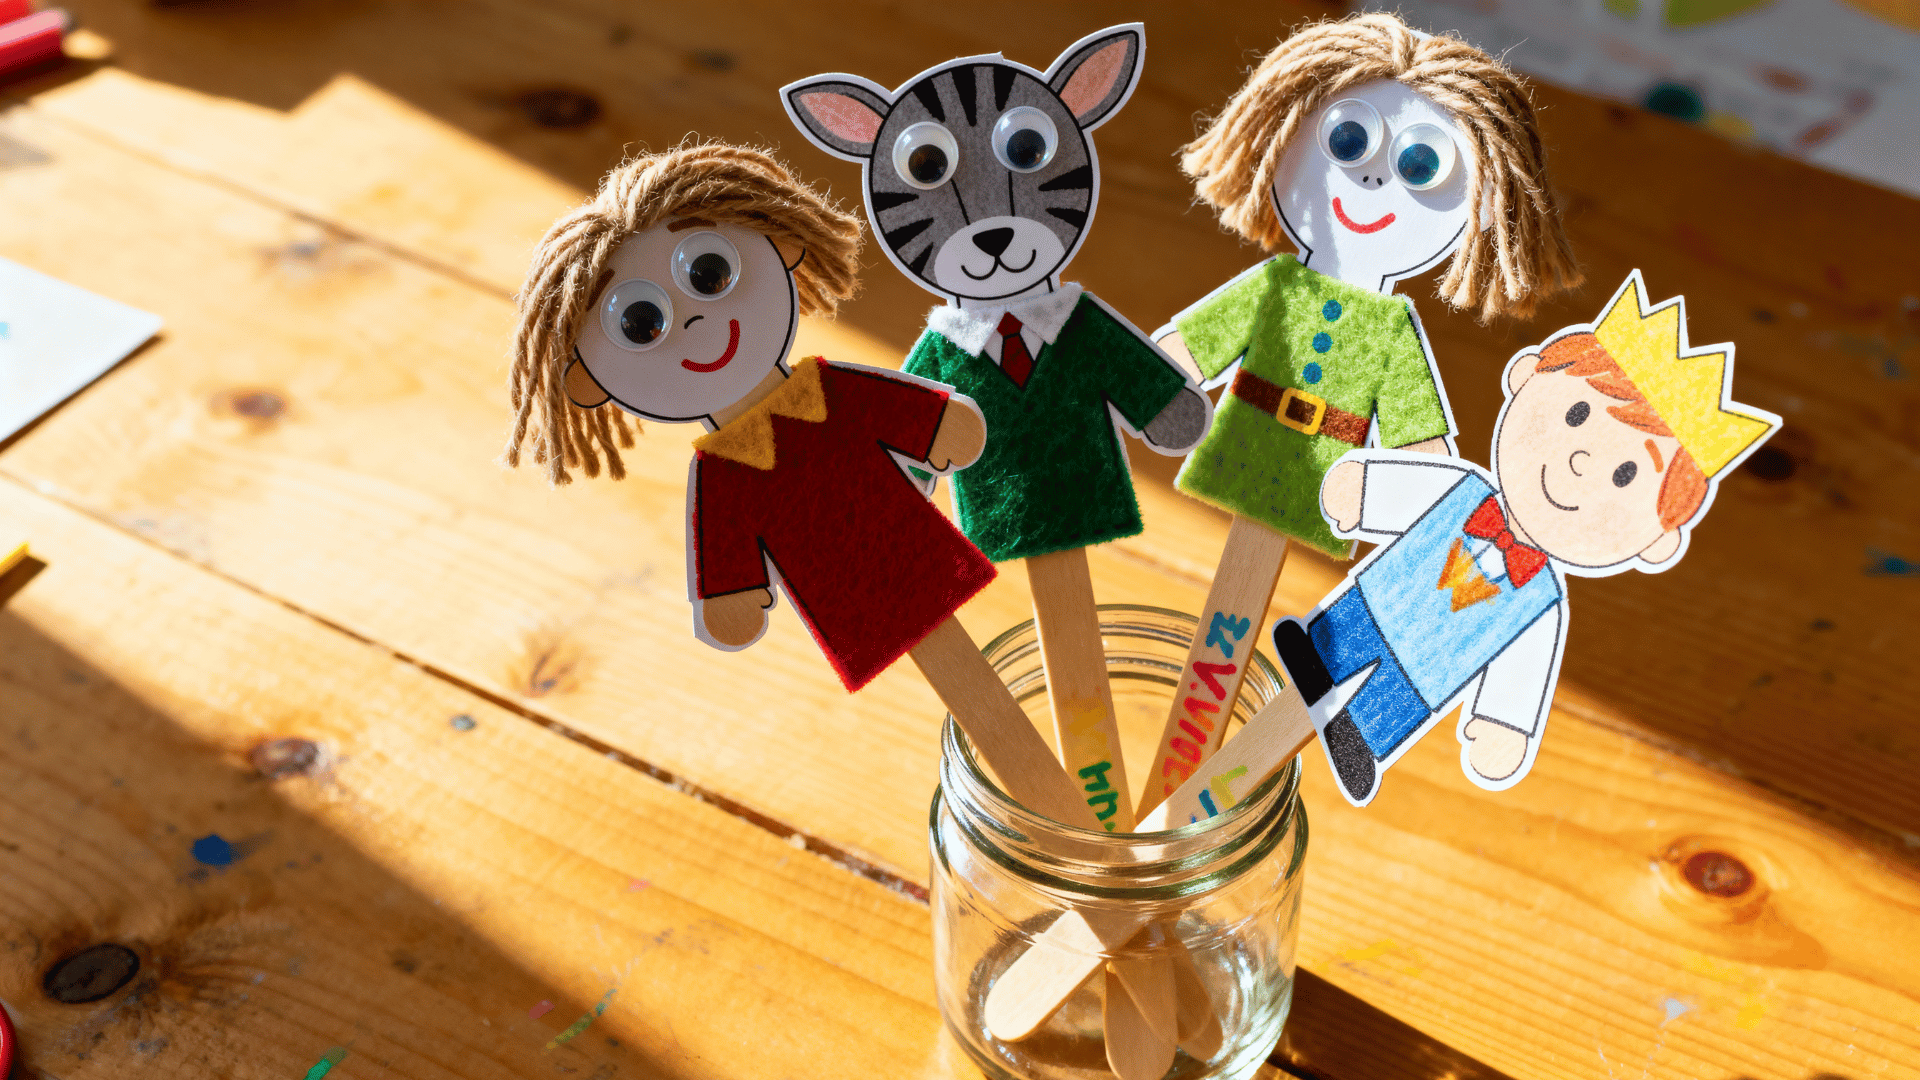
Stick puppets are fun for storytelling, pretend play, classroom lessons, and book activities.
They work well for kids ages 4 and up because each puppet can be made from a simple paper character, a popsicle stick handle, and small craft scraps.
Craft Supplies Needed:
| Supply | Quantity / Details |
|---|---|
| Popsicle sticks | 1 stick per puppet |
| Paper cutouts | For the character’s body |
| Markers | For coloring the character |
| Glue | For attaching the paper character to the stick |
| Yarn | For hair or extra detail |
| Googly eyes | Optional, for faces |
| Felt or fabric scraps | For clothing or texture |
Steps to Follow:
- Draw or print a small character shape on paper.
- Color the character before cutting it out.
- Cut the character carefully around the edges.
- Glue yarn at the top for hair if needed.
- Add felt or fabric scraps for clothing.
- Glue the finished character to the top half of a popsicle stick.
- Hold the stick upright for a few seconds so the paper does not slide.
- Use the puppet to act out a story or create a short play.
5. Rainbow Wall Hanging
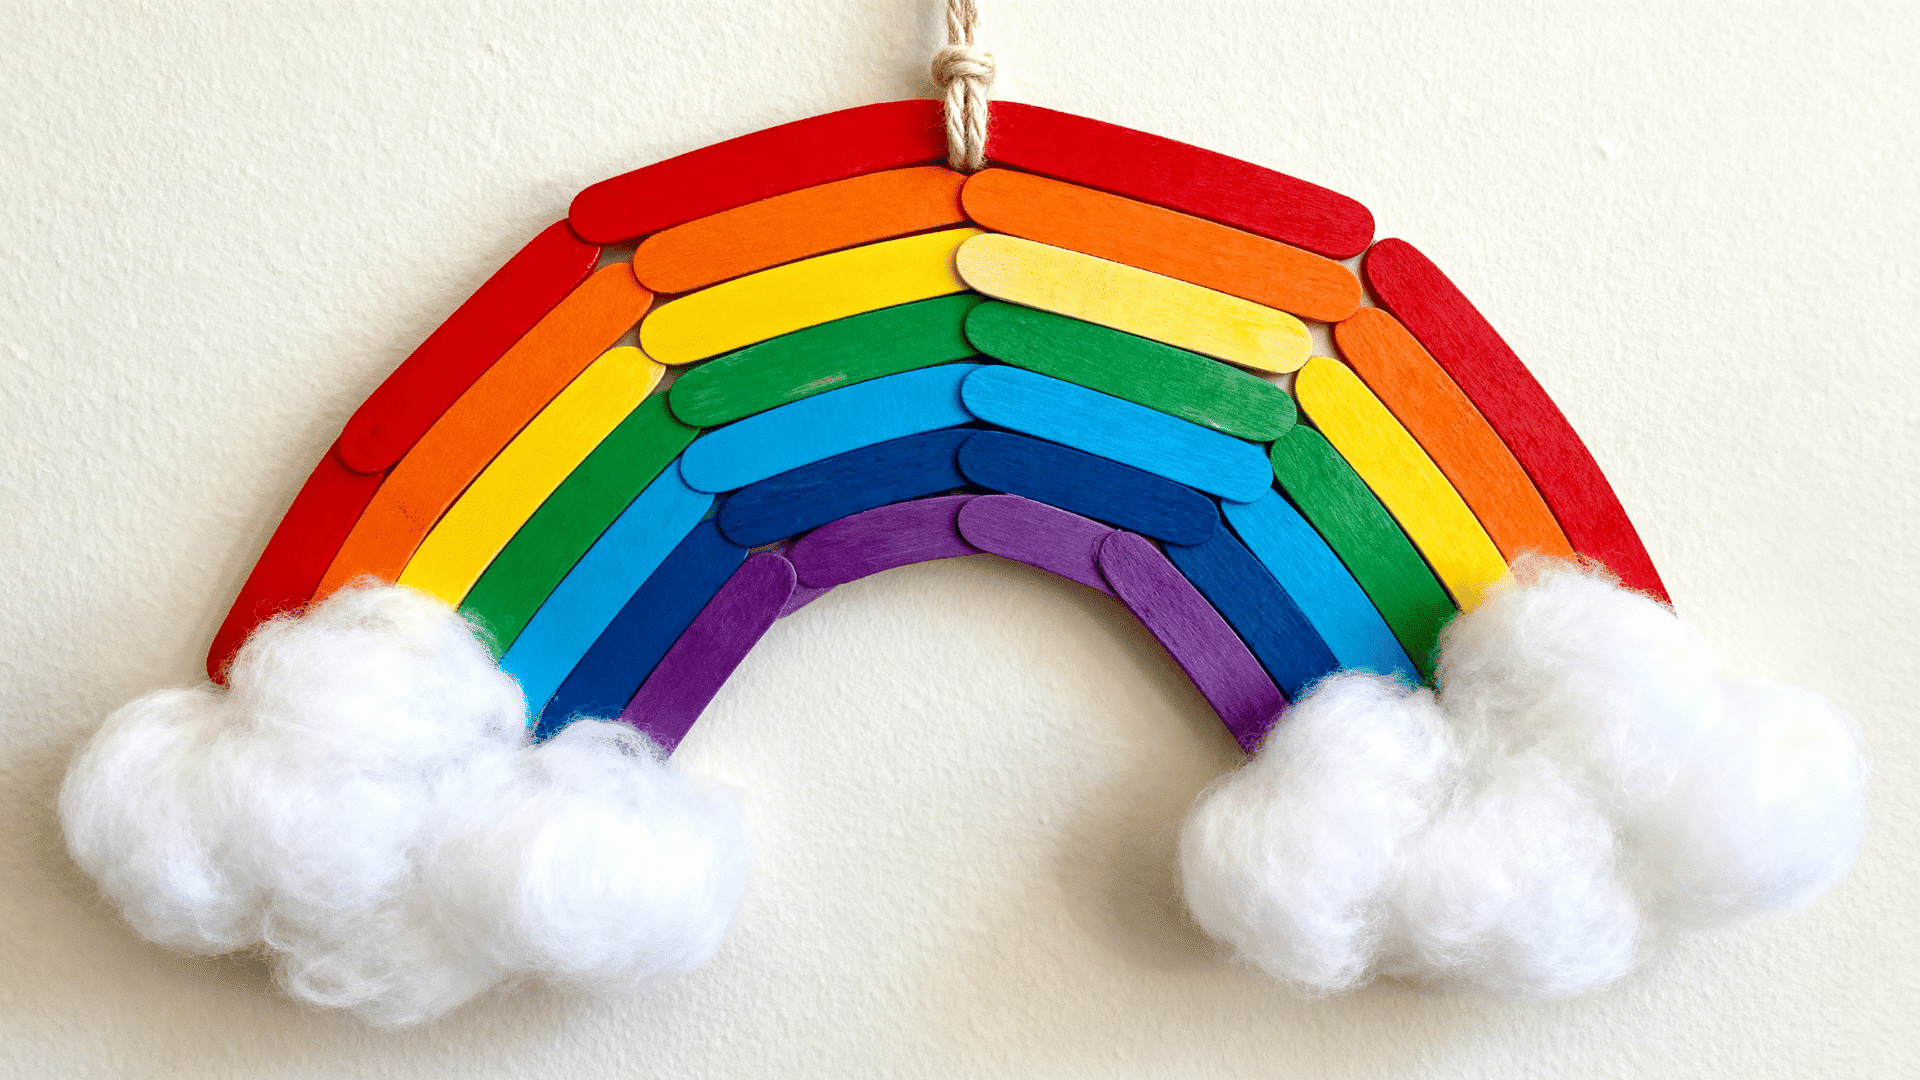
A rainbow wall hanging is a bright craft for a playroom, kids’ bedroom, craft corner, or classroom board.
It works well for kids ages 5 and up because it uses simple color order, basic gluing, and soft cotton clouds for a finished display piece.
Craft Supplies Needed:
| Supply | Quantity / Details |
|---|---|
| Popsicle sticks | 6 sticks or more |
| Paint | Rainbow colors |
| Yarn | For the hanging loop |
| Cotton balls | For clouds |
| Glue | For attaching sticks, clouds, and yarn |
| Cardboard | Narrow strip for backing |
| Ribbon | Optional, for hanging or decoration |
Steps to Follow:
- Paint each popsicle stick a different rainbow color.
- Cut a narrow cardboard strip to use as the hidden backing.
- Place the painted sticks on the cardboard in rainbow order.
- Glue each stick to the cardboard strip.
- Press cotton balls onto both lower ends to make clouds.
- Cut two equal pieces of yarn.
- Glue the yarn pieces behind the top corners.
- Tie the yarn together to make a hanging loop.
- Let the wall hanging dry flat before placing it on a wall or door.
6. Mini Christmas Tree Ornament
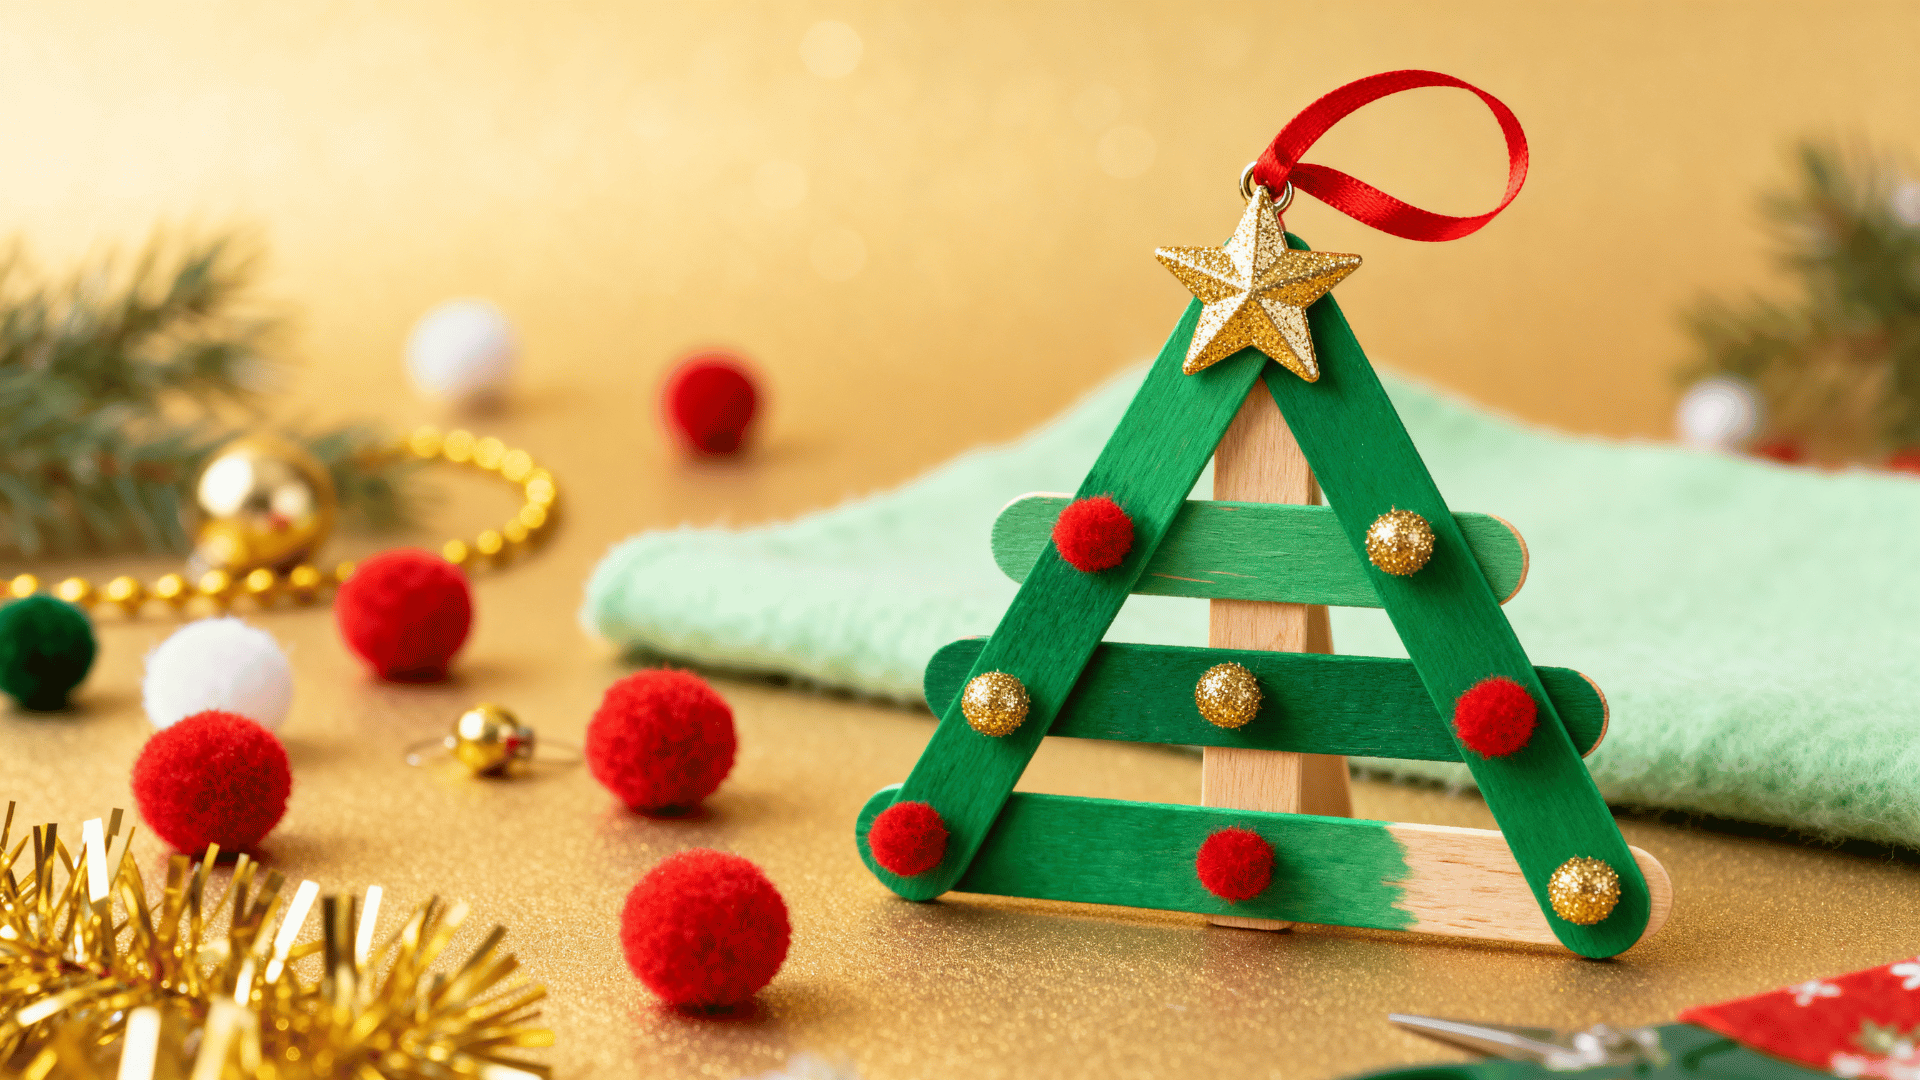
A mini Christmas tree ornament is a simple holiday craft that can hang on a tree, gift bag, classroom display, or door hook.
I’d use this craft for kids ages 4 and up since it only takes three popsicle sticks to make the tree shape.
Craft Supplies Needed:
| Supply | Quantity / Details |
|---|---|
| Popsicle sticks | 3 sticks |
| Green paint | For the tree shape |
| Mini pom-poms | For ornaments |
| Star sticker | For the top point |
| Ribbon | For the hanging loop |
| Glue | For attaching the sticks and decorations |
Steps to Follow:
- Paint all three popsicle sticks green.
- Place one stick flat at the bottom.
- Angle the other two sticks so they meet at the top and form a triangle.
- Glue the three corners together.
- Add mini pom-poms across the triangle like ornaments.
- Place the star sticker at the top point.
- Make a small ribbon loop.
- Glue the ribbon loop to the back.
- Let the ornament dry before hanging it.
7. Popsicle Stick Toy Raft
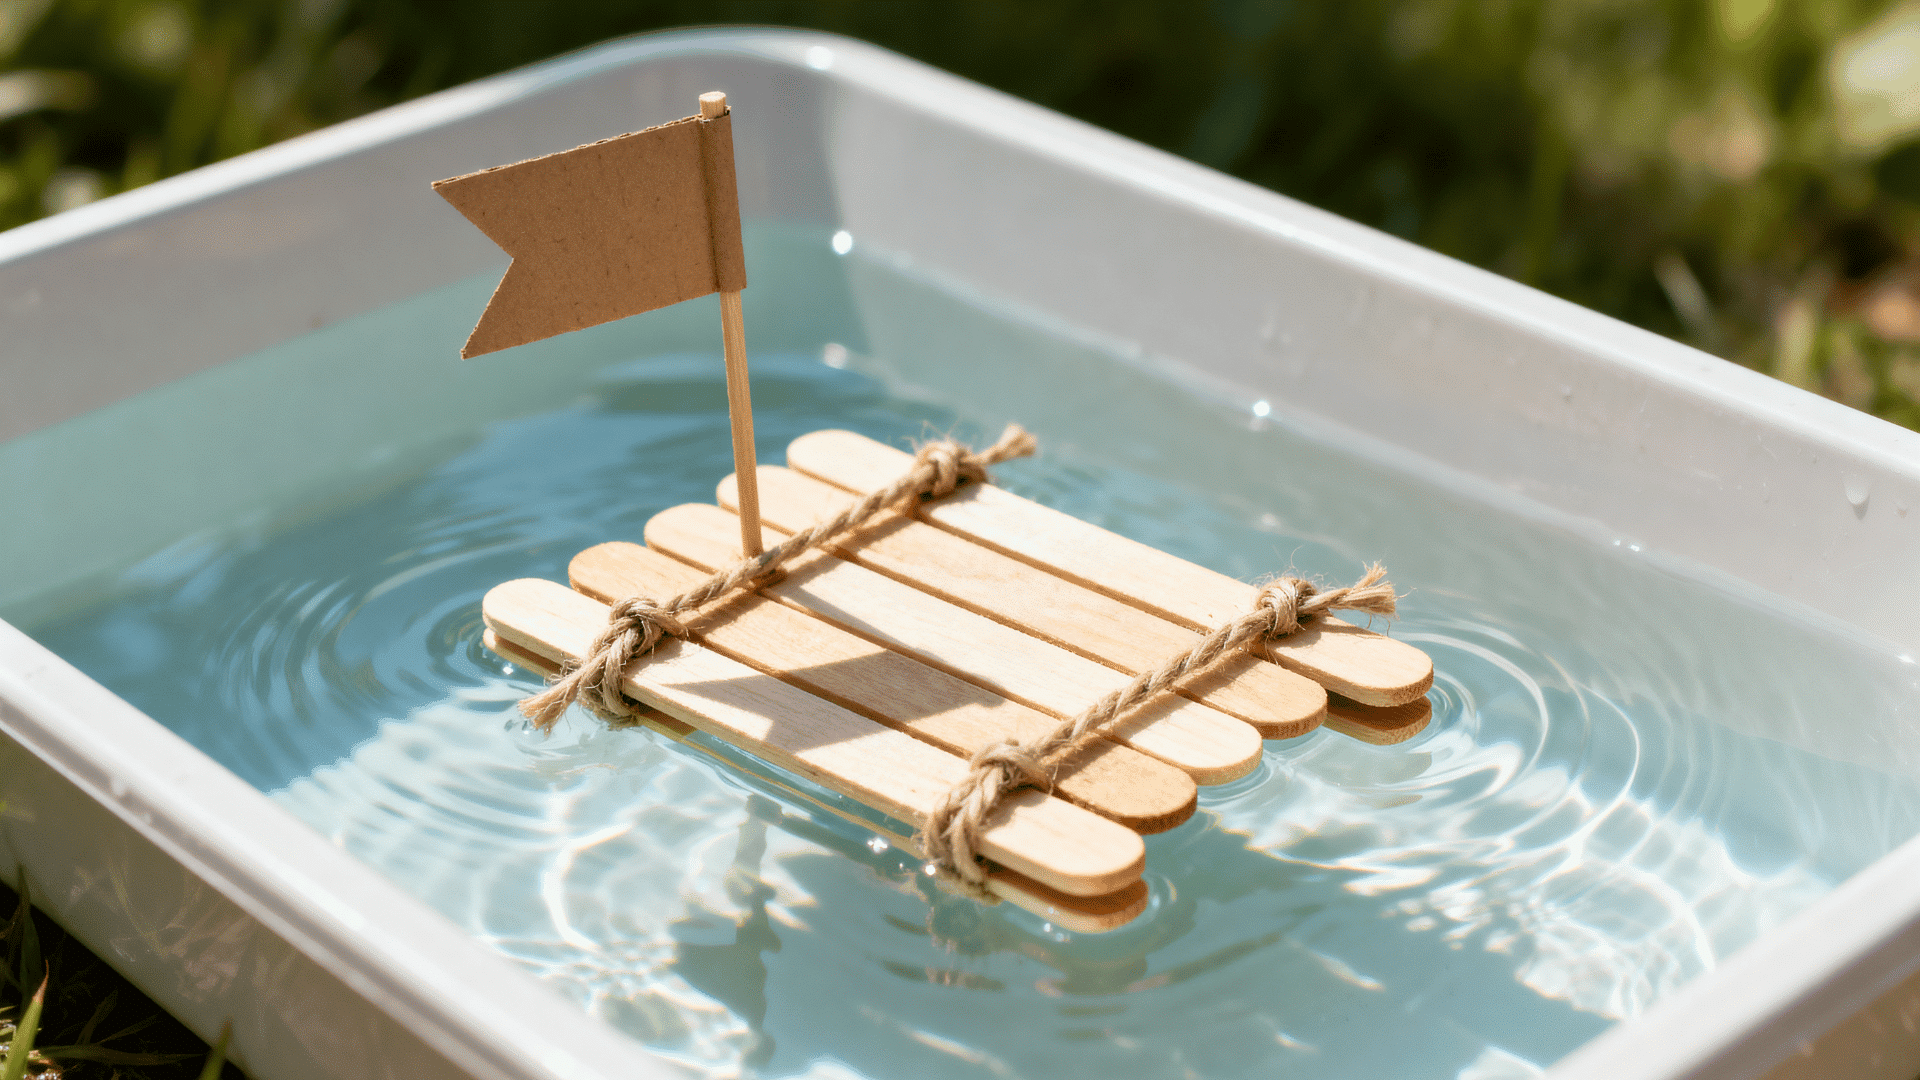
A popsicle stick toy raft is a hands-on craft that kids can build and test in shallow water.
It works well for kids ages 6 and up by adding a simple STEM-style activity to a regular craft session.
Craft Supplies Needed:
| Supply | Quantity / Details |
|---|---|
| Popsicle sticks | 8 to 10 sticks for the raft base |
| Glue | For attaching sticks |
| Paint | Optional, for color |
| Yarn or twine | For tying raft details |
| Small cardboard piece | Optional, for a flag |
Steps to Follow:
- Line up 8 to 10 popsicle sticks side by side to make the raft base.
- Glue two sticks across the back, one near each end, to hold the base together.
- Turn the raft over once the glue feels firm.
- Tie yarn or twine around both ends to give it a raft-like look.
- Add a small cardboard flag for an extra detail.
- Paint the raft after the glue has set.
- Test it in a shallow bowl, tub, or water table with adult help nearby.
8. Thanksgiving Turkey Craft
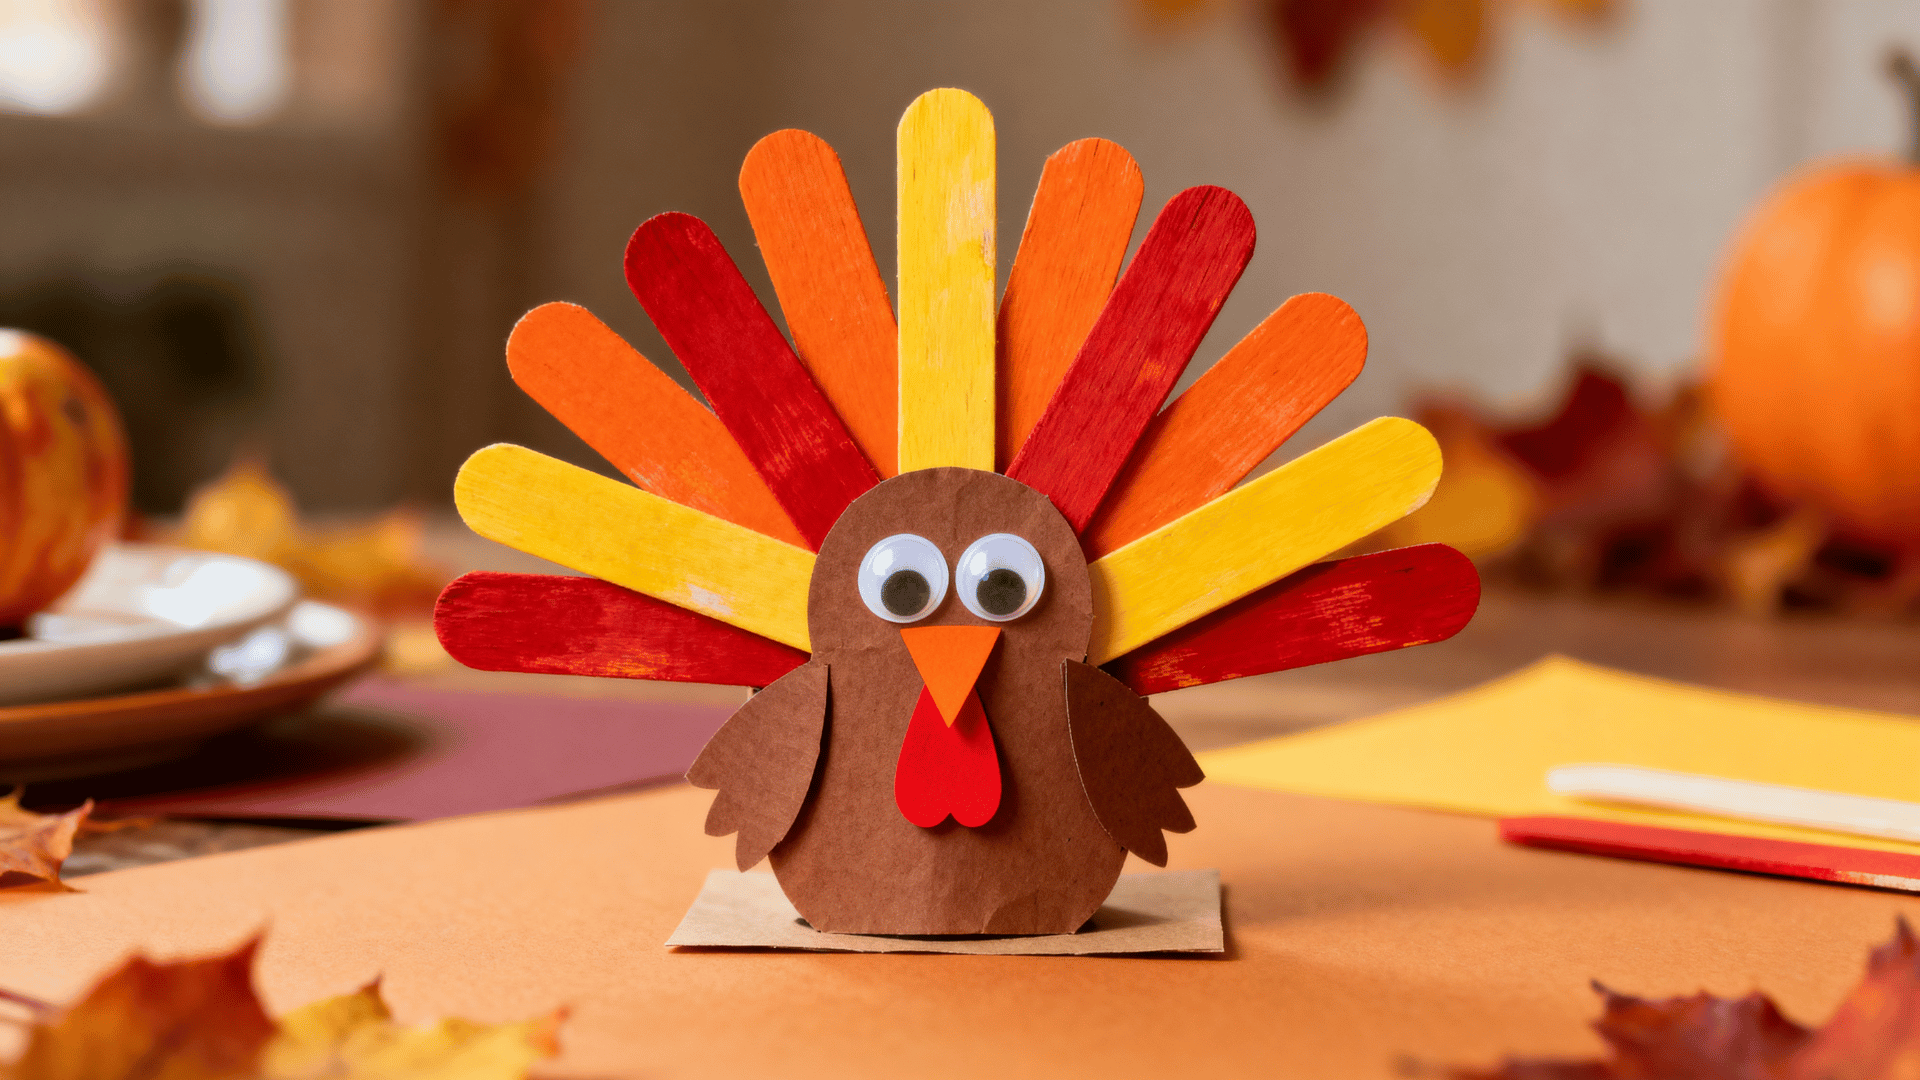
A Thanksgiving turkey craft uses painted popsicle sticks as feathers and a paper body for a bright fall project.
It works well for kids ages 4 and up and early elementary kids because they can practice painting, arranging colors, and placing small paper details.
Craft Supplies Needed:
| Supply | Quantity / Details |
|---|---|
| Popsicle sticks | 5 to 7 sticks for feathers |
| Brown paper | For the turkey body |
| Red, orange, and yellow paint | For feather colors |
| Googly eyes | 2 eyes |
| Glue | For attaching pieces |
| Markers | For small details |
| Safety scissors | For cutting paper |
Steps to Follow:
- Paint 5 to 7 popsicle sticks in red, orange, and yellow.
- Arrange the sticks in a half-circle feather shape.
- Glue the lower ends together so the feathers stay spread out.
- Cut a round or pear-shaped turkey body from brown paper.
- Glue the body over the joined ends of the feathers.
- Add googly eyes near the top of the body.
- Cut and glue a paper beak and red wattle.
- Write a name or a short thankful note across the body if using it as a place card.
9. Mini Desk Organizer

A mini desk organizer gives older kids and adults a small place for clips, notes, erasers, pens, or craft supplies.
It works well for older kids ages 8 and up, teens, and adults because it needs more planning than a pencil holder and includes separate sections.
Craft Supplies Needed:
| Supply | Quantity / Details |
|---|---|
| Jumbo popsicle sticks | For walls and dividers |
| Hot glue | For stronger assembly |
| Cardboard | For the base |
| Paint | For finishing the organizer |
| Ruler | For measuring sections |
| Pencil | For marking the layout |
Steps to Follow:
- Draw a rectangle on cardboard for the base.
- Mark two or three small sections with a pencil.
- Glue jumbo sticks around the outer edges of the base to form low walls.
- Add more sticks inside along the pencil marks to create dividers.
- Build the walls higher by adding another layer if you need more depth.
- Paint the organizer after the glue is firm.
- Use each section for a different item, such as clips, pens, or sticky notes.
10. Pencil Holder
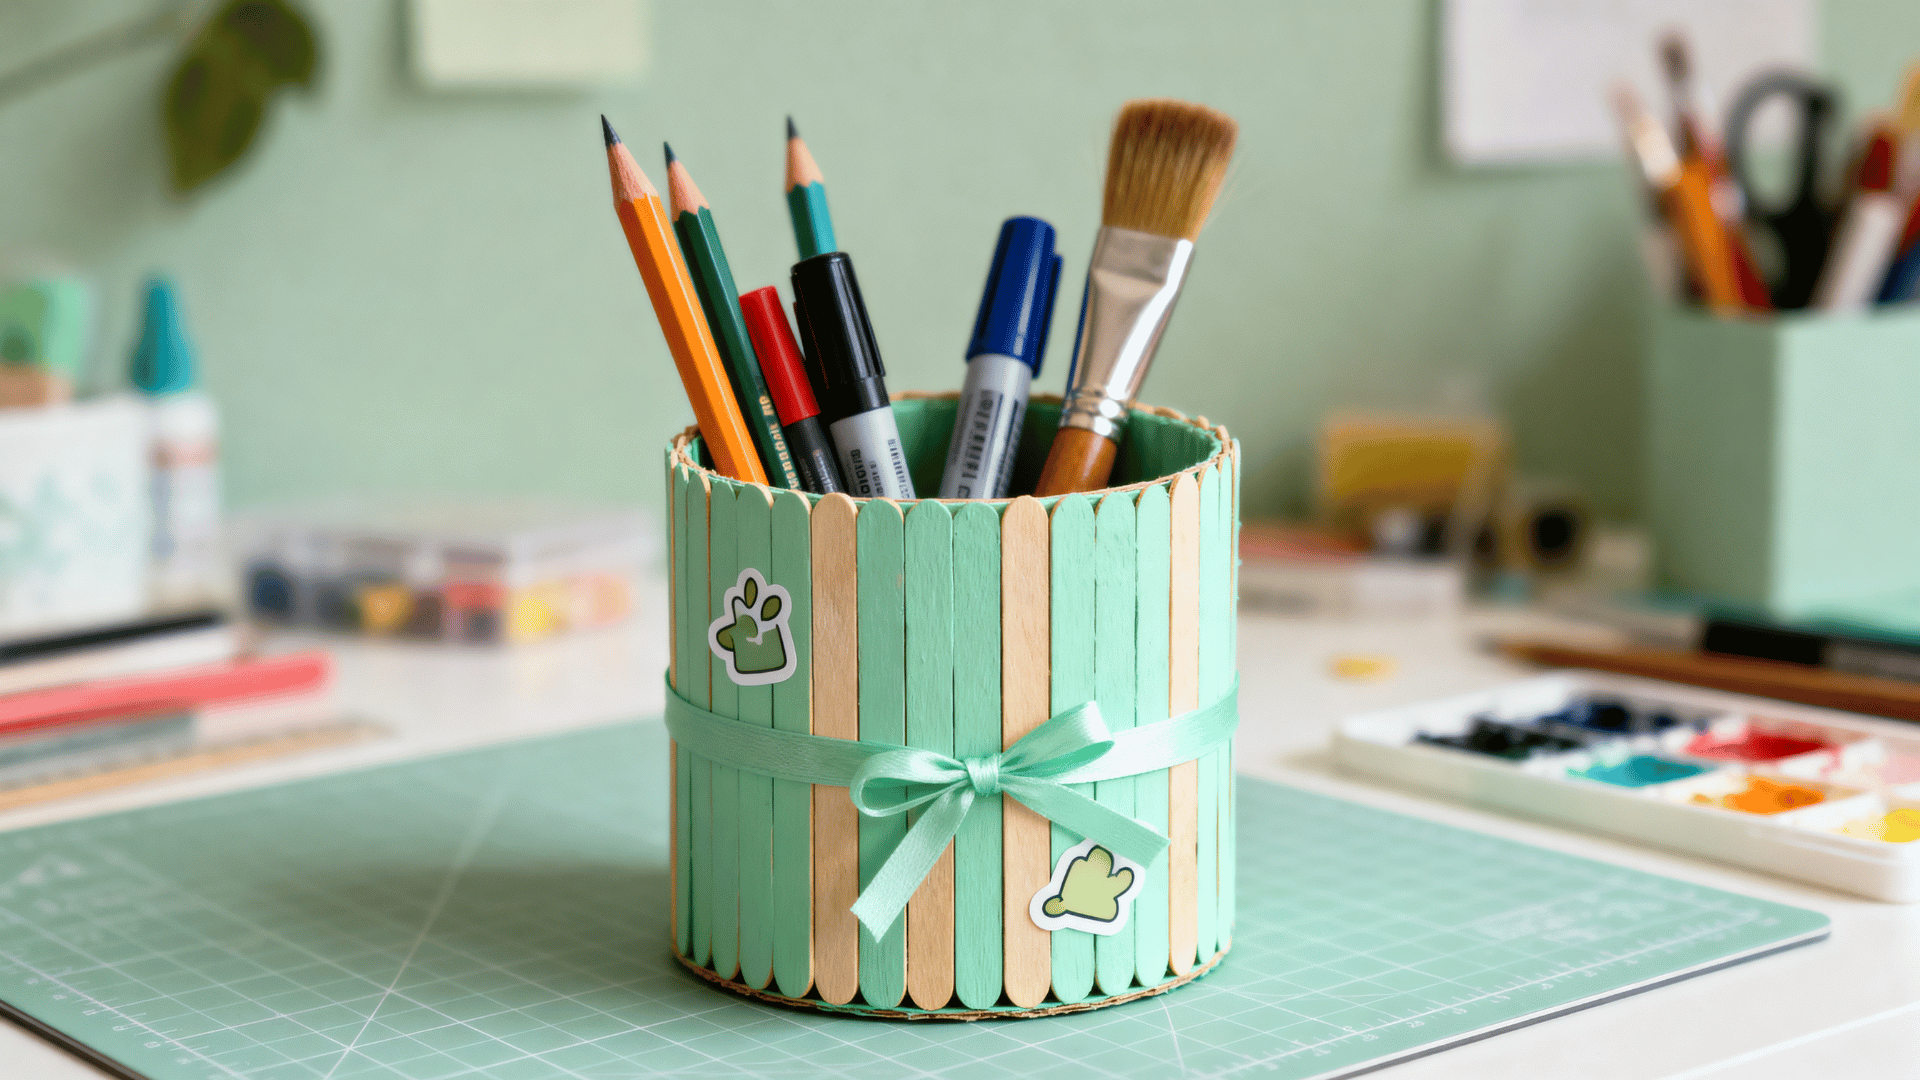
A pencil holder is a useful desk craft for pencils, markers, paintbrushes, and small craft tools.
It works well for kids ages 6 and up, teens, and adults because the finished craft can actually be used on a desk or craft table.
Craft Supplies Needed:
| Supply | Quantity / Details |
|---|---|
| Popsicle sticks | Enough to cover the tube or box |
| Empty cardboard tube or small box | Base for the holder |
| Glue | For attaching sticks |
| Paint | For coloring the holder |
| Ribbon | For wrapping around the middle |
| Stickers | For decoration |
Steps to Follow:
- Place the cardboard tube or small box upright on the table.
- Glue popsicle sticks vertically around the outside.
- Keep the bottom edges even so the holder stands straight.
- Fill any small gaps with extra sticks if needed.
- Paint the outside once the sticks feel secure.
- Wrap ribbon around the middle and glue the ends at the back.
- Add stickers near the top or bottom edge.
- Let the holder dry before adding pencils or markers.
11. Popsicle Stick Coasters
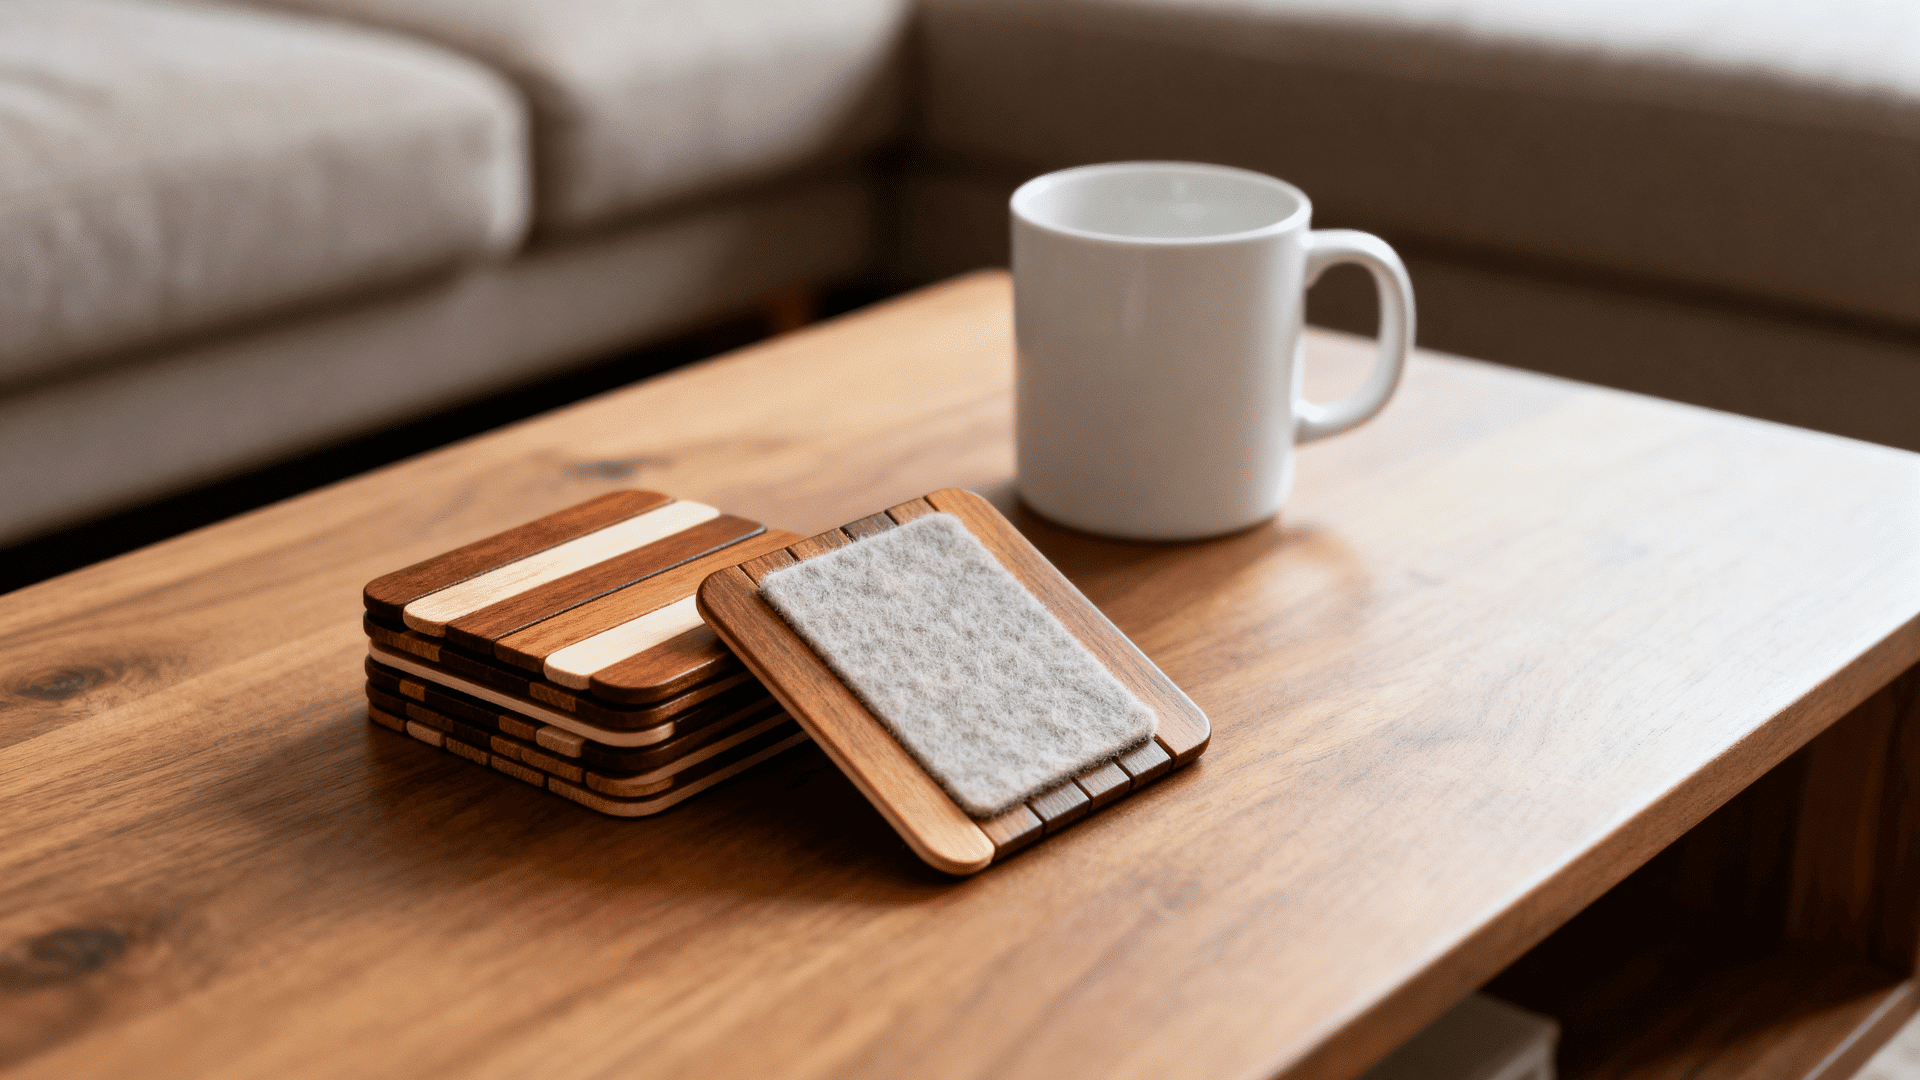
I like popsicle stick coasters because they are practical, easy to customize, and useful after the craft is done. I’ve made them in sets for both home use and gifts.
They work well for older kids ages 8 and up, teens, and adults because sealing and support pieces help the final craft last longer.
Craft Supplies Needed:
| Supply | Quantity / Details |
|---|---|
| Popsicle sticks | 8 to 10 sticks per coaster |
| Glue | For attaching the base and supports |
| Paint or stain | For color or finish |
| Clear sealer | For surface protection |
| Felt pads | For the bottom of the coaster |
Steps to Follow:
- Line up 8 to 10 popsicle sticks evenly on the table.
- Turn the row over carefully while keeping the edges straight.
- Glue two support sticks across the back, one near the top and one near the bottom.
- Flip the coaster back over once the base is secure.
- Paint or stain only the top and side edges.
- Brush on clear sealer to help protect the surface.
- Add felt pads underneath so the coaster does not scratch the table.
12. Plant Markers
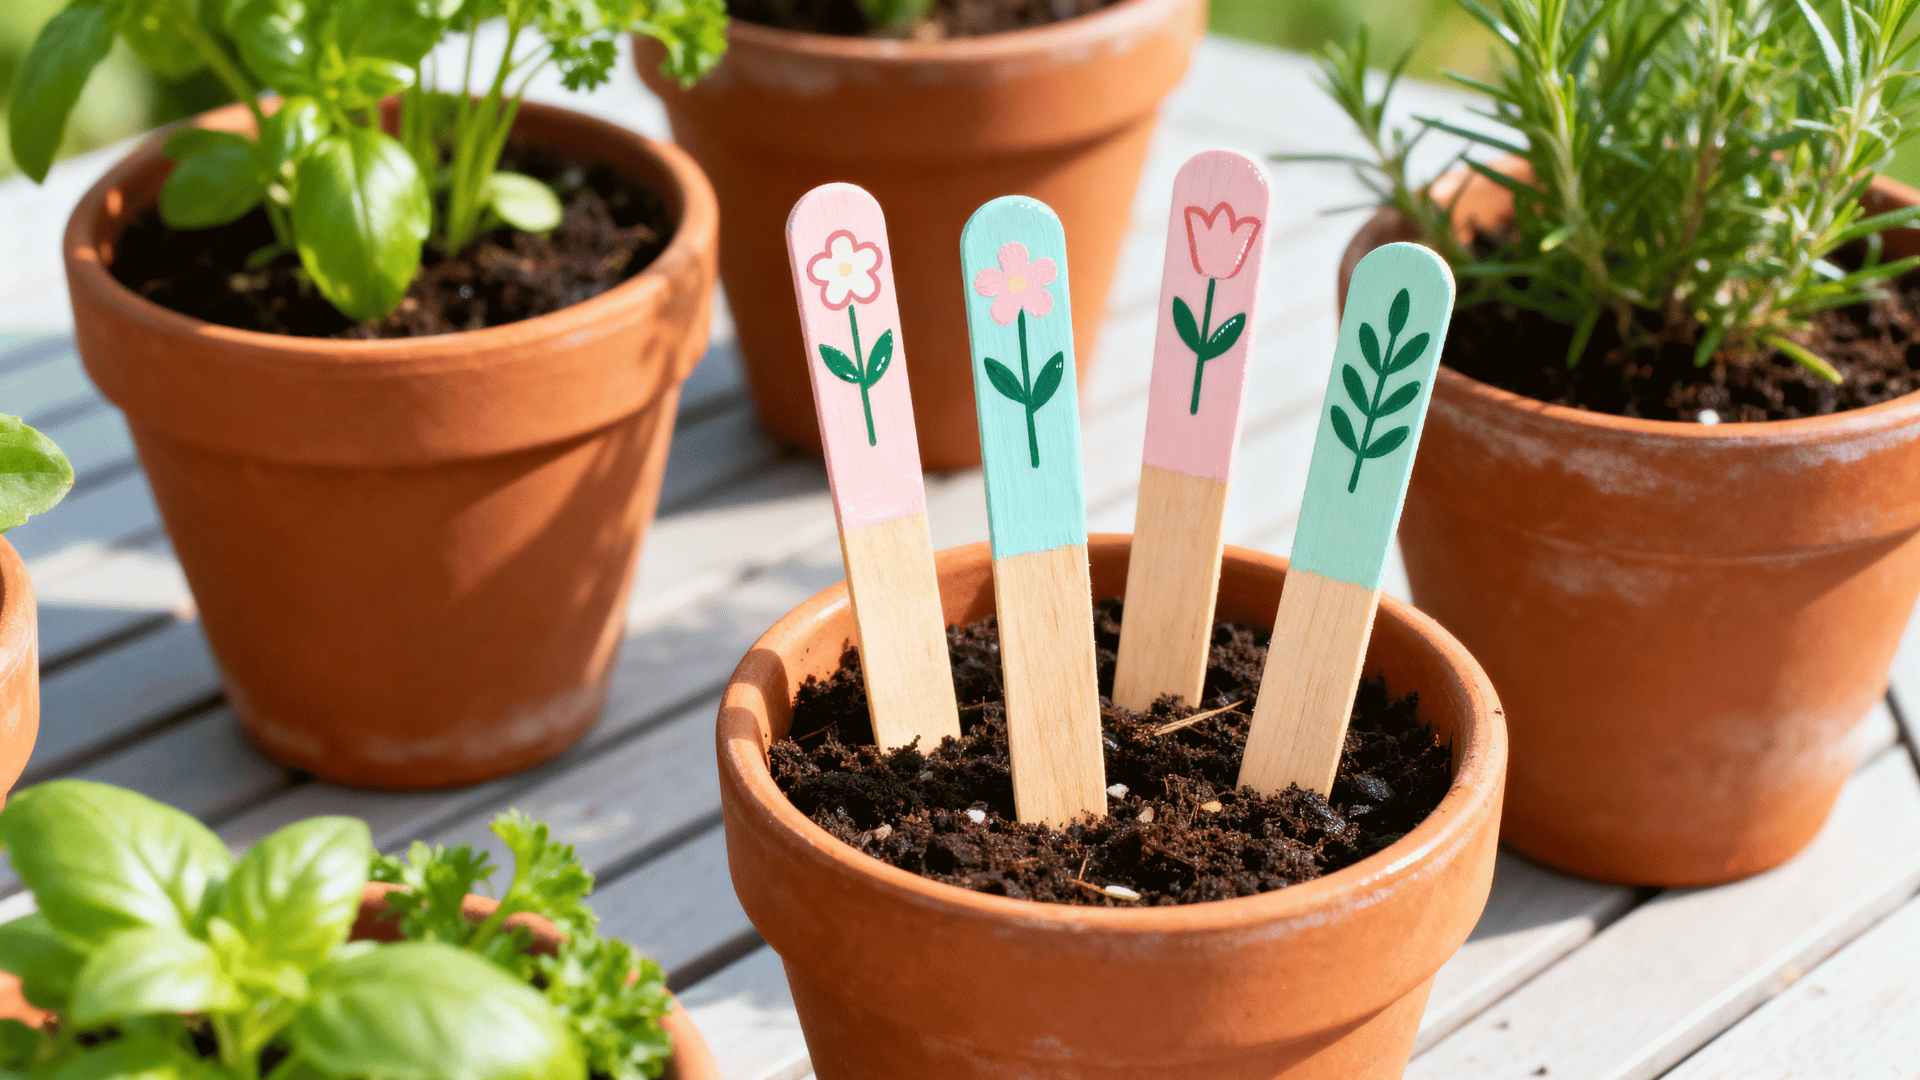
Plant markers are useful for herb pots, seed trays, flower beds, and small garden spaces.
They work well for kids ages 6 and up, teens, and adults because they combine simple painting with a practical garden use.
Craft Supplies Needed:
| Supply | Quantity / Details |
|---|---|
| Popsicle sticks | 1 stick per plant marker |
| Paint or paint pens | For coloring and decorating |
| Clear sealer | For outdoor protection |
| Marker | For plant names or details |
| Small brush | For paint or sealer |
Steps To Follow:
- Paint the top half of each stick in a light color so the plant name is easy to read.
- Write one plant name on each stick with a marker or paint pen.
- Add a small leaf, flower, or herb drawing under the name.
- Brush clear sealer over the written area if the marker may run.
- Let the markers dry fully before outdoor use.
- Push the plain lower end into the soil near the matching plant.
13. Magnet Clips
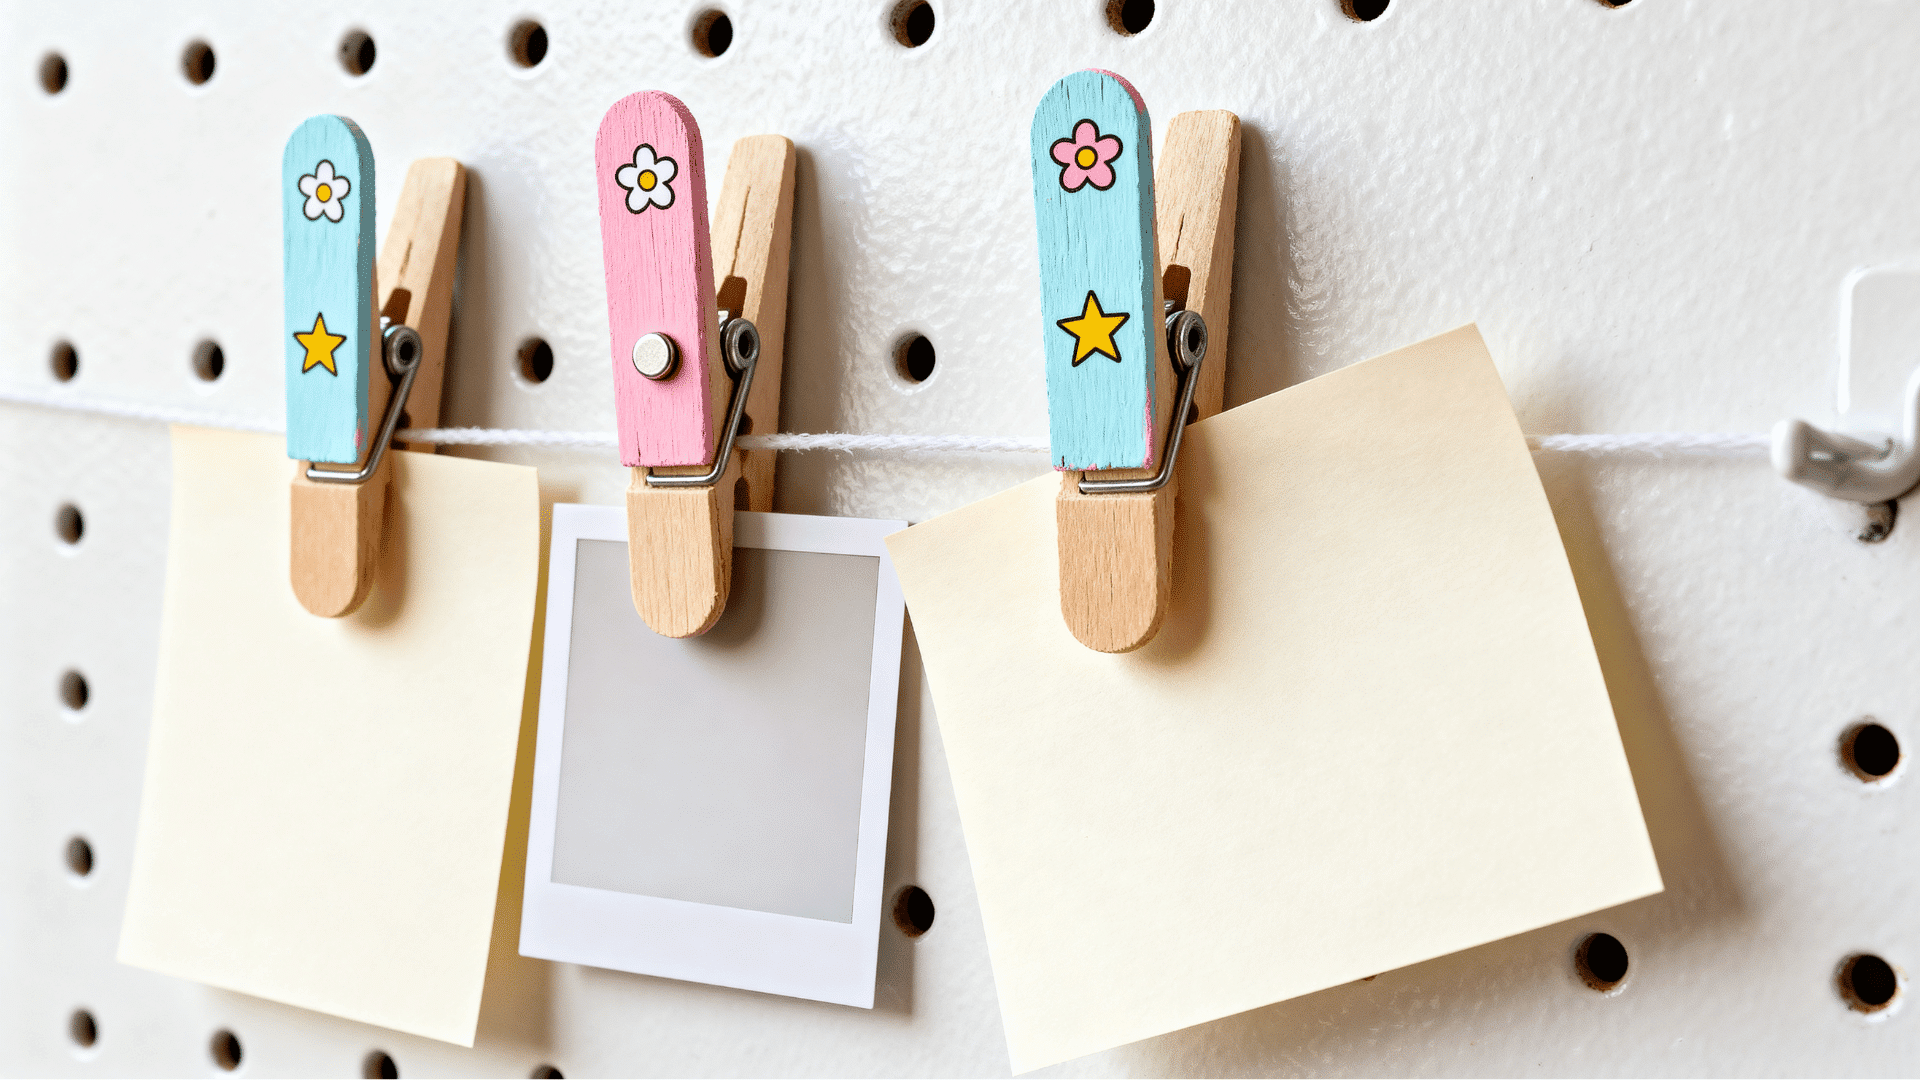
Magnet clips are handy for holding notes, photos, school papers, reminders, or shopping lists.
They work well for kids ages 6 and up, teens, and adults because they are quick to make and useful around the home.
Craft Supplies Needed:
| Supply | Quantity / Details |
|---|---|
| Popsicle sticks | 1 stick per clip |
| Clothespins | 1 clothespin per clip |
| Magnets | 1 magnet per clip |
| Glue | For attaching the stick and magnet |
| Paint | For coloring |
| Stickers | For decoration |
Steps To Follow:
- Paint the popsicle stick and clothespin in matching or mixed colors.
- Glue the popsicle stick flat across the front of the clothespin.
- Add stickers along the stick, keeping the clip opening clear.
- Turn the clothespin over.
- Glue a magnet to the back.
- Let the magnet set fully so it does not slide off.
- Clip a note or photo in place before putting it on the fridge.
14. Mini House Model
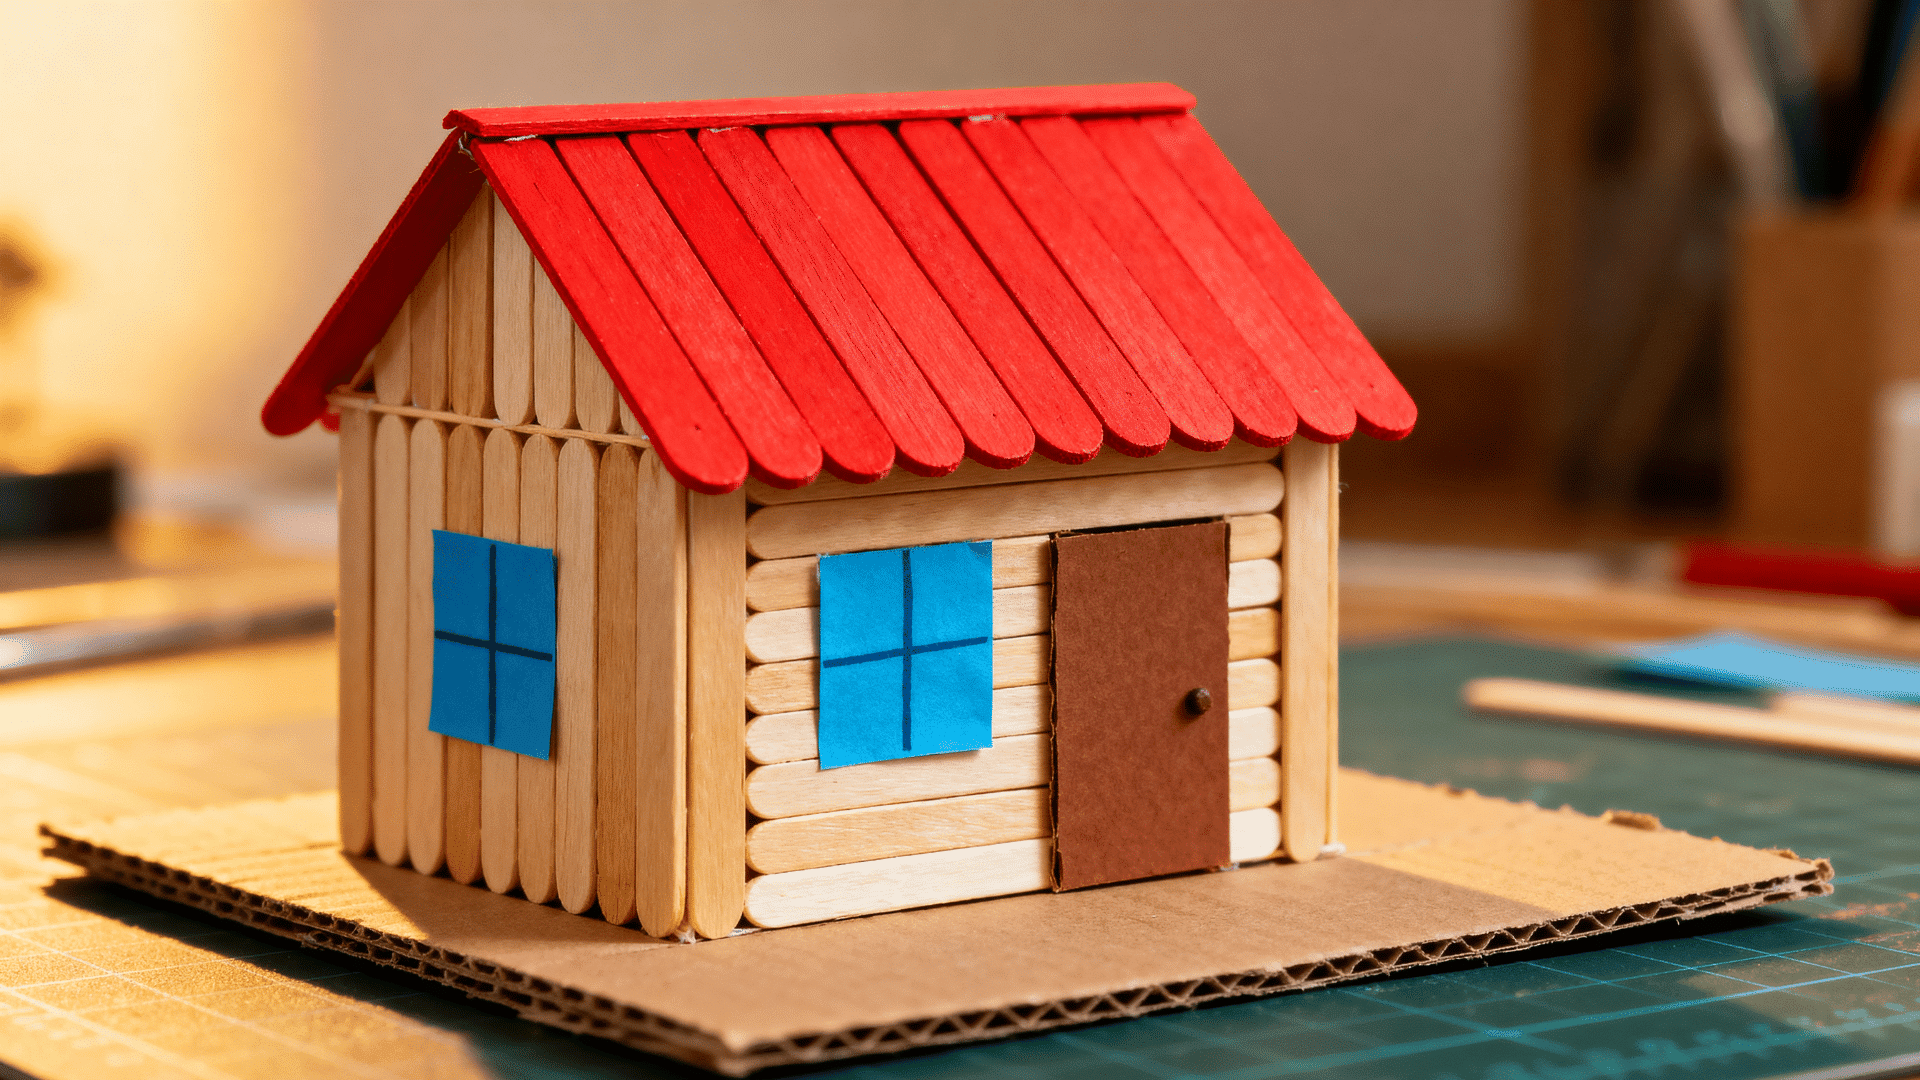
A mini house model is a building craft that lets kids create walls, roof pieces, doors, and windows from simple supplies.
It works well for older kids ages 8 and up, teens, and adults because it needs careful assembly and a stronger glue hold.
Craft Supplies Needed:
| Supply | Quantity / Details |
|---|---|
| Popsicle sticks | For walls and roof |
| Hot glue | For a stronger structure |
| Cardboard base | For supporting the house |
| Paint | For roof, base, or trim |
| Ruler | For measuring pieces |
| Pencil | For marking layout |
| Paper for windows and doors | For house details |
Steps To Follow:
- Glue sticks side by side to make one wall panel.
- Repeat the same process until you have four wall panels.
- Stand the panels on the cardboard base.
- Glue the corners together to form the house shape.
- Add popsicle sticks across the top to form a roof.
- Cut paper rectangles for windows and a larger shape for the door.
- Glue the paper pieces onto the walls.
- Paint the roof, base, and trim details after the house is stable.
15. Jewelry Box
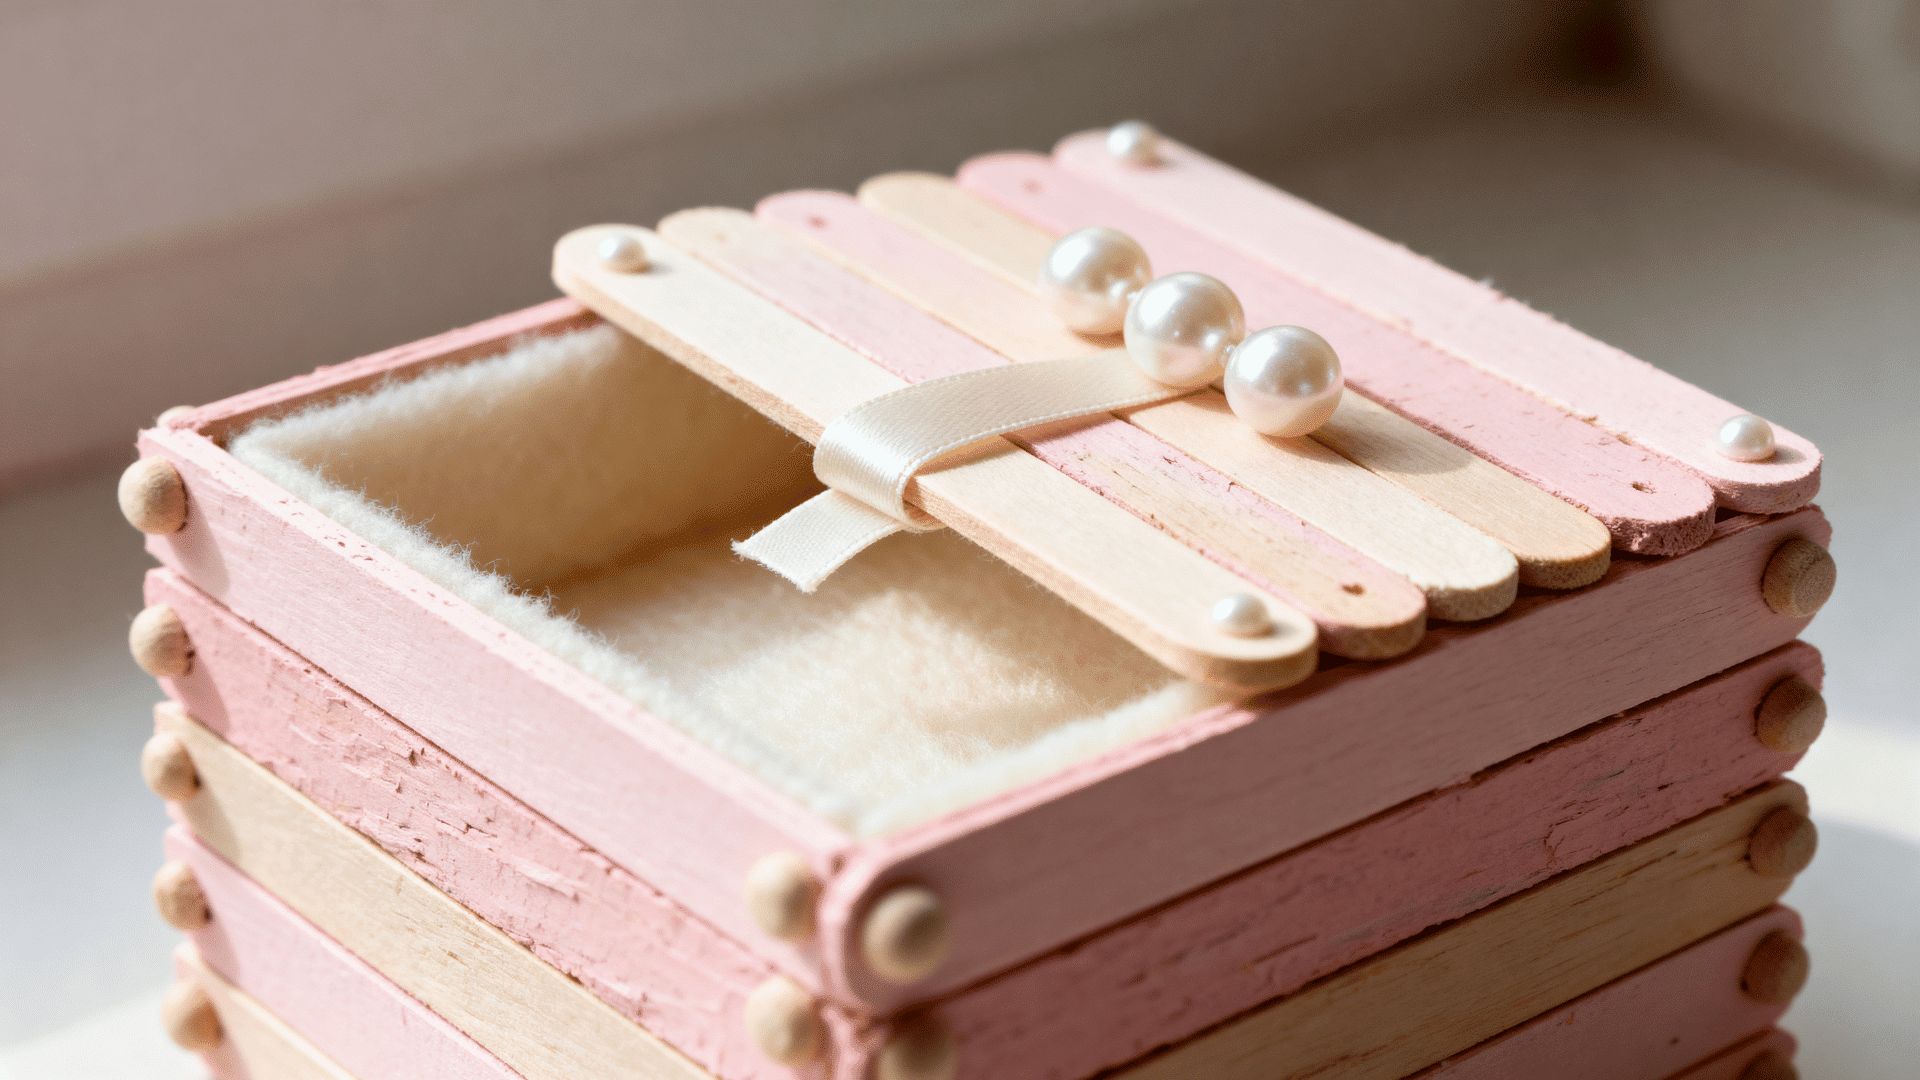
A popsicle stick jewelry box is a small storage craft for rings, beads, hair clips, tiny toys, or keepsakes.
It works well for older kids ages 8 and up, teens, and adults because it uses stacking, layering, and careful drying time.
Craft Supplies Needed:
| Supply | Quantity / Details |
|---|---|
| Popsicle sticks | Enough for base, walls, and lid |
| Glue | For stacking and attaching pieces |
| Paint | For coloring the box |
| Small beads or buttons | For lid decoration |
| Felt | For lining the inside |
| Ribbon | For decorating the lid |
Steps To Follow:
- Make a flat square base by lining up sticks.
- Glue support sticks underneath the base to hold it together.
- Glue one stick along each edge of the base to start the walls.
- Keep stacking sticks around the edges, alternating sides so the corners lock together.
- Stop when the box is tall enough for small items.
- Make a separate flat lid using the same base method.
- Paint the box and glue felt inside the bottom.
- Decorate the lid with beads, buttons, or ribbon.
16. Craft Stick Memory Game
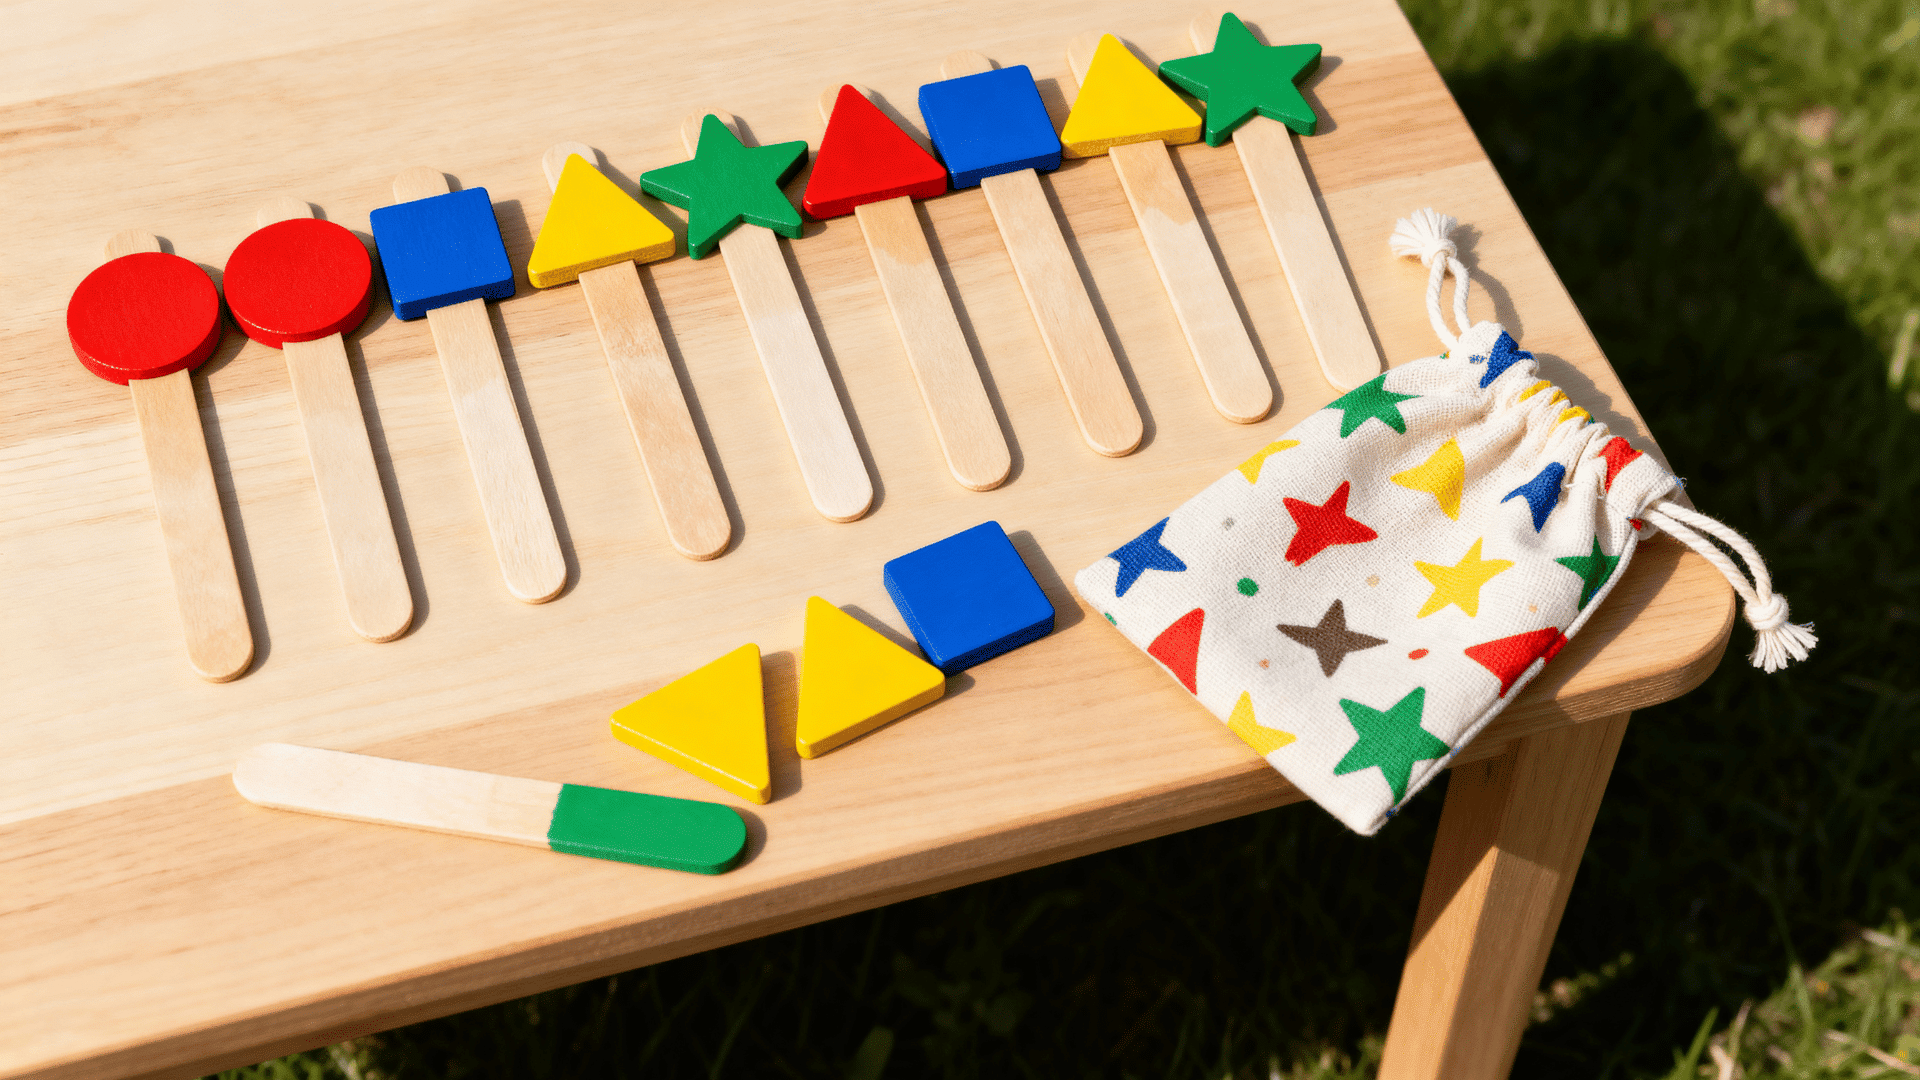
A craft stick memory game helps kids practice colors, numbers, shapes, letters, or simple drawings.
It works well for toddlers ages 3 and up with help, preschoolers, and early elementary kids because it turns a craft into a reusable learning activity.
Craft Supplies Needed:
| Supply | Quantity / Details |
|---|---|
| Popsicle sticks | An even number of sticks for matching pairs |
| Markers | For drawing matching designs |
| Stickers | Optional, for matching pairs |
| Small storage bag | For keeping the game together |
| Ruler | For placing designs evenly |
Steps To Follow:
- Choose one theme, such as colors, shapes, letters, or numbers.
- Make two sticks for each match.
- Draw or place the same sticker near the top of each matching pair.
- Use a ruler to keep the designs in the same spot on every stick.
- Mix the sticks and place them design-side down.
- Ask players to flip two sticks at a time.
- If the sticks match, the player keeps the pair.
- Store the game in a small bag after playing.
17. Popsicle Stick Bird Feeder
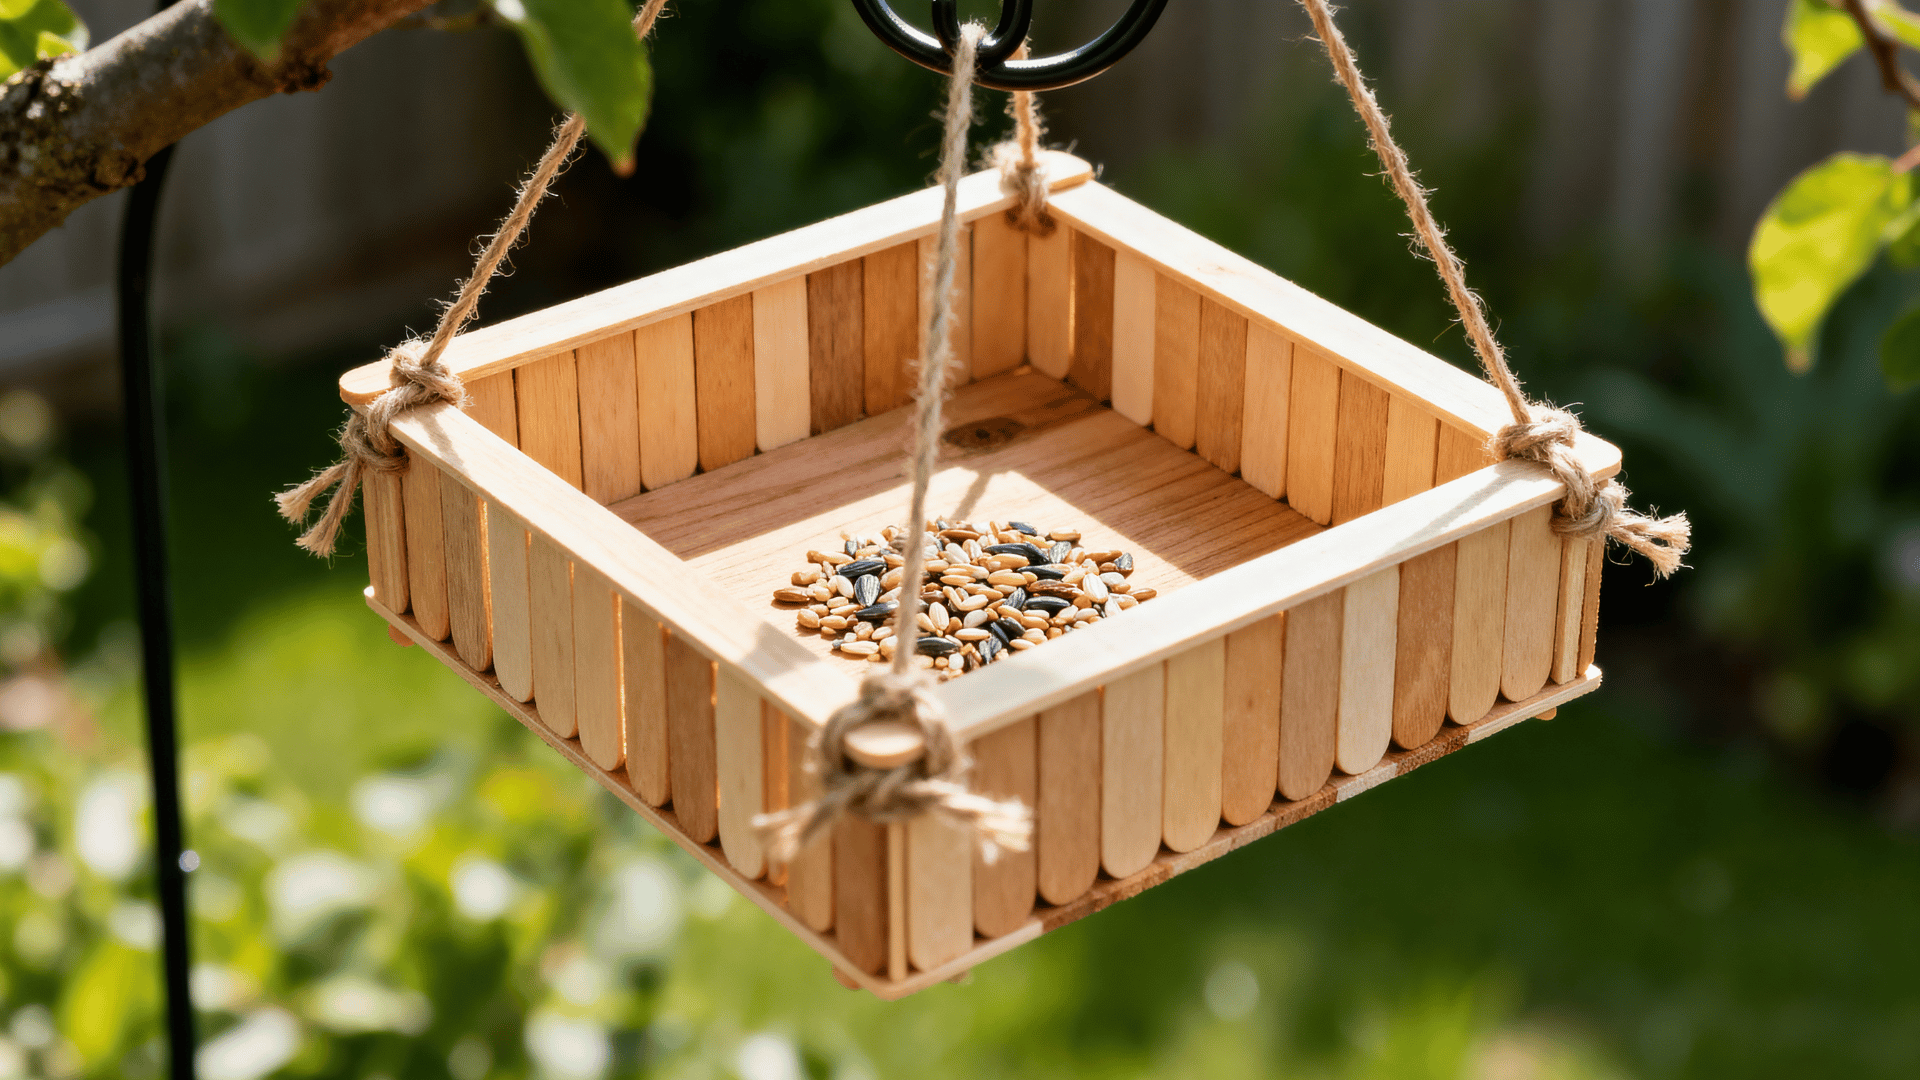
A popsicle stick bird feeder is an outdoor craft that lets older kids and adults make something useful for the backyard.
It works well for older kids ages 8 and up, teens, and adults because it needs stronger glue, drying time, and adult help for hanging.
Craft Supplies Needed:
| Supply | Quantity / Details |
|---|---|
| Popsicle sticks | For the base and side walls |
| Non-toxic glue or hot glue | For strong assembly |
| Twine | For hanging |
| Birdseed | To fill the feeder |
| Small cardboard base | For support |
| Paint | Optional, for outside color |
Steps To Follow:
- Glue popsicle sticks flat across the cardboard base until it is covered.
- Build low walls by gluing sticks around all four edges.
- Add one or two more layers so the birdseed will stay inside.
- Tie twine to the corners or glue it firmly along the sides for hanging.
- Add paint only on the outside if you want color.
- Let the feeder dry fully before adding birdseed.
- Pour birdseed into the center.
- Hang it from a safe branch or outdoor hook.
- Check it often and refill it when needed.
Conclusion
Crafting with popsicle sticks works best when you take your time, choose the right glue, and let each piece dry before moving ahead.
Small habits like testing the layout first, supporting heavier builds, and sealing display pieces can help the finished craft look cleaner and last longer. You do not need costly supplies to make something worth keeping.
With patience, care, and a few smart prep steps, even simple wooden sticks can become handmade pieces that feel personal and useful.
Frequently Asked Questions
Are Craft Sticks and Popsicle Sticks the Same Thing?
Craft sticks and popsicle sticks are usually the same flat wooden sticks. You can use both for frames, bookmarks, ornaments, toys, and small DIY projects.
How Many Popsicle Sticks are in a Standard Pack?
Most craft store packs include about 150 to 200 sticks. That is usually enough for several small projects or a few medium-sized crafts.
Can Popsicle Sticks Be Stained Instead of Painted?
Wood stain works well on popsicle sticks, giving them a natural finish. It is a good choice for coasters, organizers, frames, plant markers, and display pieces.
Can You Bend Popsicle Sticks without Breaking Them?
You can bend popsicle sticks by soaking them in warm water for 30 to 60 minutes. Once the wood softens, shape it gently and let it dry in place.