A child’s name is often one of the first words they learn to recognize, write, and feel connected to. That makes it a great starting point for an art activity that feels personal from the beginning.
I like name art because it turns something familiar into a project kids can make their own.
The best part is that name art can work for many ages, settings, and skill levels. It can be used during quiet craft time, classroom projects, or weekend activities when kids need something simple, hands-on, and fun to make.
Let’s get started!
Why Name Art is More Than Just a Creative Activity
Name art is a creative activity that uses a person’s name as the main focus of an artwork. Letters can be decorated with colors, patterns, textures, and craft materials to create something personal and unique.
As children write, trace, color, and decorate their names, they become more familiar with letter shapes and spelling. These hands-on activities can also help strengthen fine motor skills used in writing and everyday tasks.
Because every project is centered around a person’s name, name art encourages self-expression and creativity. It gives children an opportunity to create something meaningful while building confidence in their artistic abilities.
Creative Name Art Ideas to Try
Name art projects offer a fun way to turn letters into colorful and personalized creations. From simple drawings to hands-on crafts, these ideas can make learning and creativity go hand in hand.
1. Rainbow Name Art
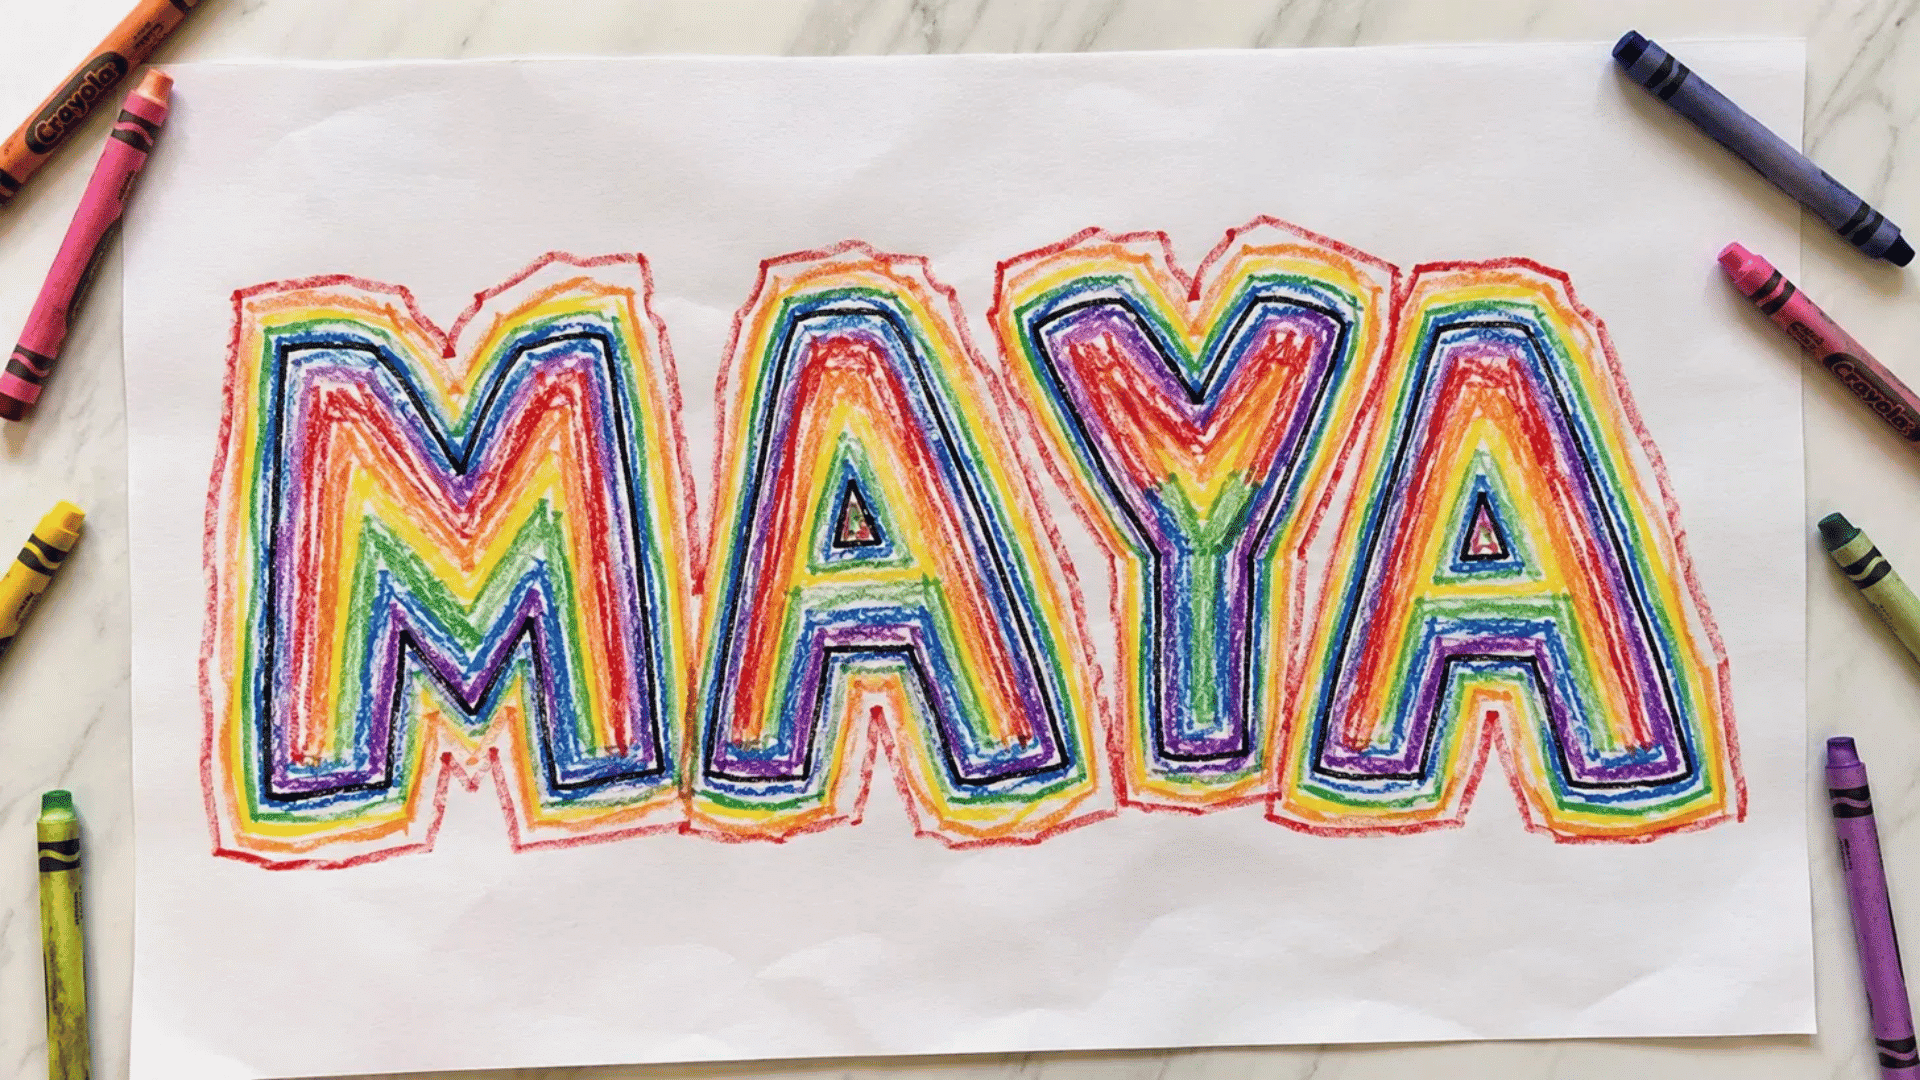
Rainbow name art layers multiple colors around letters to create a good and cheerful effect. You’ll need white paper, a pencil, and a set of colorful markers or crayons.
How to Create Rainbow Name Art:
- Write your name lightly in pencil using large block or bubble letters.
- Choose a marker color and trace over the letters.
- Repeat the tracing several times using different colors, slightly shifting each outline.
- Continue adding colors until the rainbow effect is visible.
- Erase any remaining pencil marks once the ink is dry.
- Display your finished rainbow name art on a wall, bulletin board, or notebook cover.
My Tip: Use markers with contrasting colors to make each outline stand out. Starting with lighter shades and ending with darker ones can create a more vibrant rainbow effect.
2. Bubble Letter Name Designs
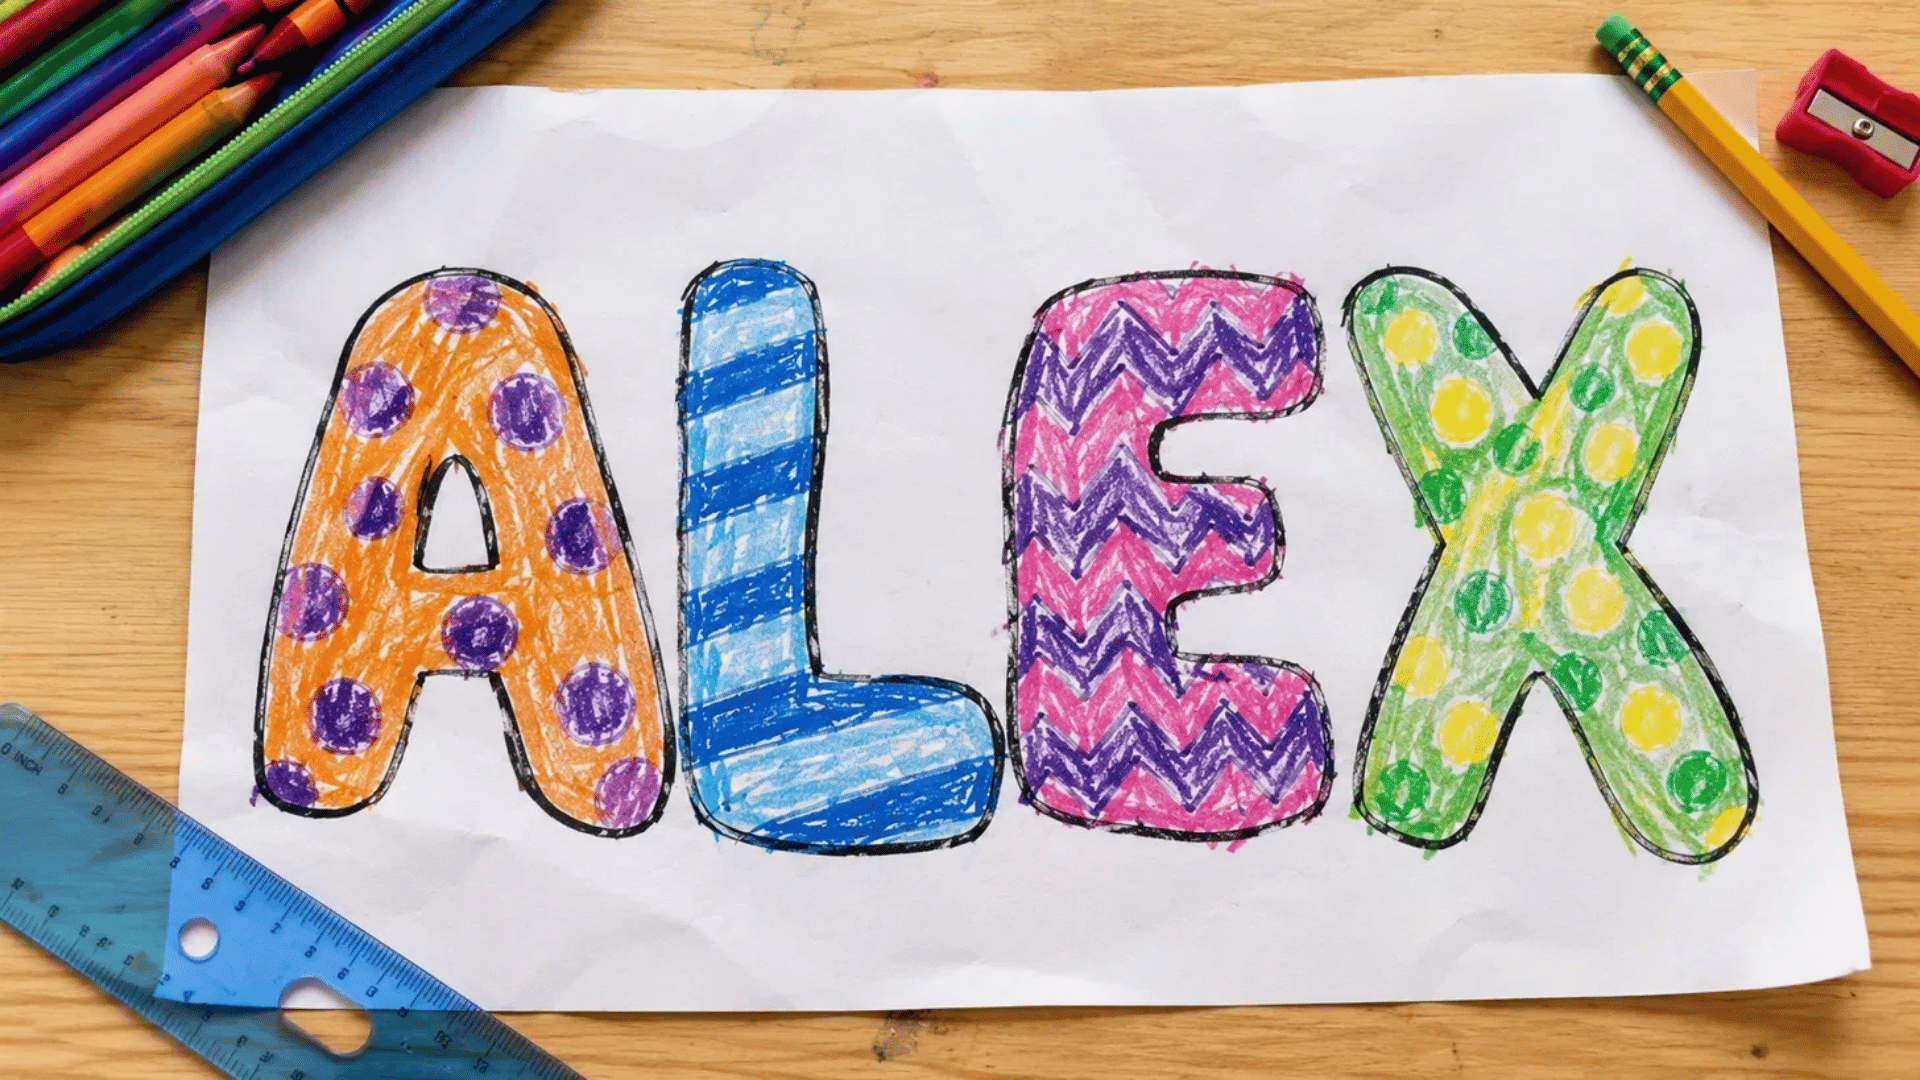
Bubble letter name art turns ordinary letters into bold, eye-catching designs that can be customized with colors and patterns. You’ll need white paper, a pencil, and markers, crayons, or colored pencils.
How to Create Bubble Letter Name Designs:
- Draw your name in large bubble letters across a sheet of paper.
- Outline each letter using a dark marker or pen.
- Choose a different pattern for each letter, such as dots or stripes.
- Fill the letters with colors using markers, crayons, or pencils.
- Add a simple background around the letters if desired.
- Display your finished artwork on a wall or bulletin board.
My Tip: I like using a different pattern inside each letter because it makes the finished design look more creative without requiring extra materials.
3. Watercolor Name Art
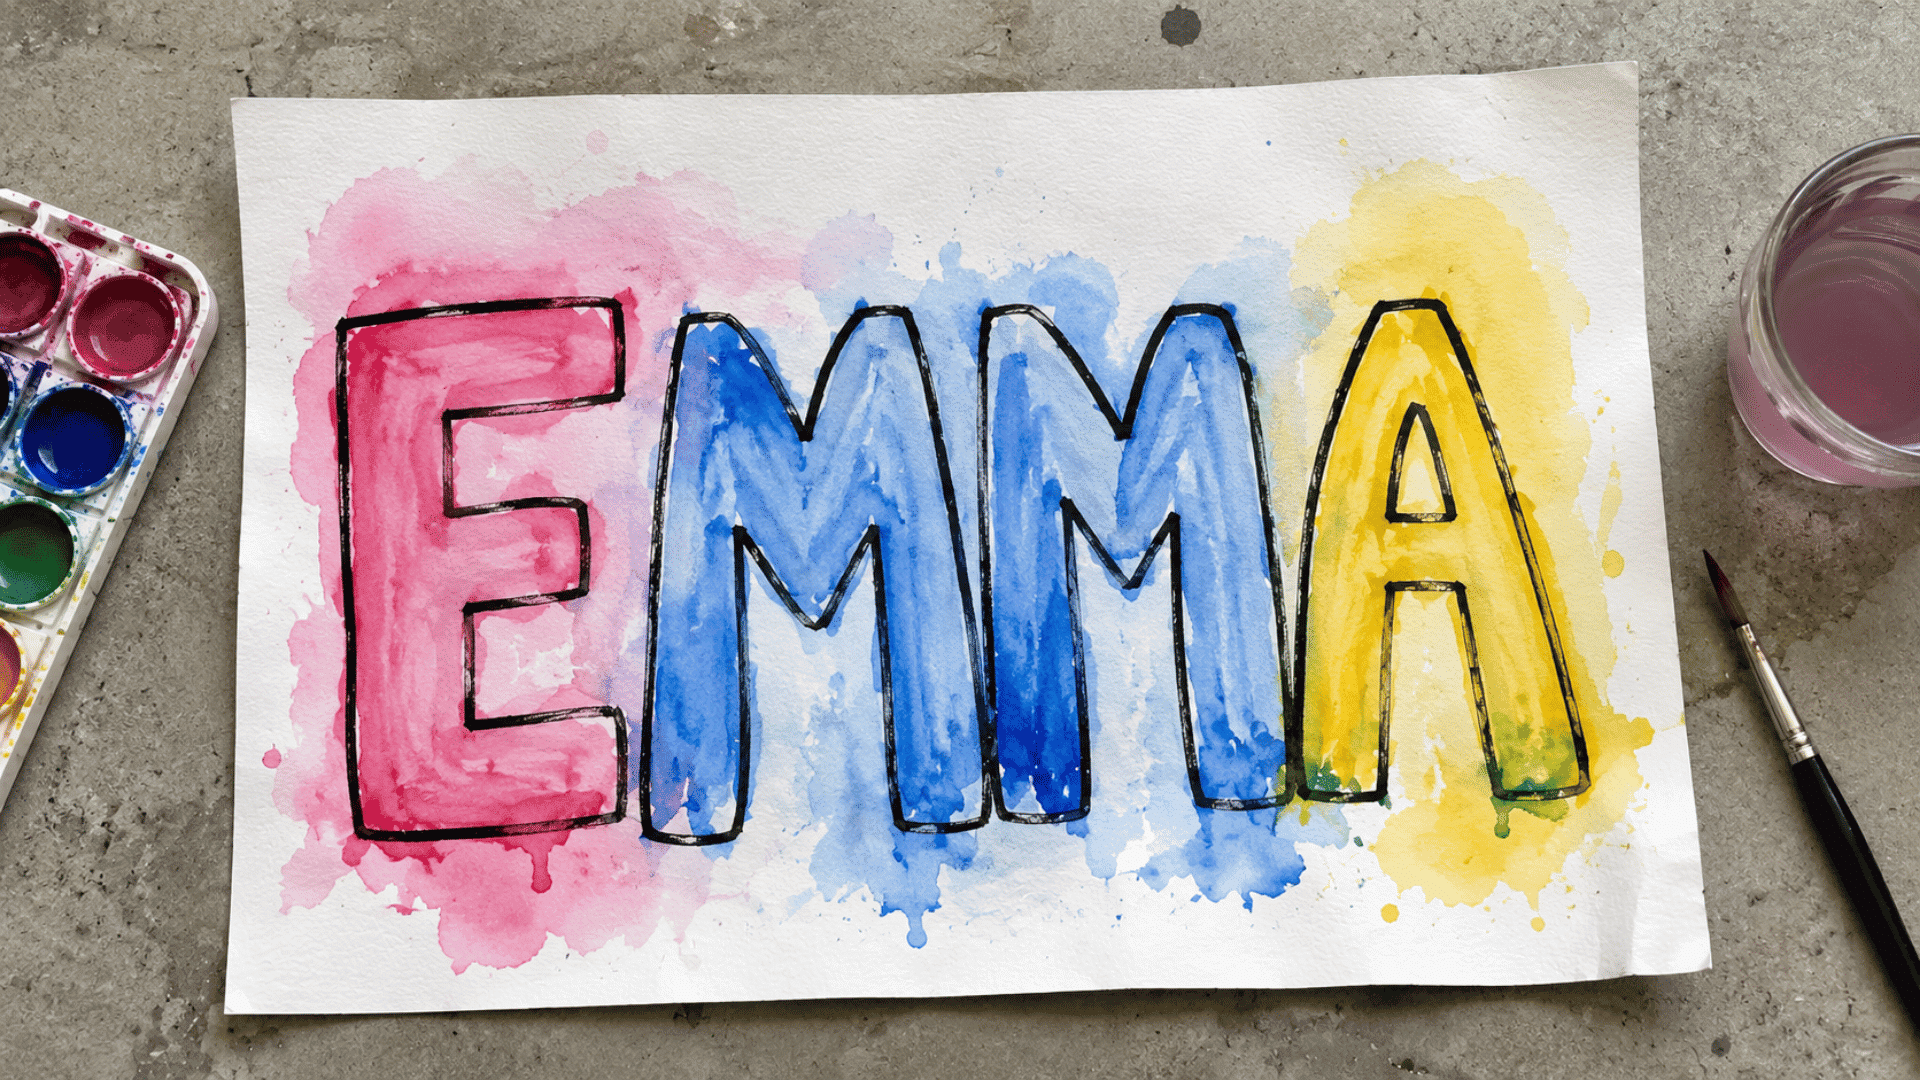
Watercolor name art adds soft blends of color around letters, creating a colorful design. You’ll need watercolor paper, watercolor paints, brushes, water, and a waterproof marker.
Different watercolor paint types can create different blending results, from lighter washes to stronger color layers.
How to Create Watercolor Name Art:
- Write your name in large letters using a waterproof black marker.
- Select two or three watercolor shades that work well together.
- Paint inside and around the letters using a soft brush.
- Blend the colors gently while the paint is still wet.
- Allow the artwork to dry completely before handling it.
- Add extra details or borders if you would like.
My Tip: Leave a few small white spaces between colors to help each shade stand out.
4. Nature-Inspired Name Collages
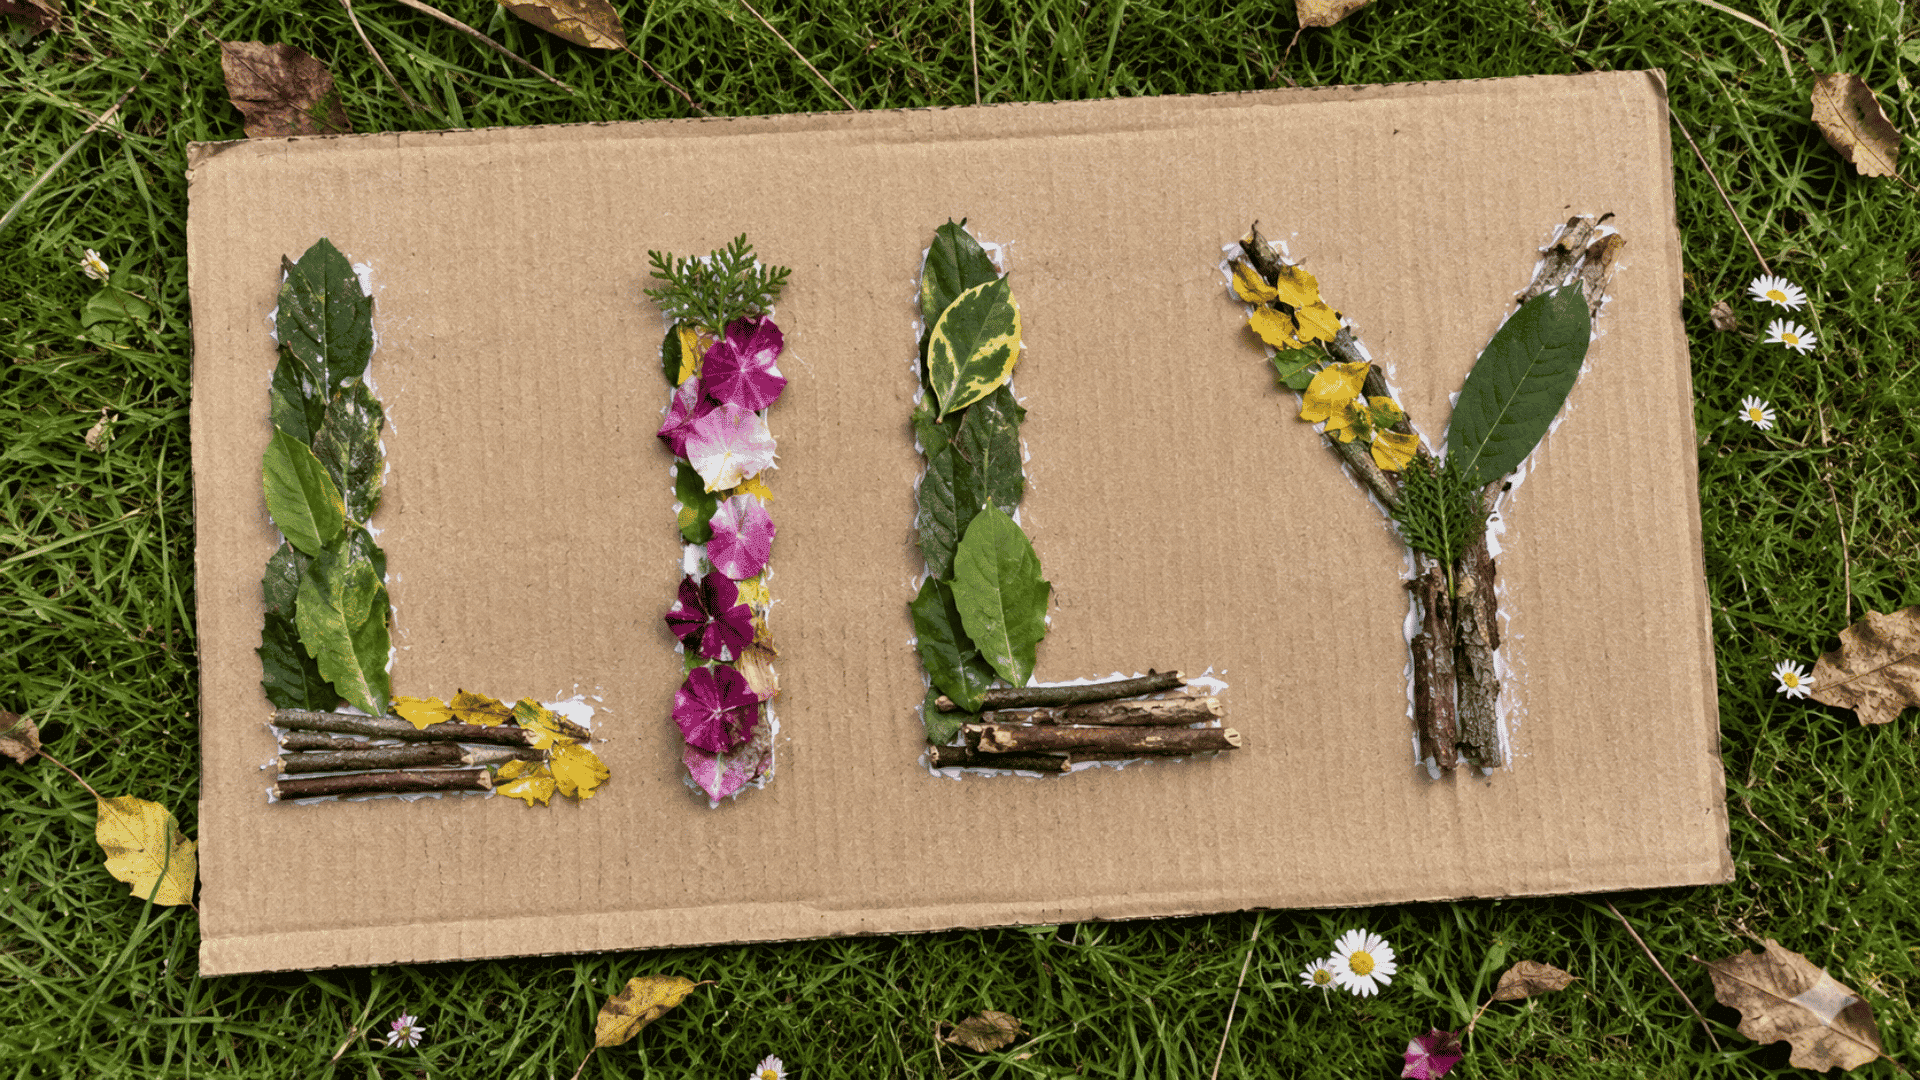
Nature-inspired name collages use leaves, petals, and twigs to add texture and character to each letter. You’ll need cardboard or thick paper, glue, leaves, flower petals, and small twigs.
How to Create Nature-Inspired Name Collages:
- Write your name lightly on a piece of cardboard or thick paper.
- Collect leaves, flower petals, twigs, or other natural materials.
- Arrange the materials along the shape of each letter.
- Glue the pieces into place one section at a time.
- Let the collage dry completely before moving it.
- Trim any loose pieces and display your finished design.
My Tip: Mixing smooth leaves with rough twigs creates more texture and visual interest.
5. Magazine Cut-Out Name Art
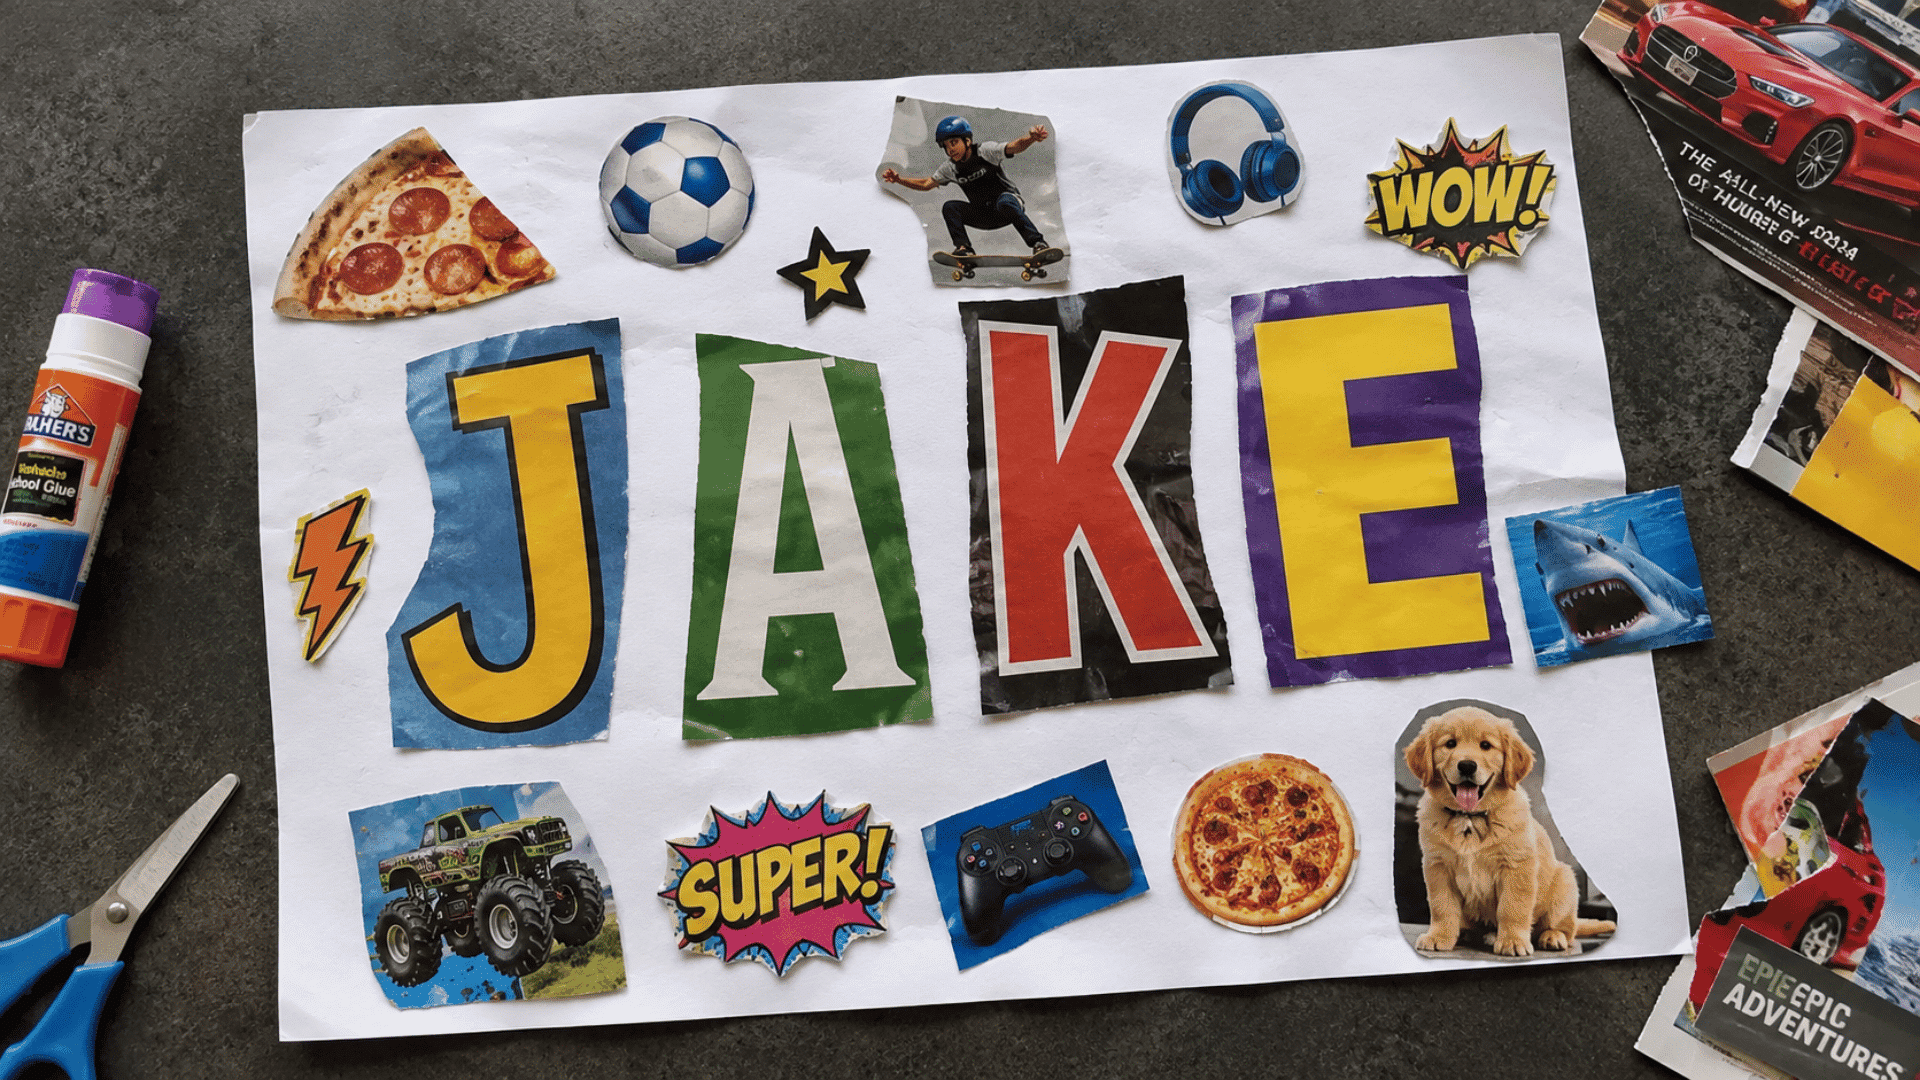
Magazine cut-out name art combines colorful letters and images to create a playful collage. You’ll need old magazines, scissors, glue, and a sheet of paper.
How to Create Magazine Cut-Out Name Art:
- Search through magazines for letters that spell your name.
- Carefully cut out each letter using a pair of scissors.
- Arrange the letters on a blank sheet of paper.
- Glue the letters down once you are happy with the layout.
- Fill empty spaces with colorful magazine images or patterns.
- Allow the glue to dry before displaying the collage.
My Tip: Don’t worry about matching fonts because mixed styles often make the artwork more fun.
6. Mosaic Name Art
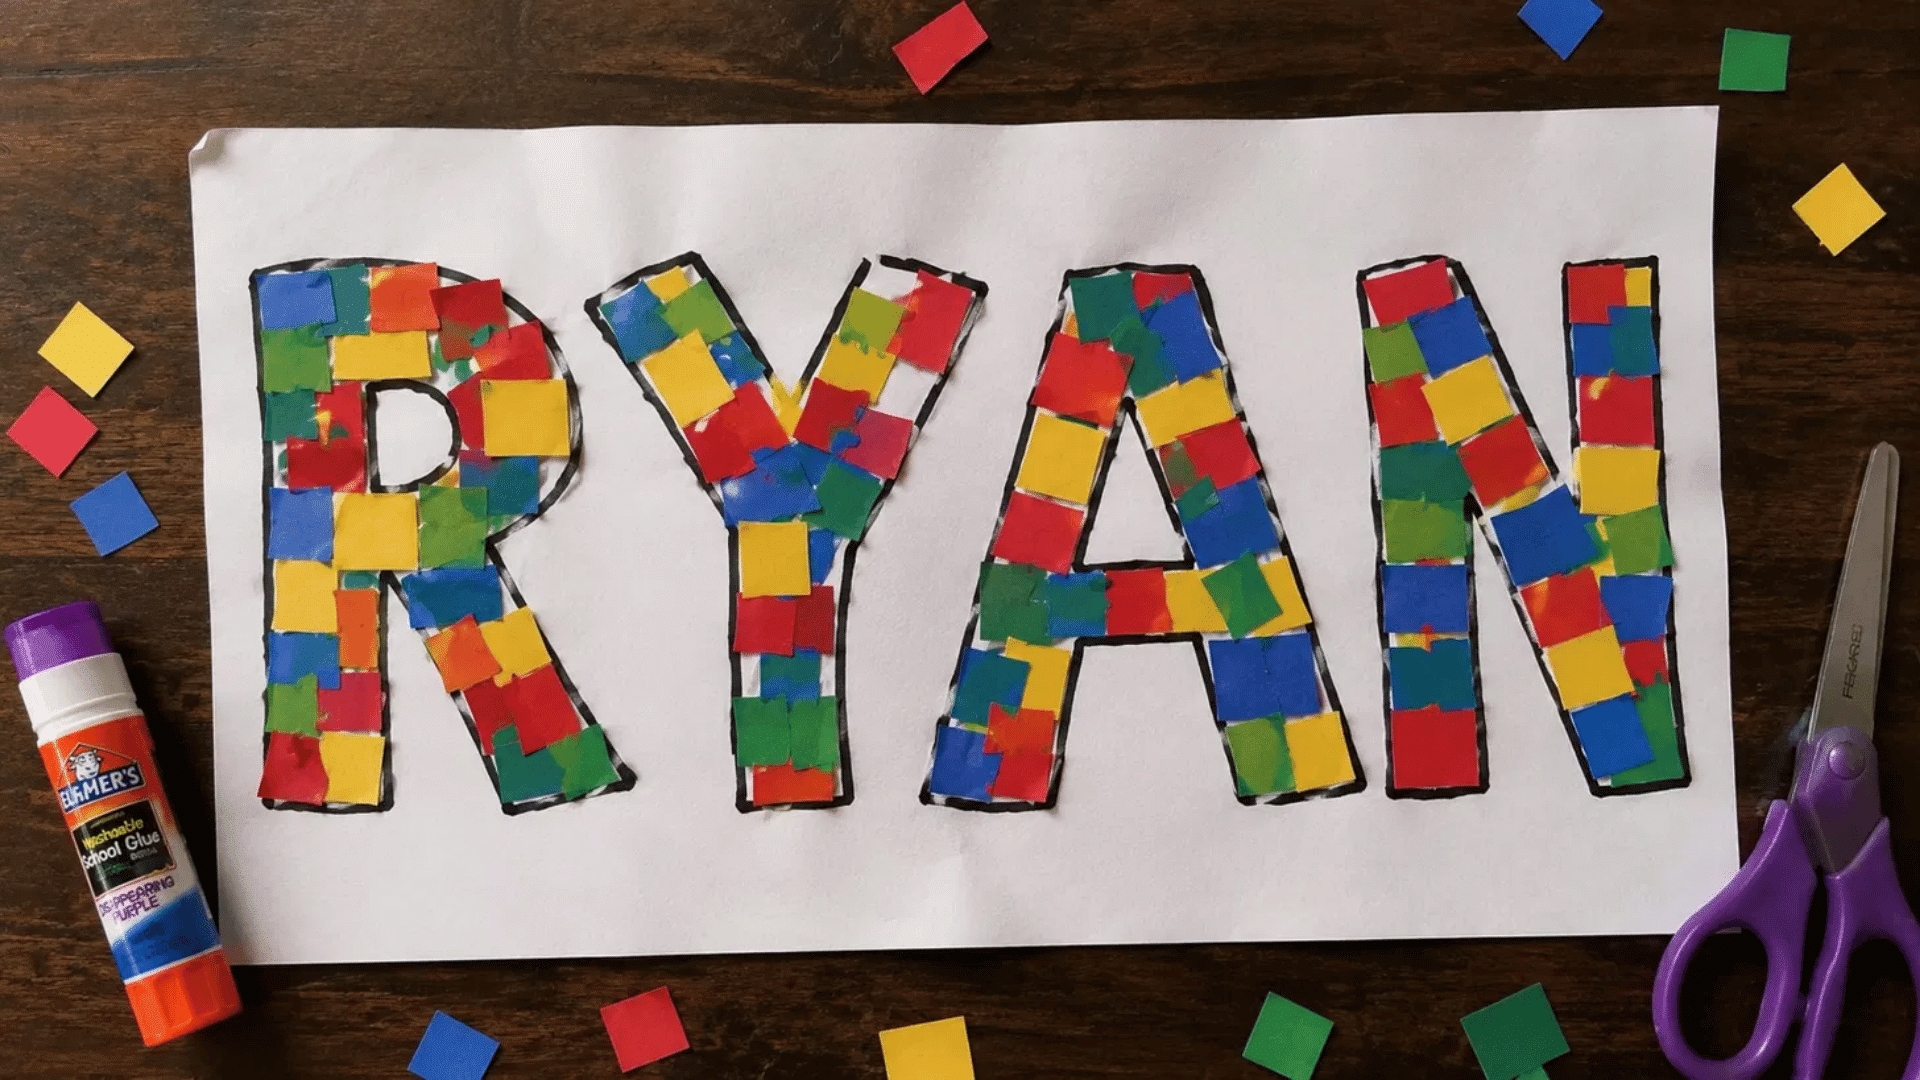
Mosaic name art fills letters with small pieces of colored paper to create a detailed and eye-catching effect. You’ll need cardstock, construction paper, scissors, and glue.
How to Create Mosaic Name Art:
- Write your name in large block letters on cardstock.
- Cut colored paper into small squares or rectangles.
- Apply glue inside one letter at a time.
- Place the paper pieces closely together to create a mosaic effect.
- Continue until every letter is completely covered.
- Let the artwork dry before hanging or displaying it.
My Tip: Choosing three or four main colors helps the design look organized.
7. Yarn-Wrapped Name Letters
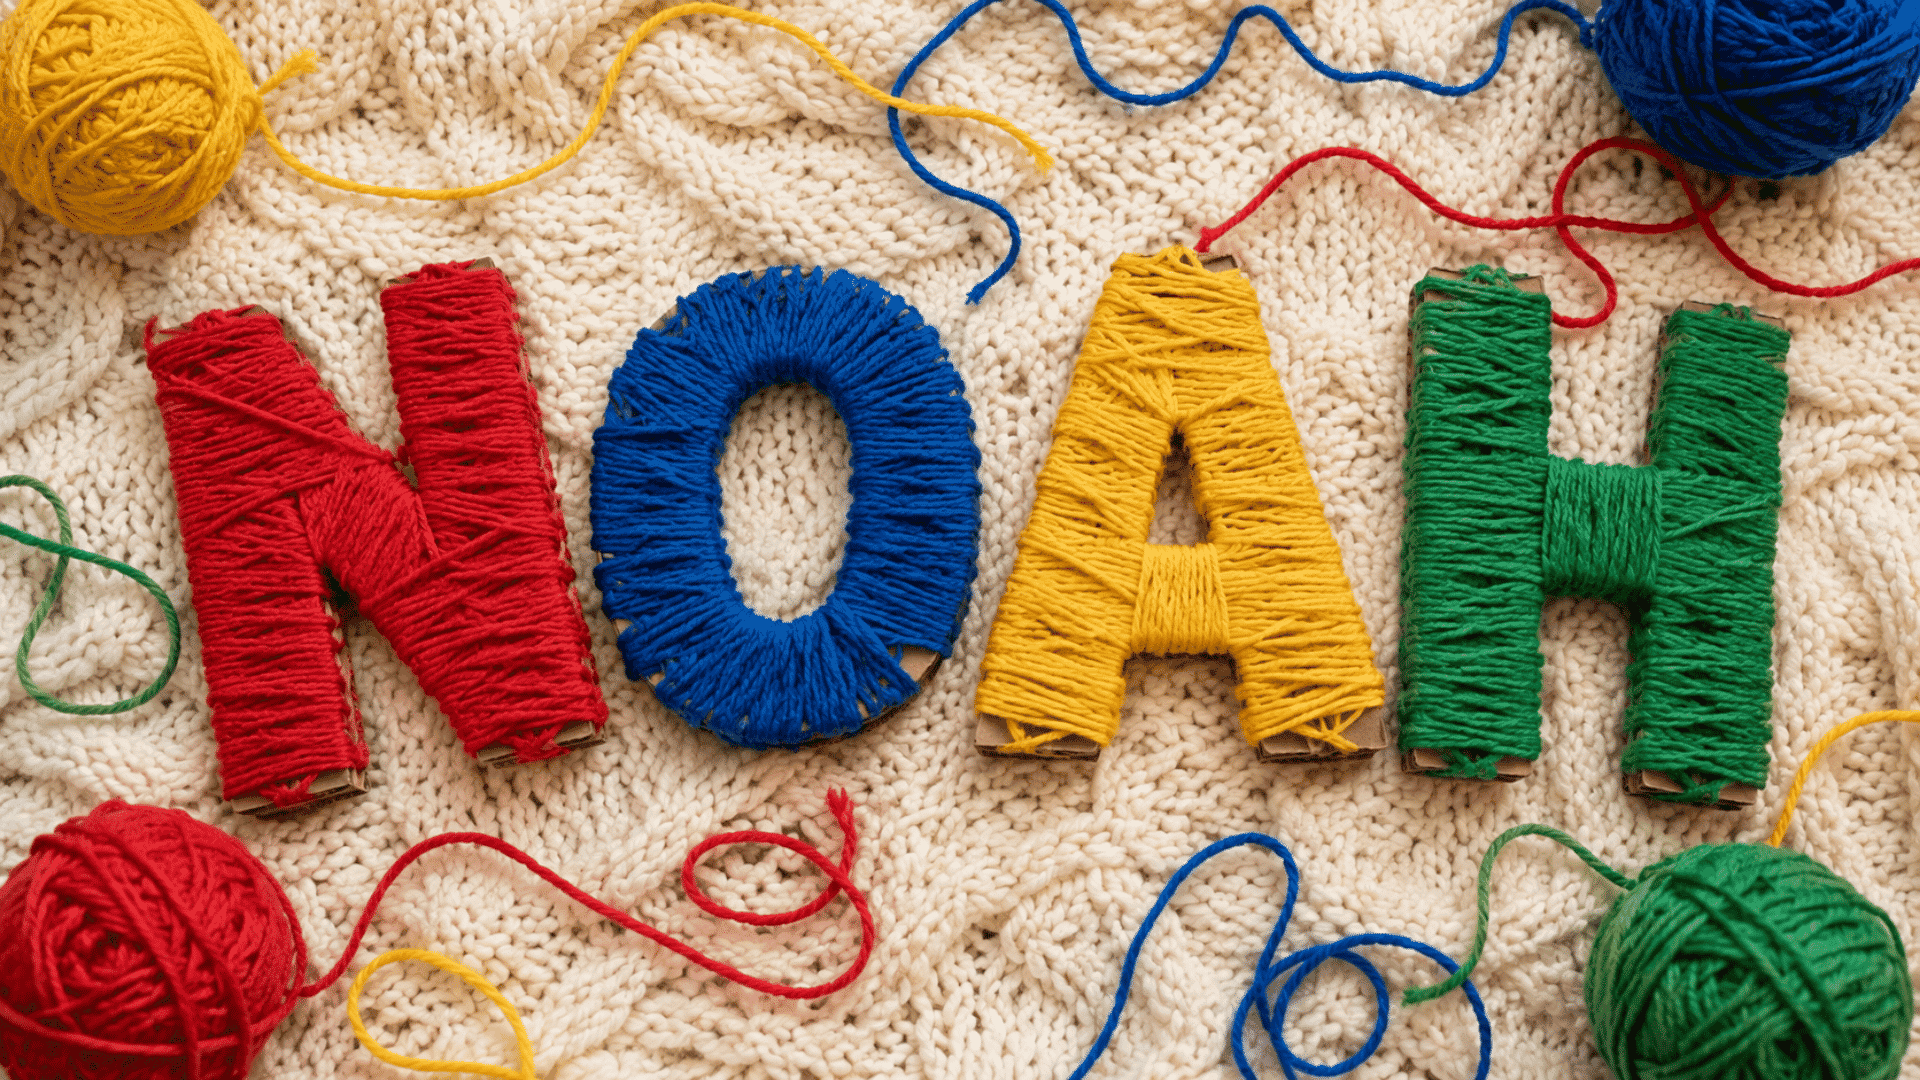
Yarn-wrapped name letters turn simple cardboard shapes into textured decorative pieces. You’ll need cardboard, yarn, scissors, and glue.
How to Create Yarn-Wrapped Name Letters:
- Draw and cut out each letter of your name from cardboard.
- Secure one end of the yarn with a small amount of glue.
- Wrap the yarn tightly around the cardboard letter.
- Continue wrapping until the entire surface is covered.
- Glue the loose end in place when you finish.
- Arrange the letters together to display your name.
My Tip: Using two yarn colors on the same letter creates a striped effect with very little effort.
8. Sticker Name Art
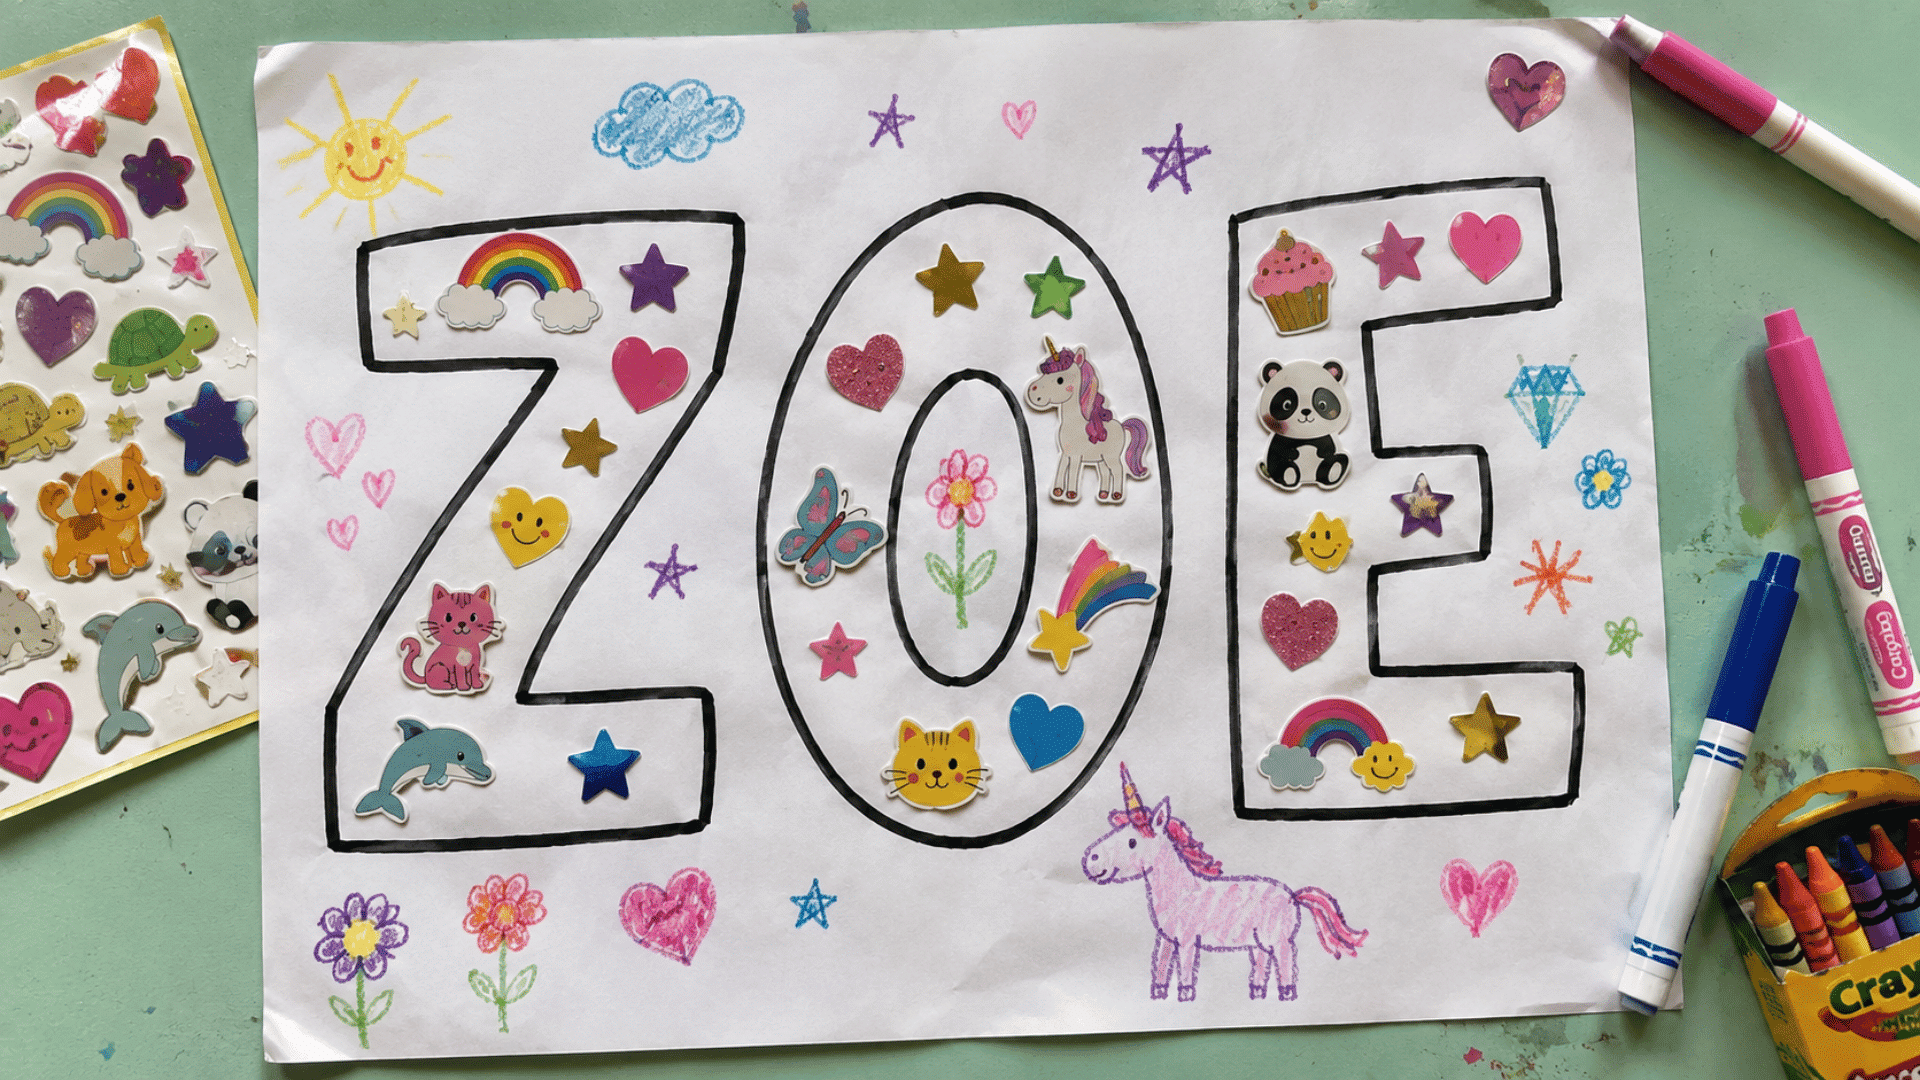
Sticker name art is a simple craft that uses themed stickers to decorate and personalize letters. You’ll need paper, a pencil, markers, and assorted stickers.
How to Create Sticker Name Art:
- Write your name in large letters on a sheet of paper.
- Outline the letters using markers or colored pencils.
- Choose stickers that match a theme or favorite interest.
- Place the stickers inside and around the letters.
- Fill any empty areas with drawings or additional colors.
- Display the finished artwork in a notebook or on a wall.
My Tip: Pick one theme, such as animals or space, to make the design feel connected.
9. Animal-Themed Name Art
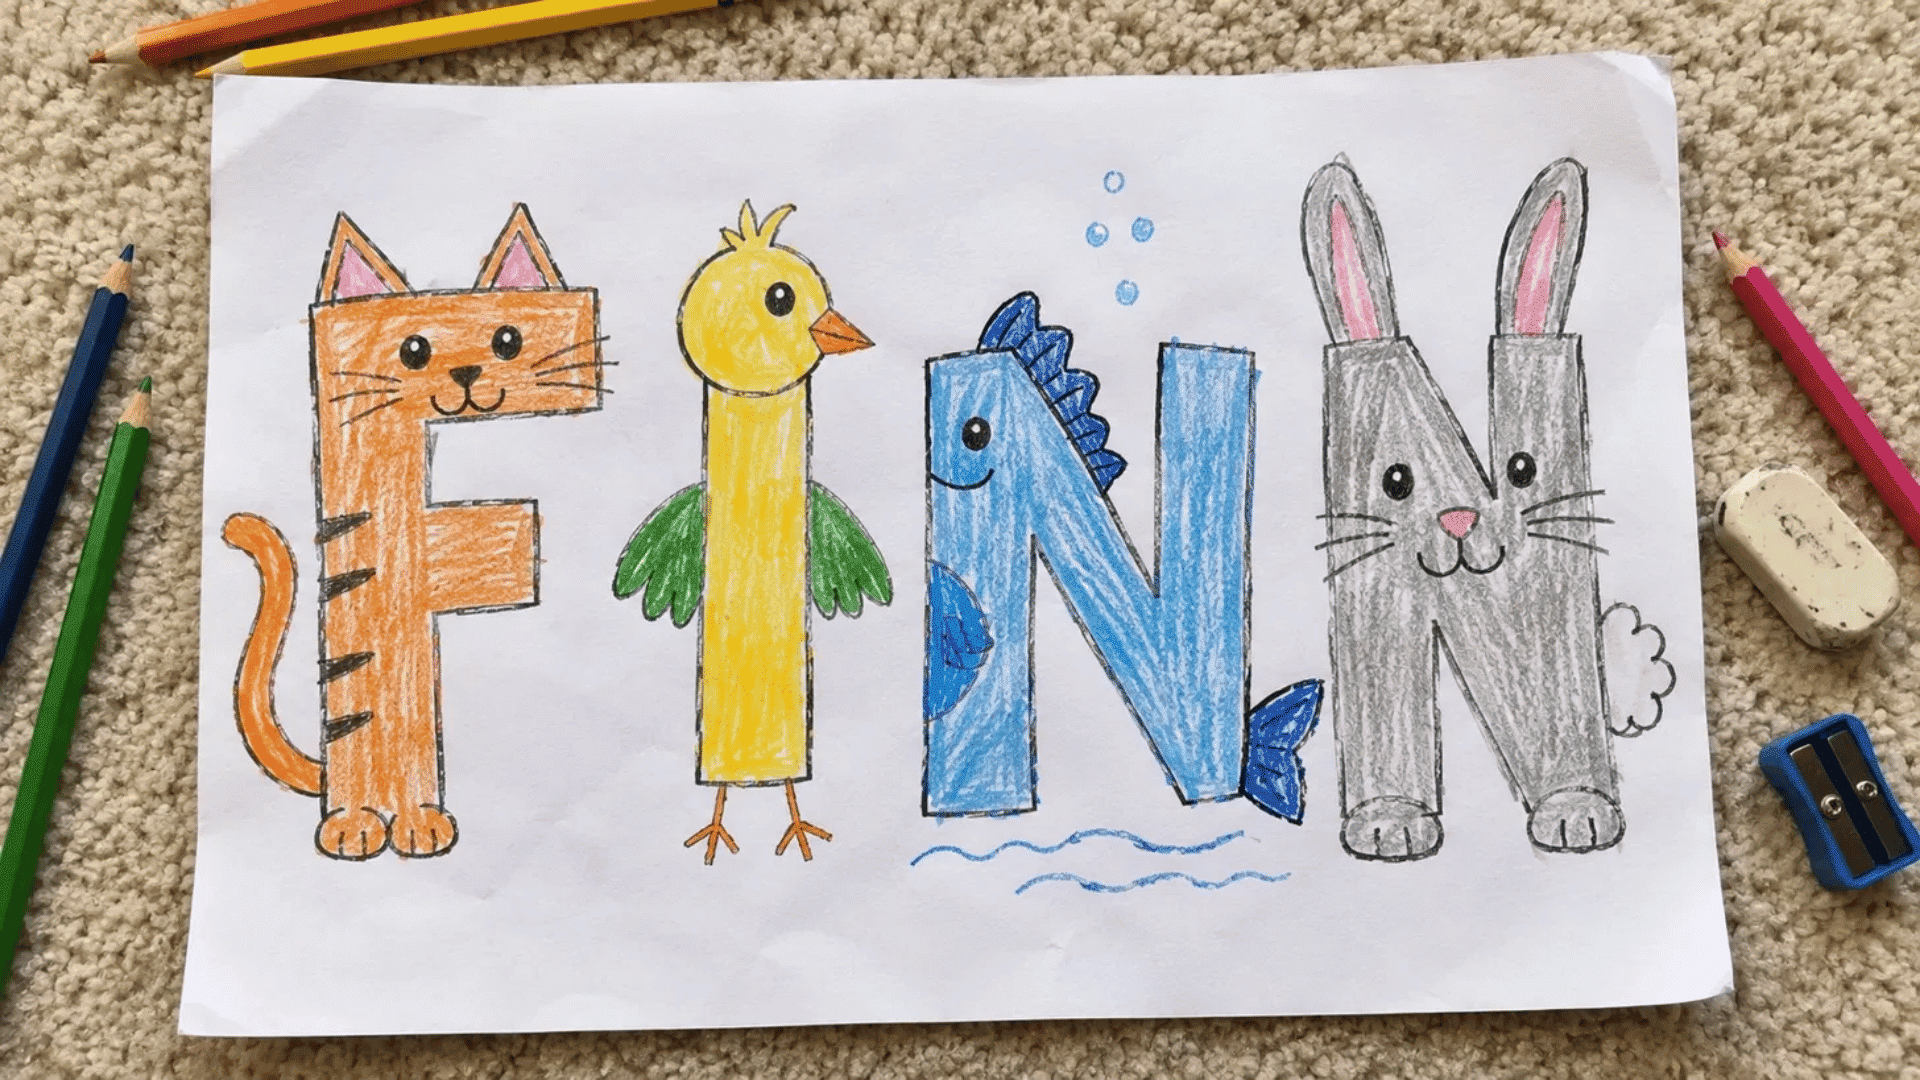
Animal-themed name art transforms letters into creative animals using simple drawings and details. You’ll need paper, pencils, erasers, and coloring supplies.
How to Create Animal-Themed Name Art:
- Write your name in large letters using a pencil.
- Look at each letter and imagine it as part of an animal.
- Add features such as eyes, tails, wings, or ears.
- Outline the finished drawings with a marker.
- Color the animals using crayons, markers, or pencils.
- Add a simple background to complete the artwork.
My Tip: Start with one letter first and build ideas from its shape.
10. Chalk Name Murals
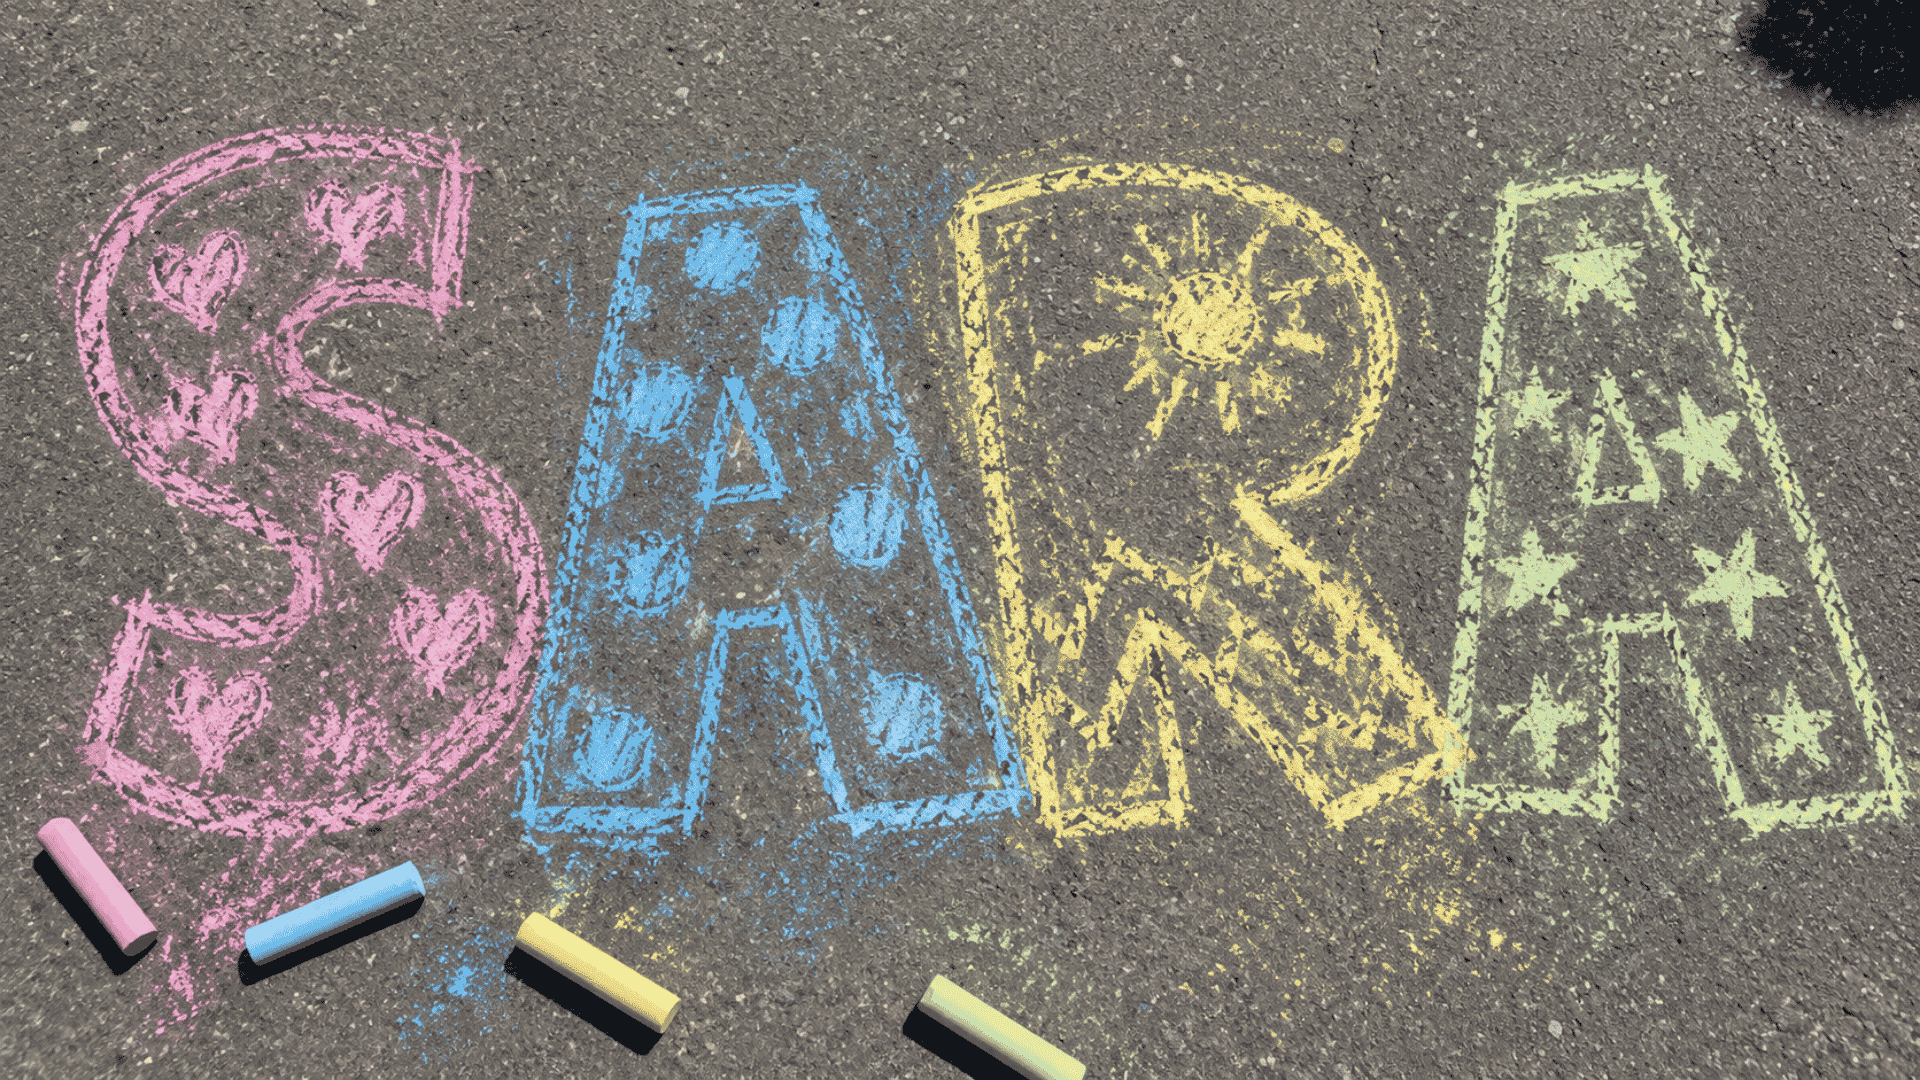
Chalk name murals use oversized lettering and bright colors to create artwork outdoors. You’ll need sidewalk chalk and a paved surface such as a driveway or sidewalk.
How to Create Chalk Name Murals:
- Write your name in oversized letters on a driveway or sidewalk.
- Outline each letter using bright sidewalk chalk colors.
- Fill the letters with patterns, shapes, or drawings.
- Add decorative designs around the outside of the name.
- Blend colors together to create extra visual interest.
- Take a photo of the mural before it fades away.
My Tip: Thick outlines make the letters easier to see from a distance.
11. 3D Name Art Creations
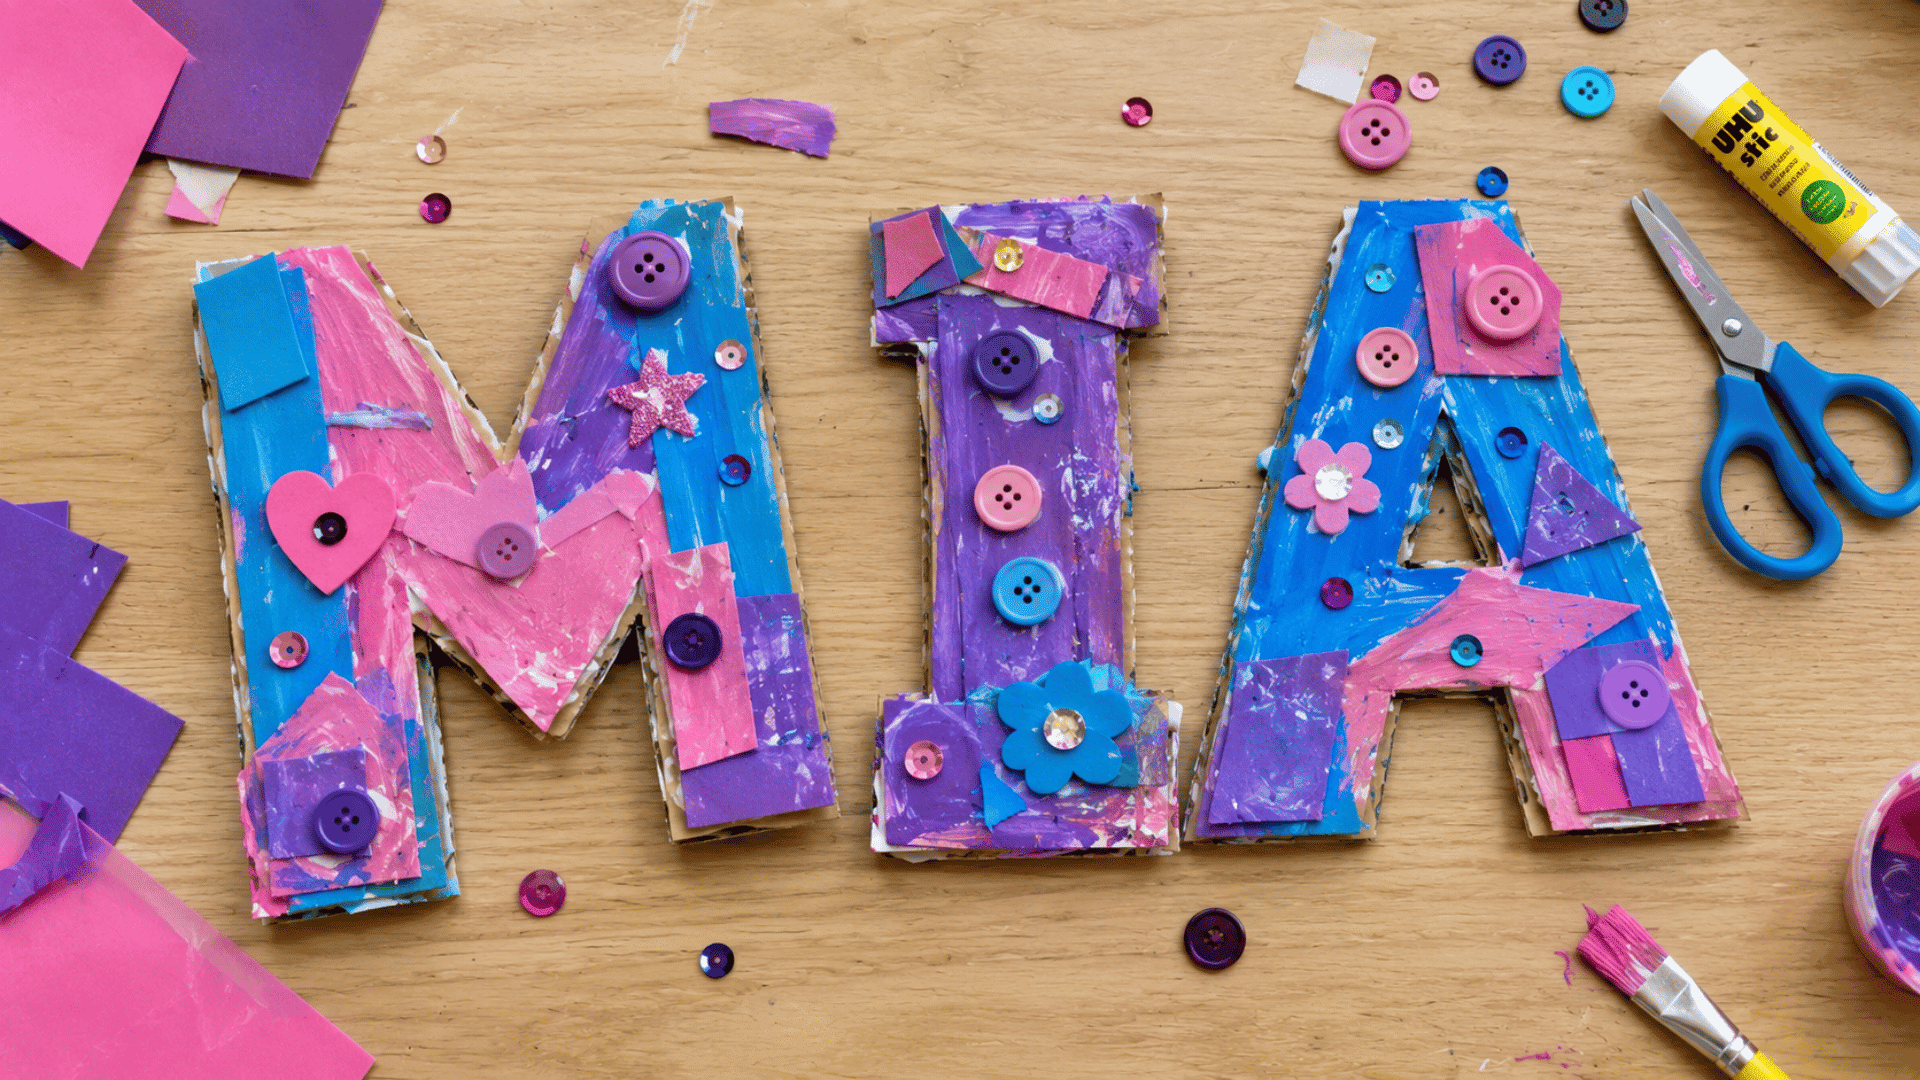
3D name art brings letters to life by adding depth and dimension with layered materials. You’ll need cardboard, craft foam, scissors, glue, and paint or markers.
How to Create 3D Name Art Creations:
- Draw and cut out each letter of your name from cardboard.
- Cut matching shapes from craft foam or another thick material.
- Glue the layers together to create a raised effect.
- Paint or decorate the letters using your chosen supplies.
- Allow everything to dry completely before handling it.
- Arrange the letters to spell your name and display them.
My Tip: Small decorations such as buttons or patterned paper can add extra personality.
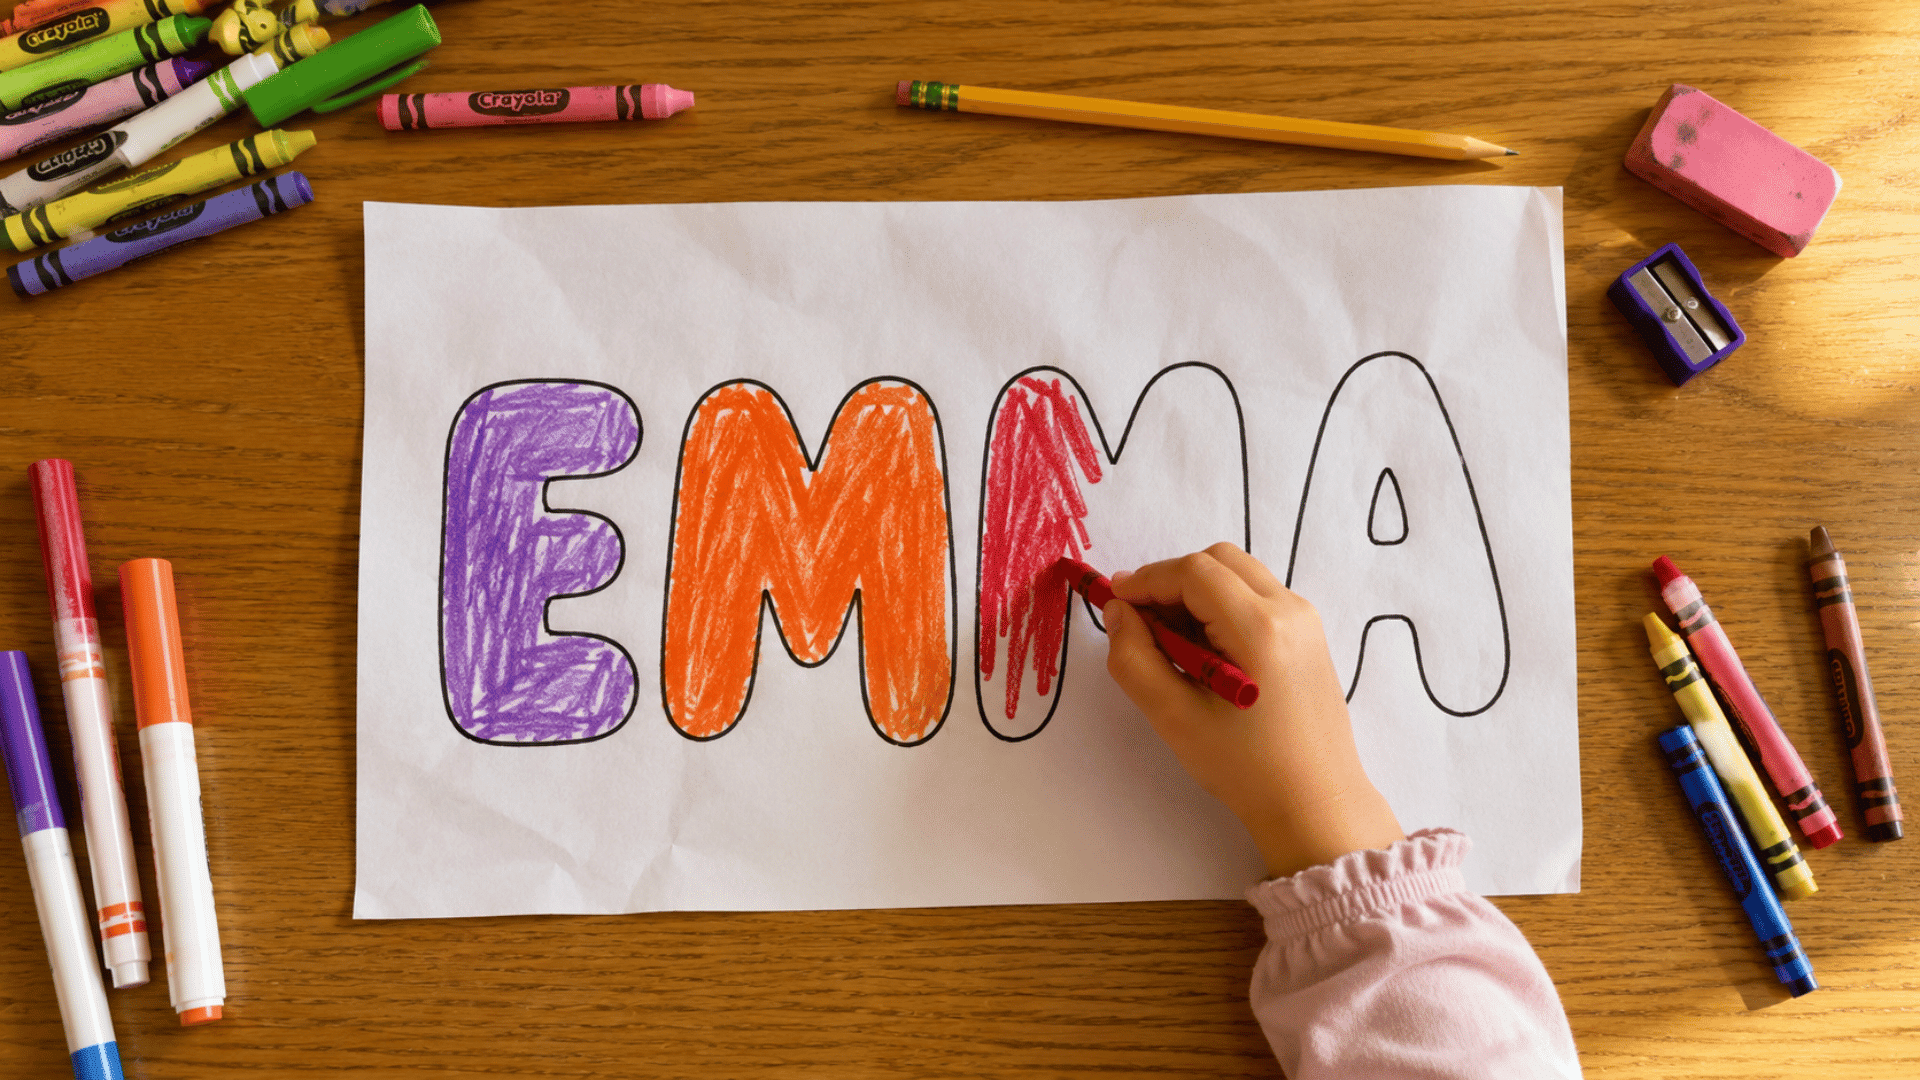
12. Pattern-Filled Name Art
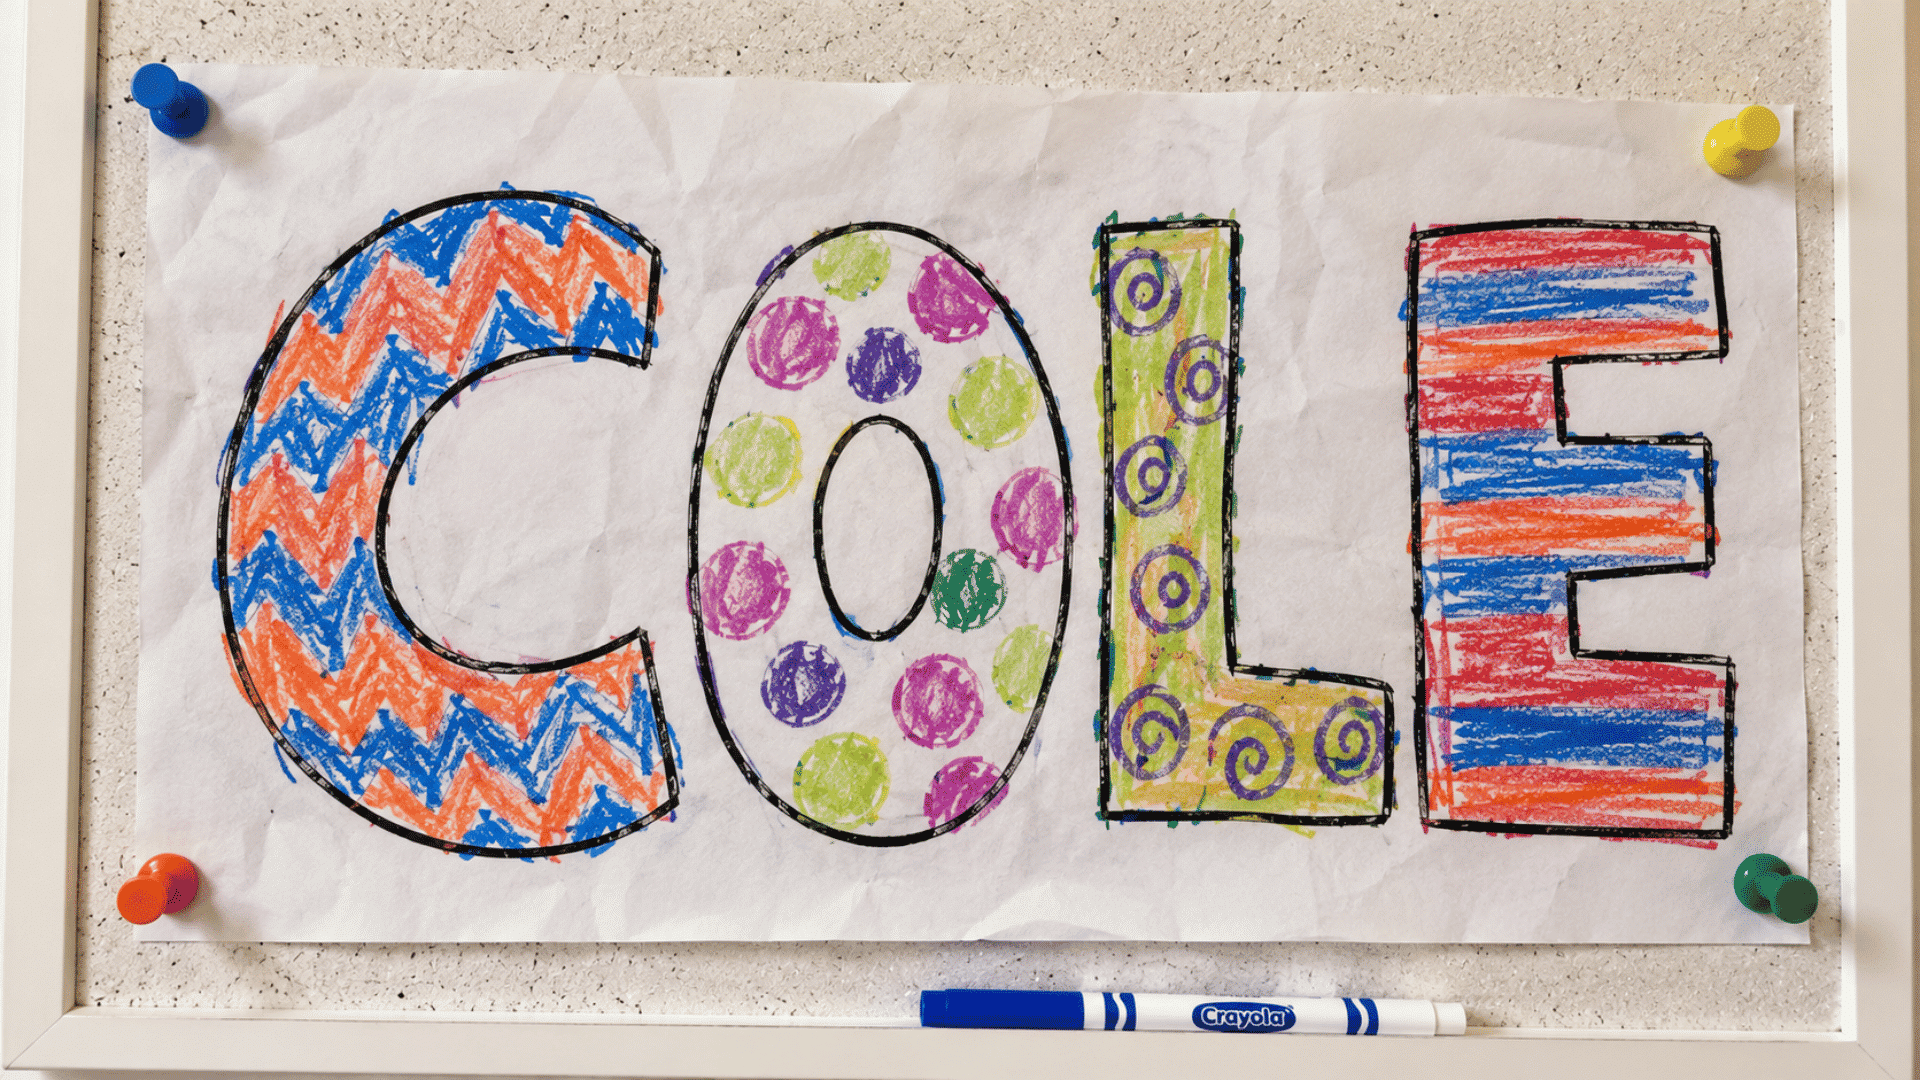
Pattern-filled name art uses repeated shapes and designs to make letters more decorative and colorful. You’ll need paper, a pencil, and markers, crayons, or colored pencils.
How to Create Pattern-Filled Name Art:
- Write your name in large block or bubble letters.
- Choose several simple patterns such as zigzags, dots, or swirls.
- Fill each letter with a different pattern design.
- Color the patterns using markers, crayons, or pencils.
- Add extra details around the outside of the letters.
- Display the finished artwork once all coloring is complete.
My Tip: Repeating a few favorite patterns throughout the design can help everything look connected.
Choosing the Right Name Art Project
Use this quick comparison to find the name art project that best matches your materials, skill level, and creative goals.
| Project Type | Best For | Difficulty |
|---|---|---|
| Rainbow & Bubble Letter Art | Beginners and younger children | Easy |
| Watercolor & Sticker Art | Painting and creative expression | Easy to Medium |
| Magazine & Mosaic Art | Fine motor skill practice | Medium |
| Nature & Chalk Art | Outdoor and seasonal activities | Easy |
| Yarn-Wrapped & 3D Letter Art | Decorative craft projects | Medium |
| Animal & Pattern-Filled Art | Drawing and design practice | Easy to Medium |
Every name art project offers something different, from simple coloring activities to hands-on crafts. Choose the one that appeals to you most and enjoy turning a name into a creative work of art.
Final Thoughts
Names may be simple words, but they can inspire some truly creative projects. With a few supplies and a little imagination, letters can become colorful works of art.
Every name art idea offers a chance to experiment with colors, patterns, and textures. The results are often as unique as the names themselves.
One thing I enjoy about name art is that there are no strict rules to follow. Each project can be personalized to match different interests and styles.
Choose an idea that catches your attention and give it a try. You might end up creating a piece that you’ll want to display for years to come.
Frequently Asked Questions
How Long Does It Take to Complete a Name Art Project?
Most name art projects can be completed in 15 to 45 minutes, depending on the materials used and the amount of detail added to the design.
Can Name Art Projects Be Used as Gifts?
Yes, personalized name art can make thoughtful gifts for birthdays, holidays, classroom celebrations, or special occasions because each piece is created specifically for the recipient.
Can Name Art Be Used for Classroom Activities?
Yes, name art works well in classrooms because it helps students learn names, practice letter recognition, and create personalized displays for walls, desks, or bulletin boards.