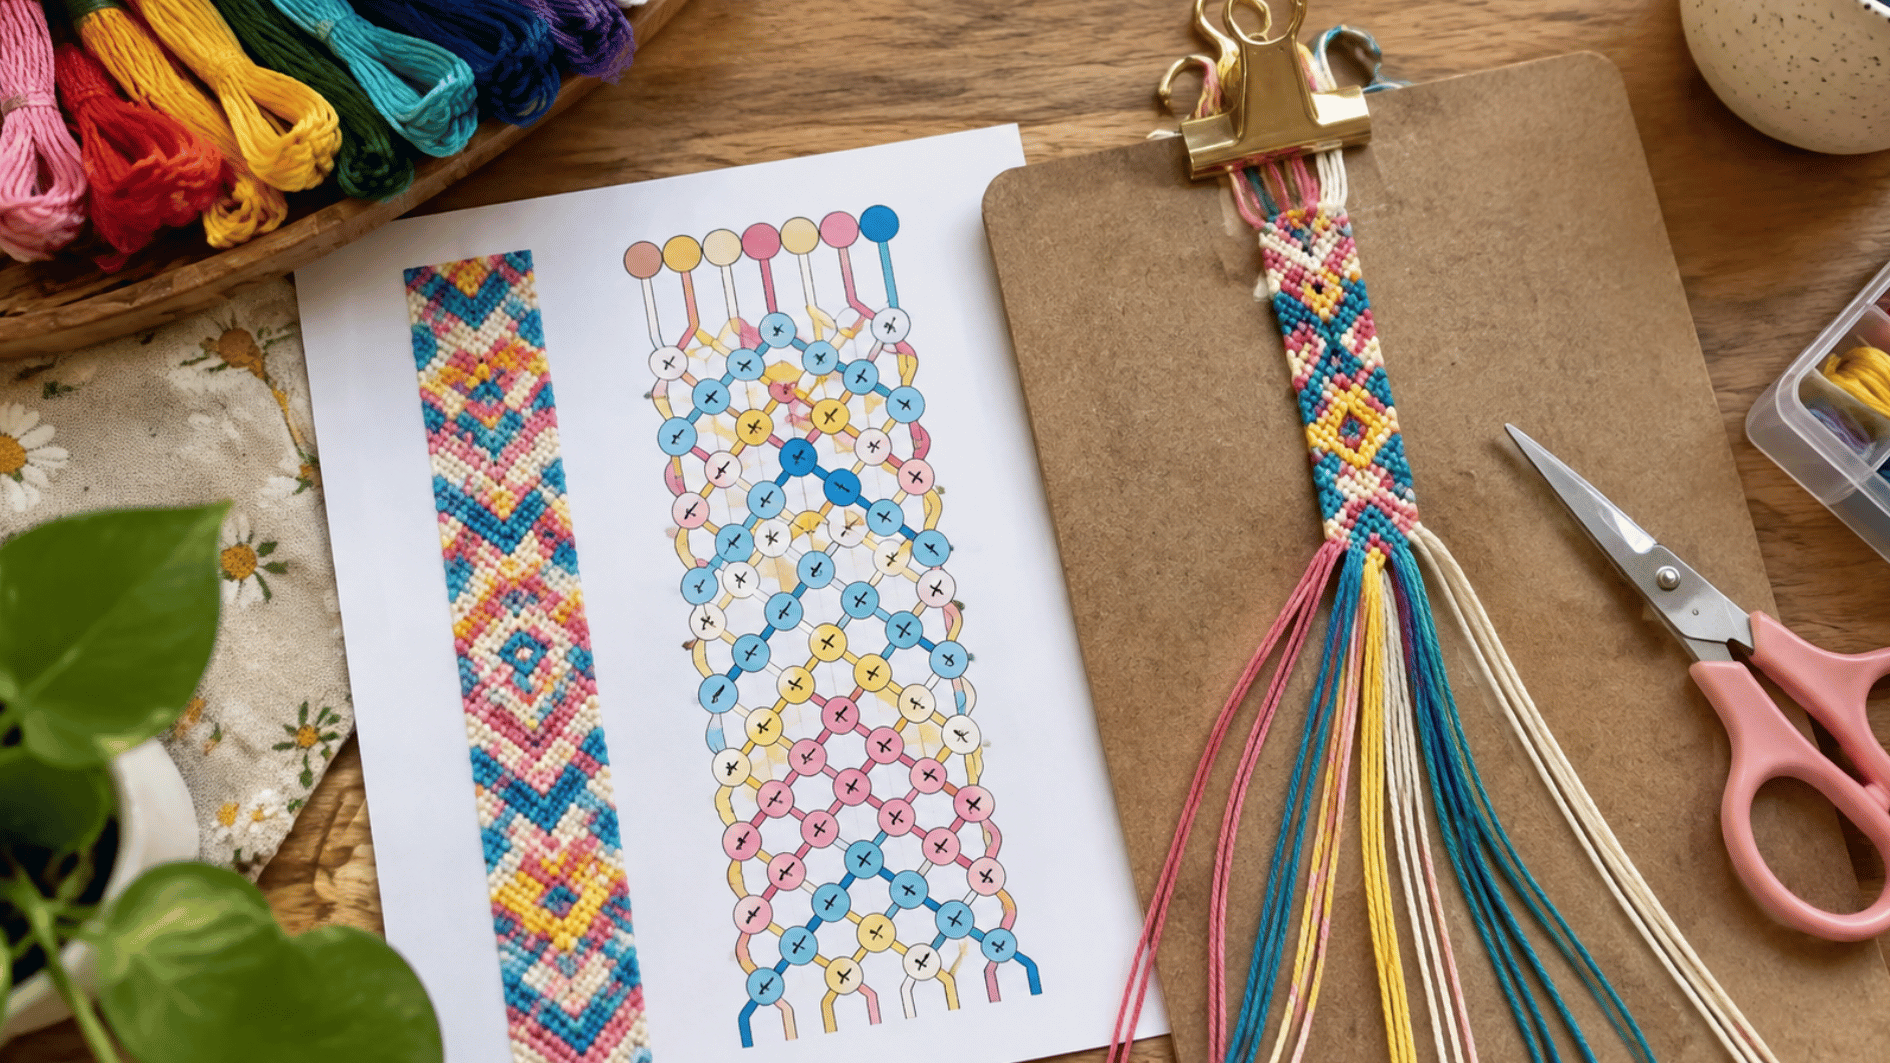
Friendship bracelet charts can look like a maze of arrows, colors, and crossing strings at first glance. Once each symbol has a purpose, the pattern becomes much easier to follow. This guide explains how to read friendship bracelet patterns, track string movement, understand knot directions, and stay on the row.
What Is a Friendship Bracelet Pattern?
A friendship bracelet pattern is a visual chart that shows how your strings should be arranged, which threads knot together, and how each string moves through the design.
Friendship bracelet patterns rely on knot symbols and moving strings, unlike beaded bracelets, where bead order and stringing create the design.
Most normal patterns use colored lines for strings and arrows for knot directions. You follow the chart row by row as the threads switch positions and form the bracelet design.
Think of it as a set of visual instructions. Once the starting strings are in the right order, the chart shows you what to do next without needing to memorize the whole pattern.
Parts of a Friendship Bracelet Pattern
Before you start knotting, it helps to know what you are actually looking at. I usually scan the chart first so I can spot the main pieces before the threads start moving around.
- Starting strings: The lines at the top show how many strings you need and their starting order.
- Colors: Different colors or letters identify the threads used in the design.
- String lines: Diagonal lines show how each thread travels through the bracelet.
- Knot symbols: Circles with arrows tell you which knot to make.
- Rows: Horizontal levels show the order in which knots are completed.
- Pattern repeat: When you reach the bottom, you usually begin the knot sequence again.
What Do the Arrows Mean In Friendship Bracelet Patterns?
The arrows show which direction the working string should move. Once you recognize the four basic symbols, it becomes much easier to follow the chart without stopping at every knot.
|
Knot |
Arrow Direction |
String Movement |
|---|---|---|
|
Forward knot |
Down and right |
Left string moves right |
|
Backward knot |
Down and left |
Right string moves left |
|
Forward-backward knot |
Right, then left |
Working string returns left |
|
Backward-forward knot |
Left, then right |
Working string returns right |
How to Read Friendship Bracelet Patterns: Step-by-Step
Learning how to read friendship bracelet patterns feels much easier once you break the chart into smaller parts. Instead of taking in the whole design at once, follow the steps below in order and focus on one movement at a time.
1. Look Over the Bracelet Pattern
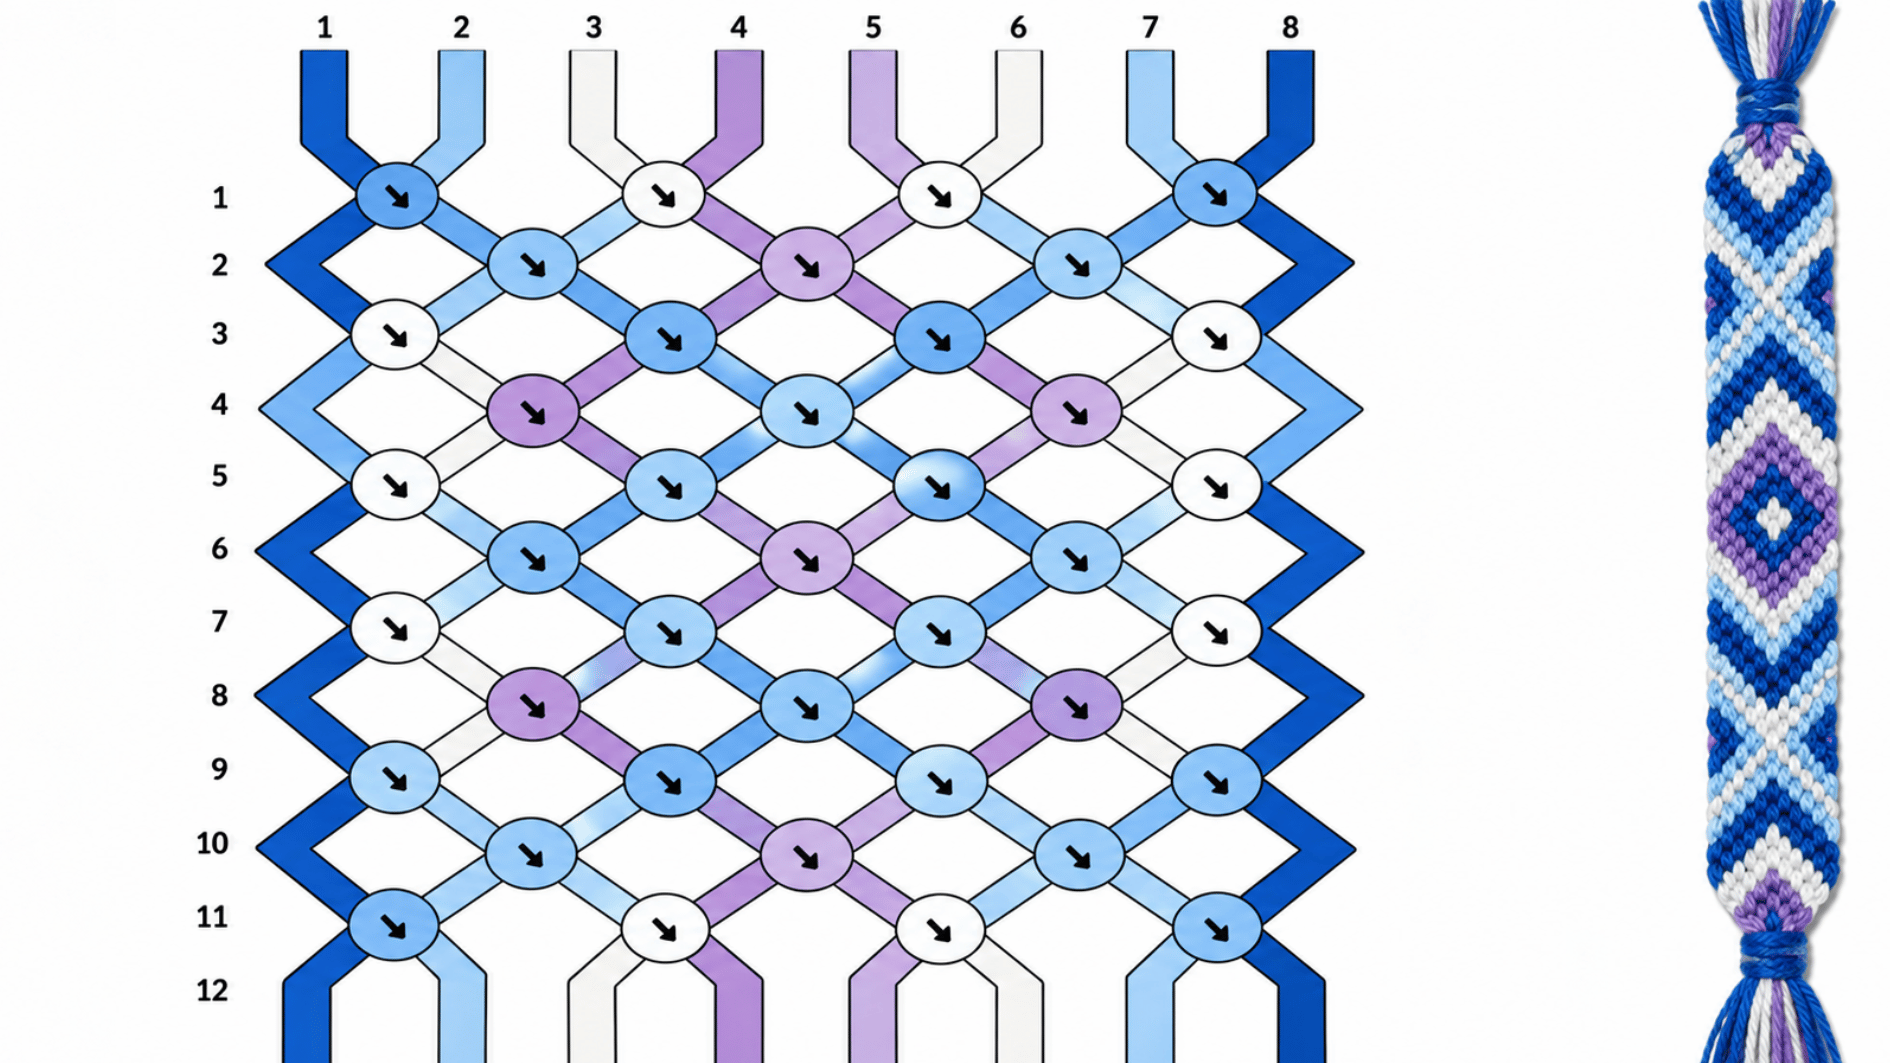
Start by looking over the full pattern before working with the strings. Notice the numbered starting threads at the top, the rows running down the chart, and the circles containing directional arrows.
The colored lines show how individual strings travel through the design, while the finished bracelet gives you an idea of how those charted movements come together.
- Starting Strings: Check how many threads appear across the top.
- Pattern Rows: Notice how the knots alternate as you move downward.
- Finished Design: Use the bracelet preview to see what the repeated pattern creates.
2. Count the Strings At the Top
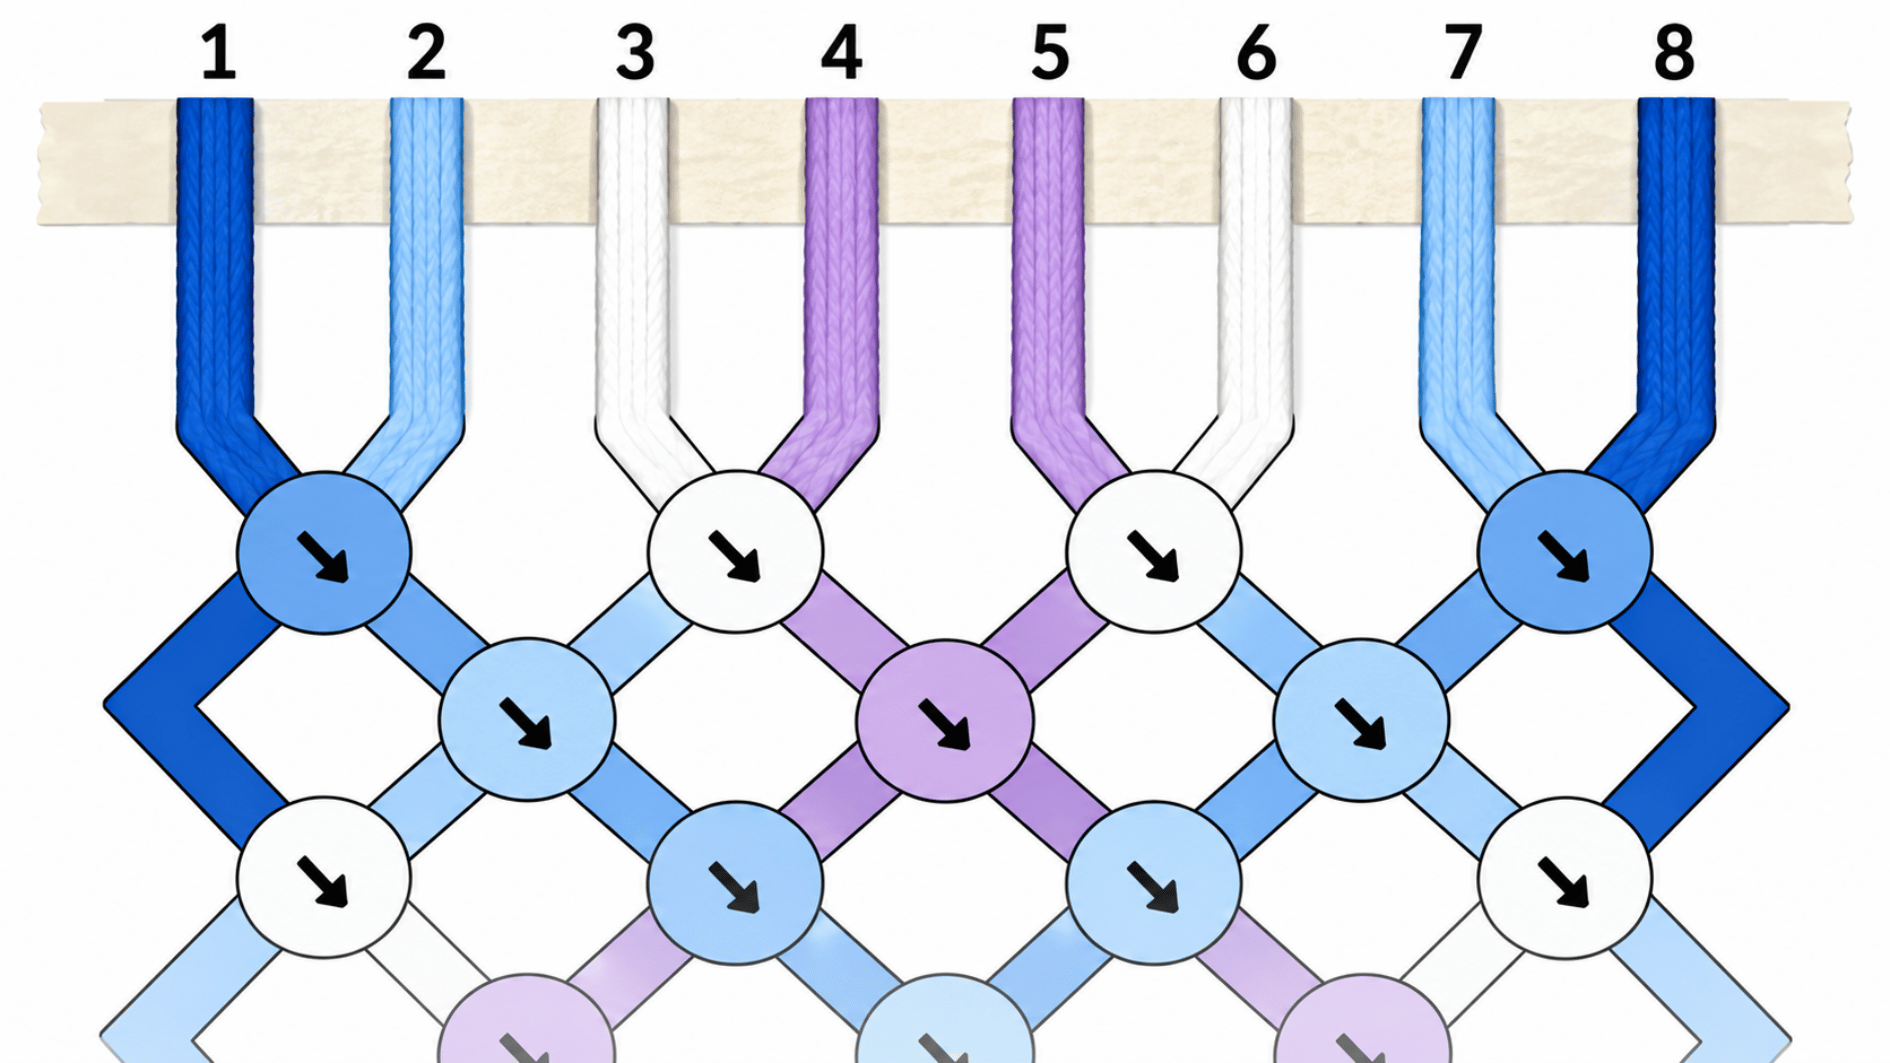
Look across the top of the chart and count the starting strings. In this example, the numbers 1 through 8 show that the bracelet begins with eight separate threads.
Do not confuse the number of strings with the number of colors. This pattern has eight strings but repeats several colors across the starting sequence.
- String Count: Eight numbered threads are shown.
- Color Order: Dark blue, light blue, white, purple, purple, white, light blue, dark blue.
- Width Check: More starting strings generally create a wider bracelet.
3. Put Your Strings In the Correct Order
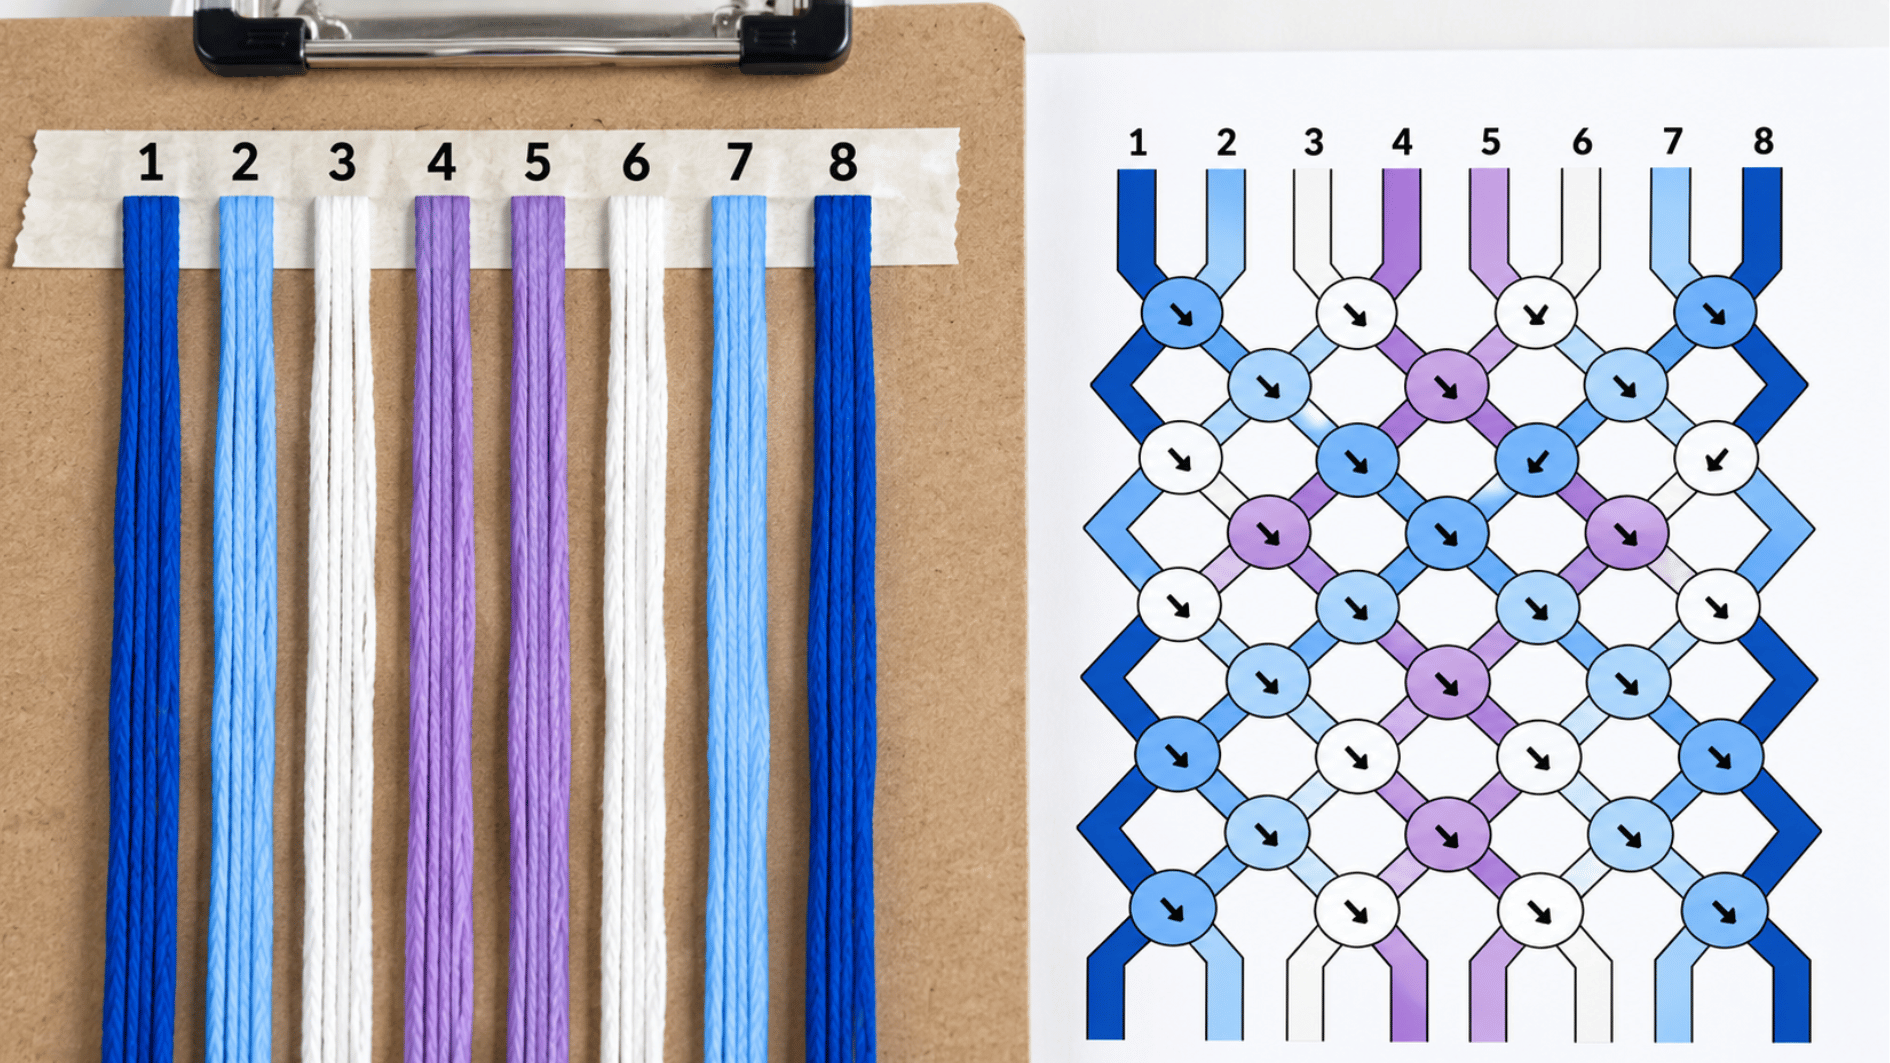
Arrange your threads from left to right in the same order shown across the top of the chart. The image makes it easier to compare the actual floss with the numbered string positions before knotting begins.
If two colors get switched at the beginning, they may move through the wrong parts of the finished design. I usually spread similar colors apart before I start because misplaced threads are much easier to spot this way.
- Match the Numbers: Line each thread up with its chart position.
- Secure the Threads: Tape or clip them to a firm surface.
- Check the Order: Compare the floss with the chart one more time.
4. Find the First Row
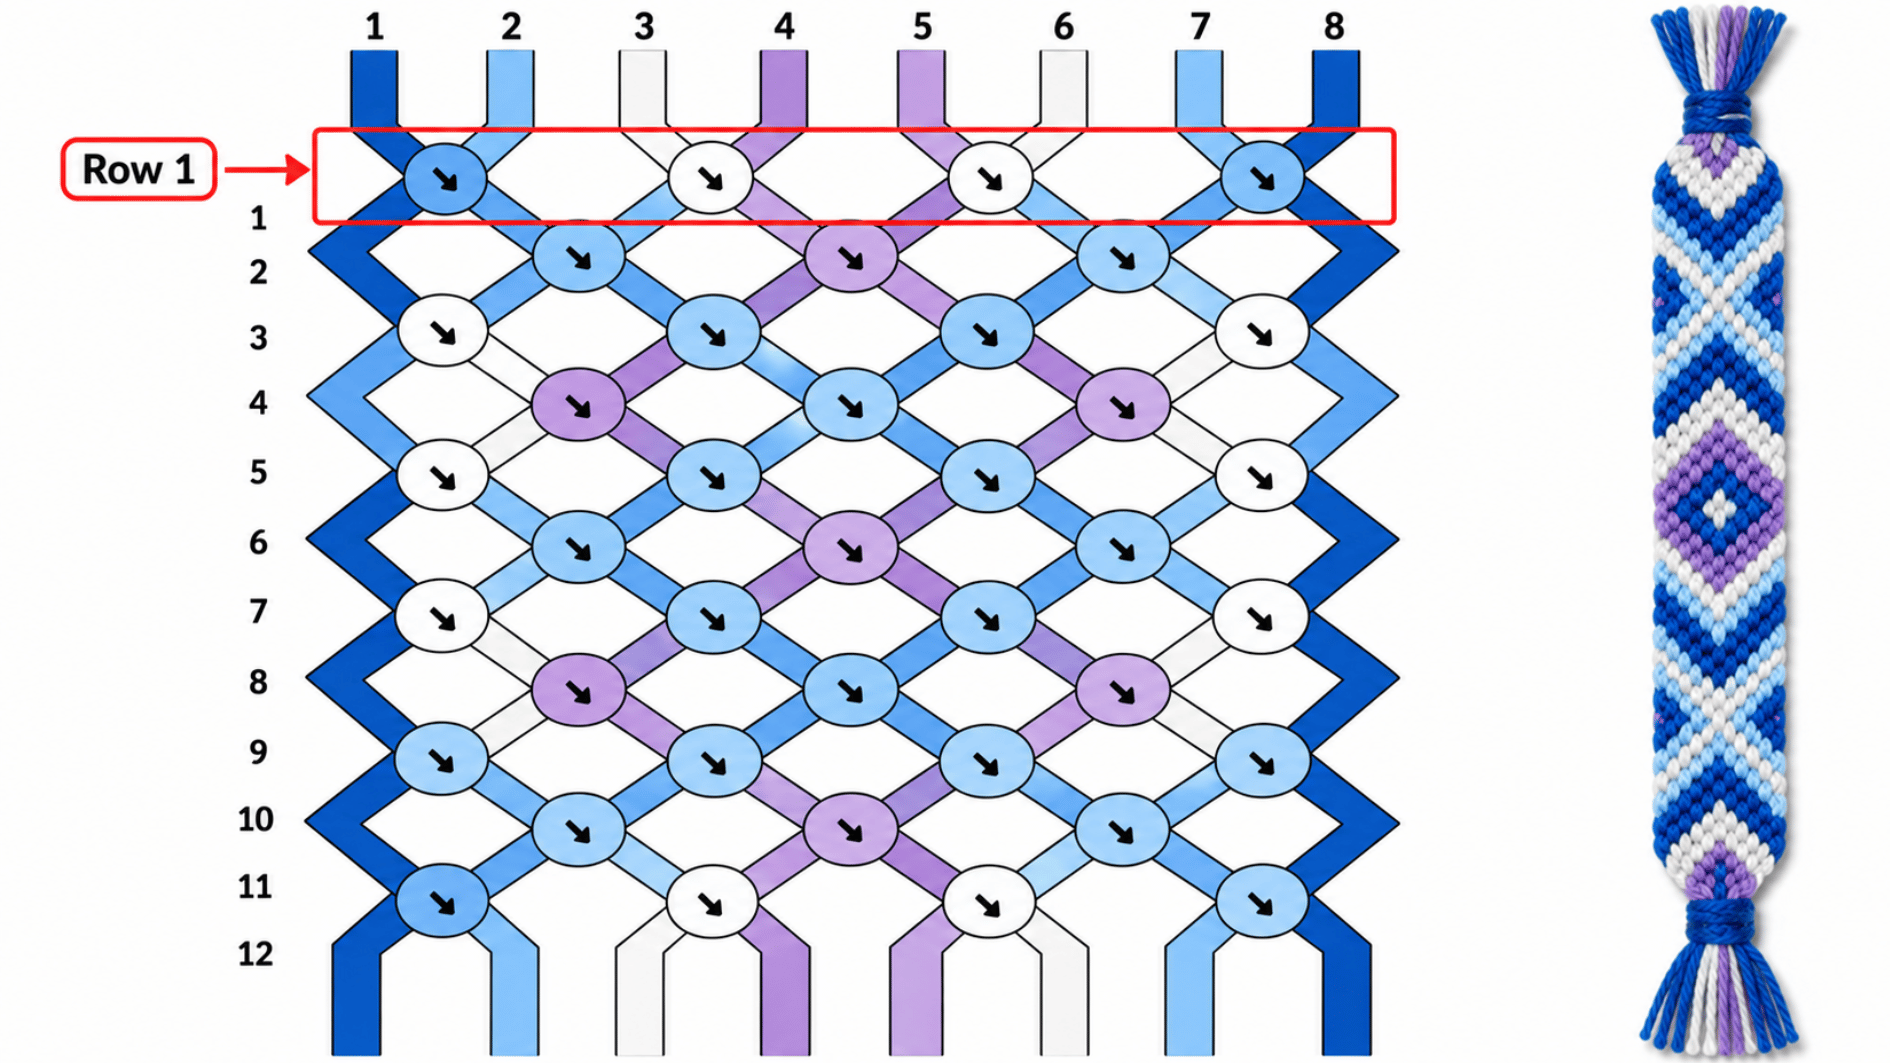
Move directly below the numbered starting strings to find Row 1. In this pattern, the first row contains four knot symbols spread across the chart.
Each symbol connects one pair of neighboring strings. Follow the highlighted row from left to right before moving farther down the pattern.
- Start at Row 1: Use the highlighted line as your starting point.
- Check Each Pair: See which two strings meet at every circle.
- Finish the Row: Complete all four knots before moving down.
5. Read the Arrow and Tie Each Knot
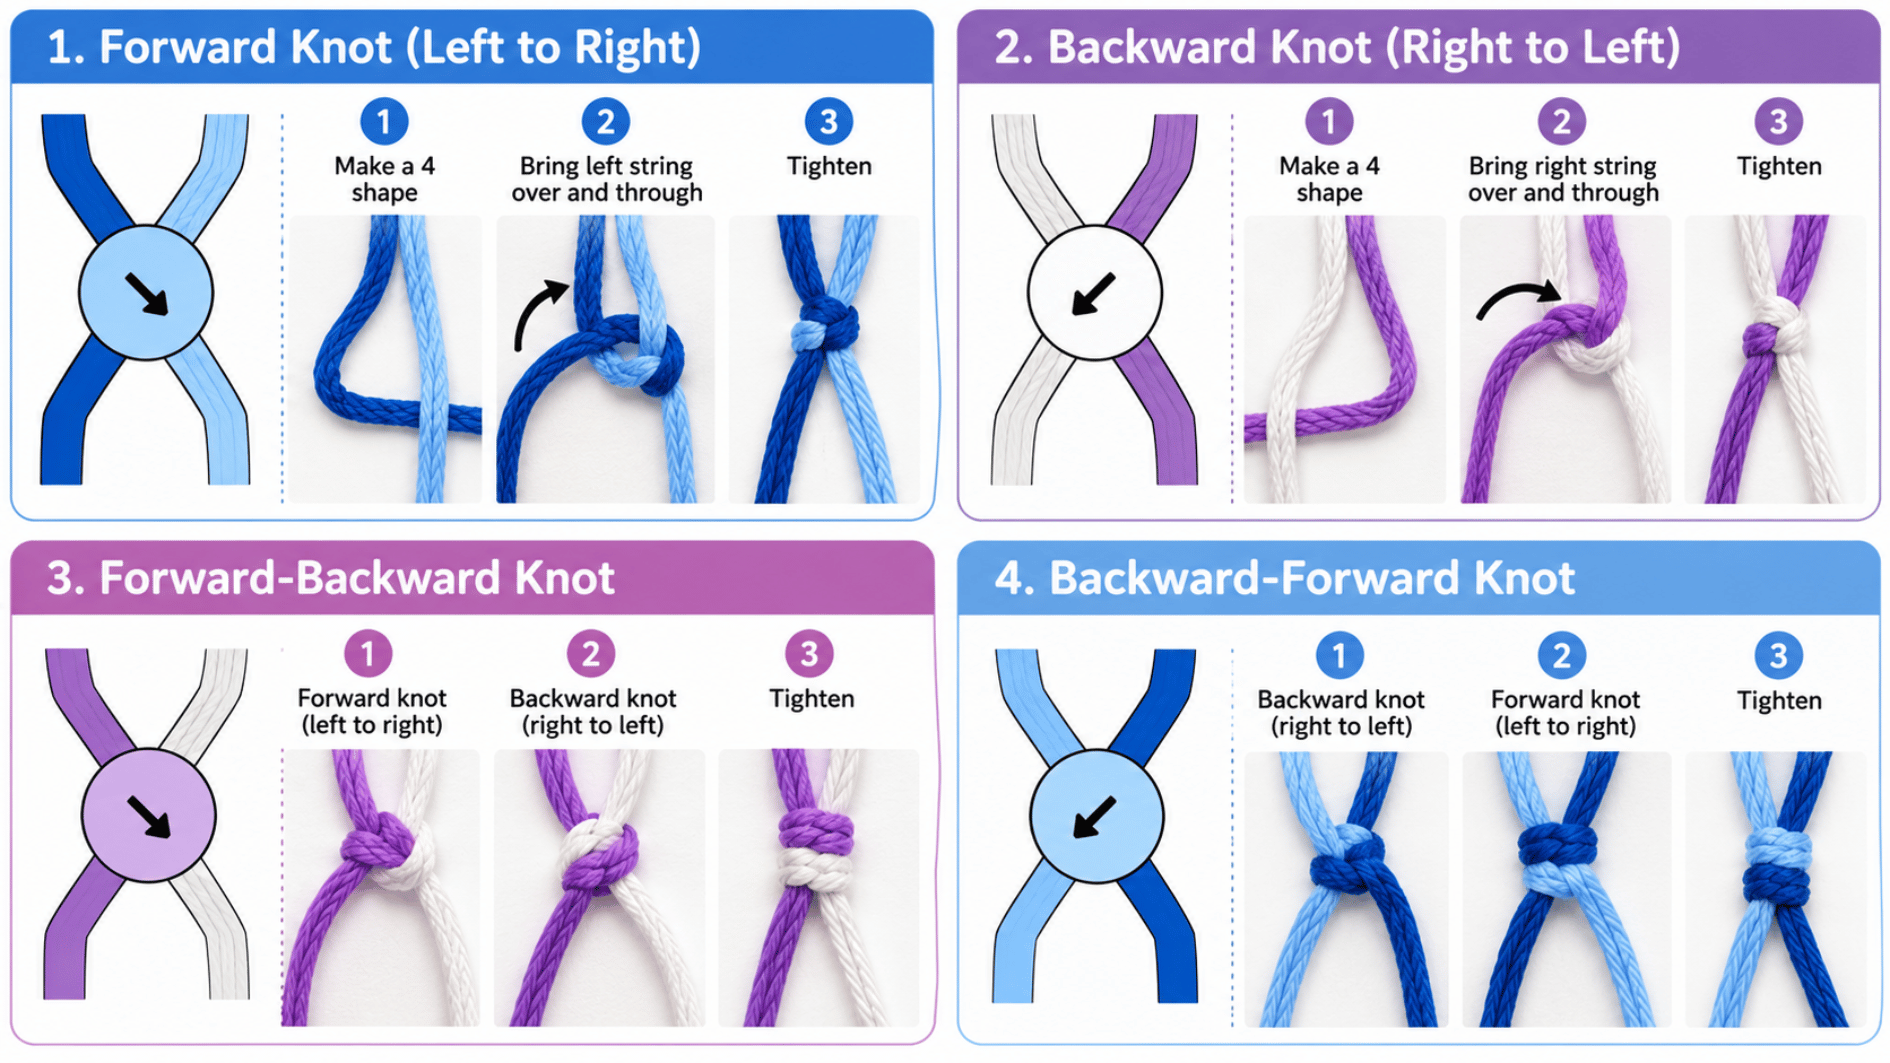
Before tying anything, check the arrow inside the knot symbol. The image shows the four movements you may encounter and how each arrow connects to the actual thread motion.
For a forward knot, cross the left string over the right into a number-4 shape, bring it through, and tighten. A backward knot mirrors the movement. I find it easier to follow the working string’s direction than to memorize every knot name at first.
- Forward Knot: Work from left to right.
- Backward Knot: Work from right to left.
- Forward-Backward: Move right, then return left.
- Backward-Forward: Move left, then return right.
- Tension Check: Keep each finished knot snug without pulling too hard.
6. Follow How the Strings Move
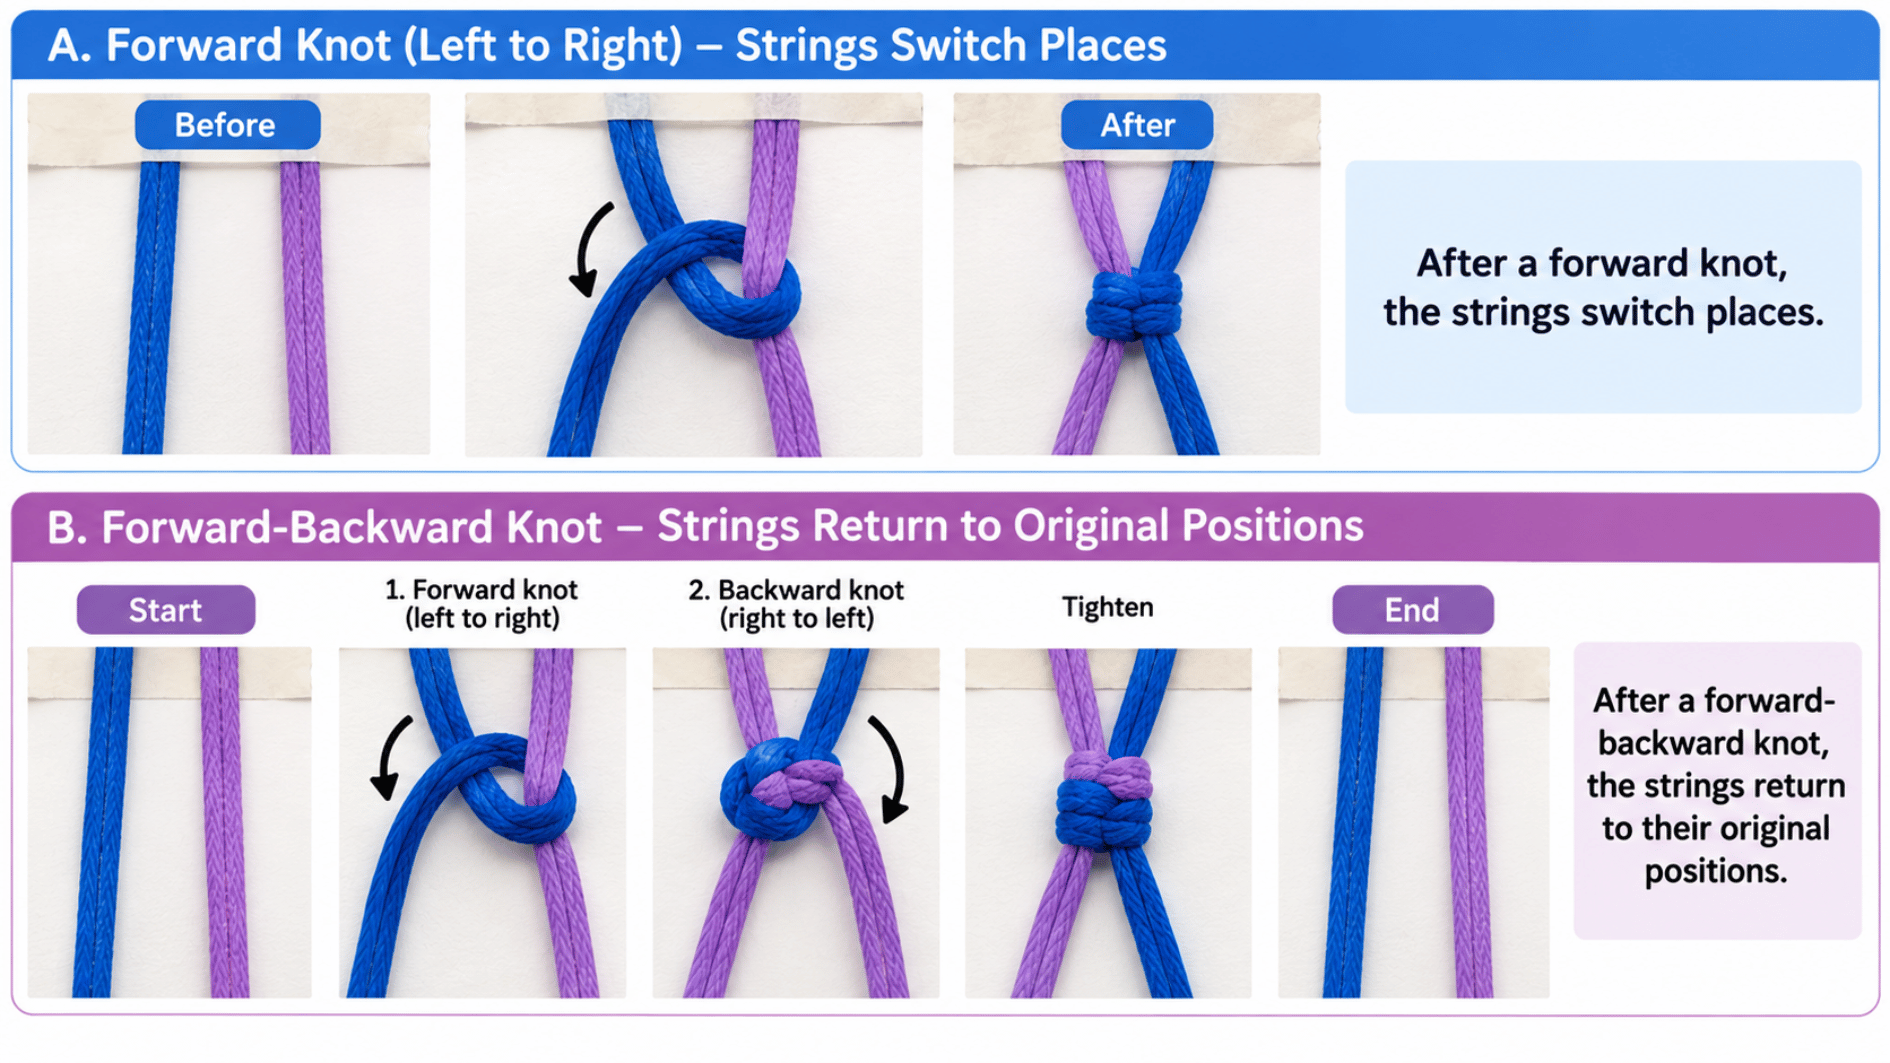
After tying a knot, notice where the two strings end up. The top example shows a forward knot switching the blue and purple strings from one side to the other.
The lower example shows a forward-backward knot. Here, the working string changes direction and both strings finish back in their original positions. I usually follow the actual thread movement rather than trying to remember where every color should go.
- Forward Knot: The two strings switch places.
- Forward-Backward Knot: The strings return to the same positions.
- Tracking Method: Watch where each colored thread finishes.
7. Move to the Next Row
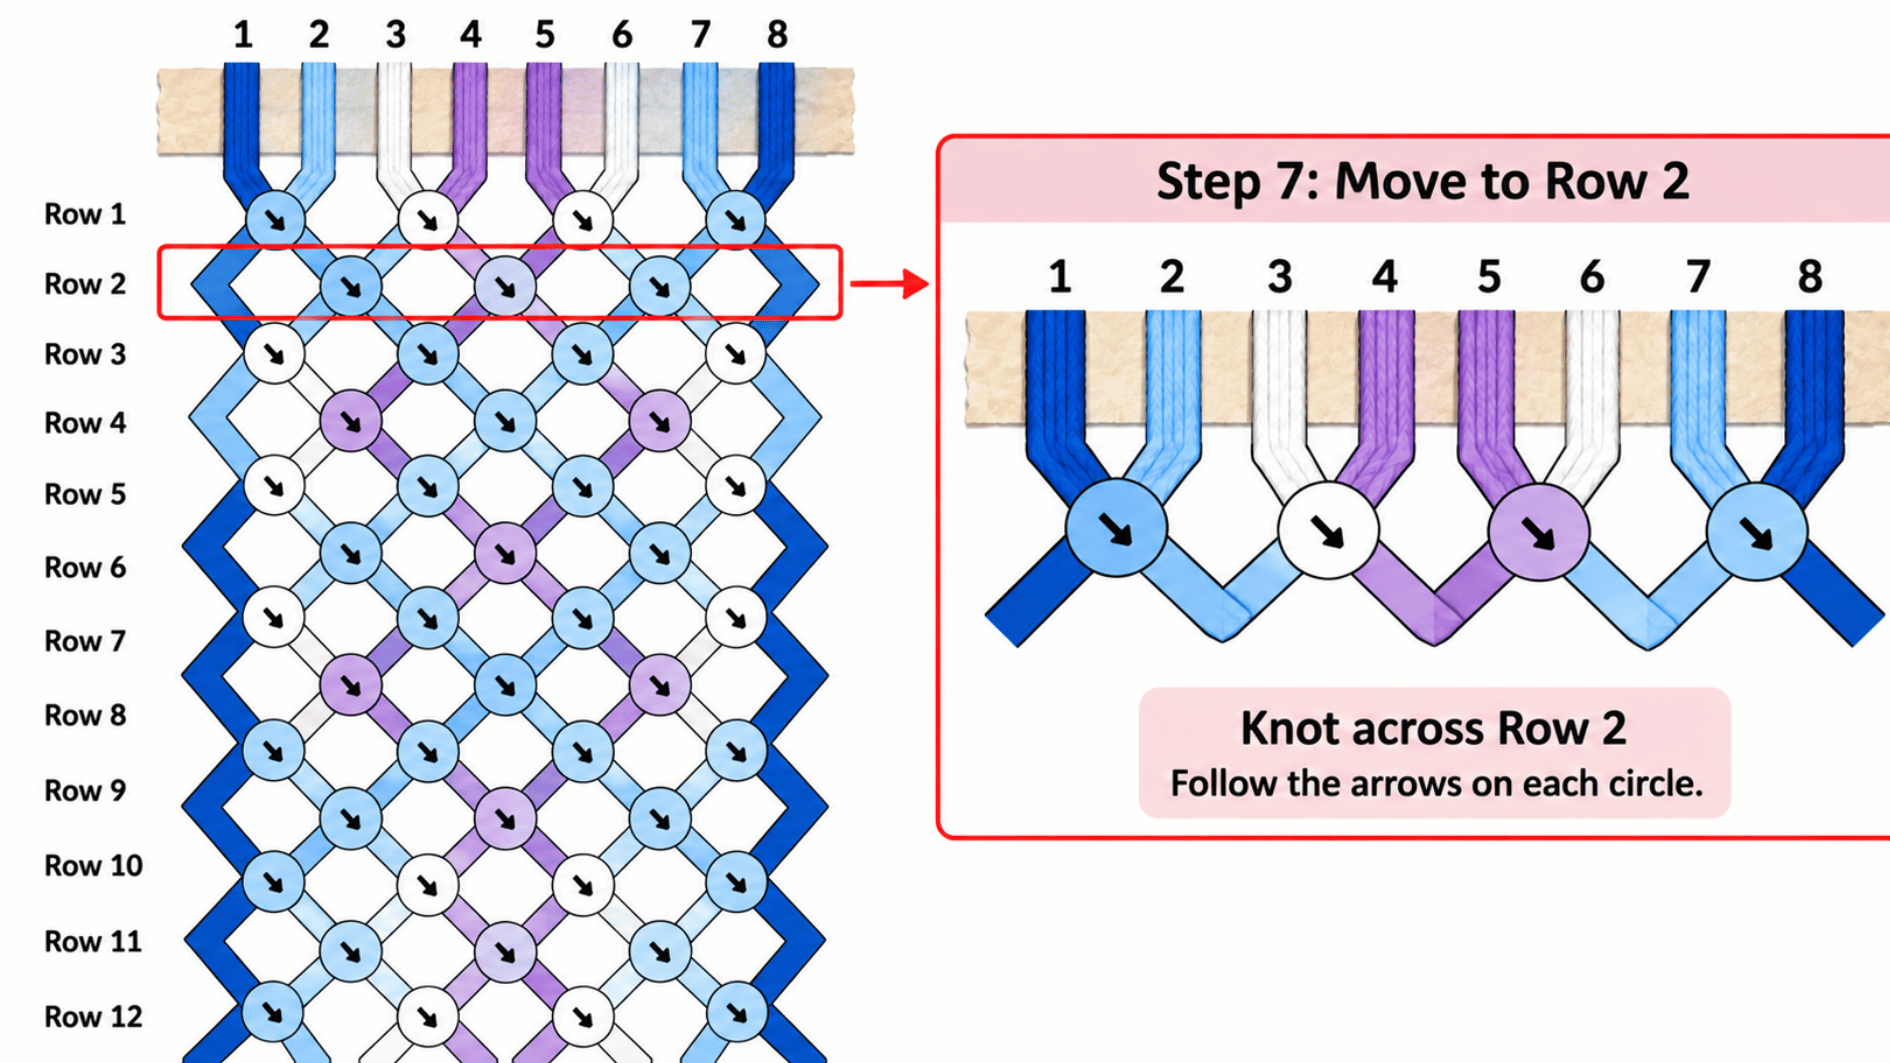
Once Row 1 is complete, move down to Row 2. The close-up shows that the next set of knots sits between the positions used in the first row rather than directly underneath them.
With eight strings, the two outside strings may sit out while the six middle strings form three new pairs. This staggered setup continues as you work through the chart.
- Shift the Pairs: Use the new pairings shown in Row 2.
- Leave Edges Alone: Outside strings may not be used in that row.
- Follow the Symbols: Let the chart decide which strings meet next.
8. Work Down the Chart One Row at a Time
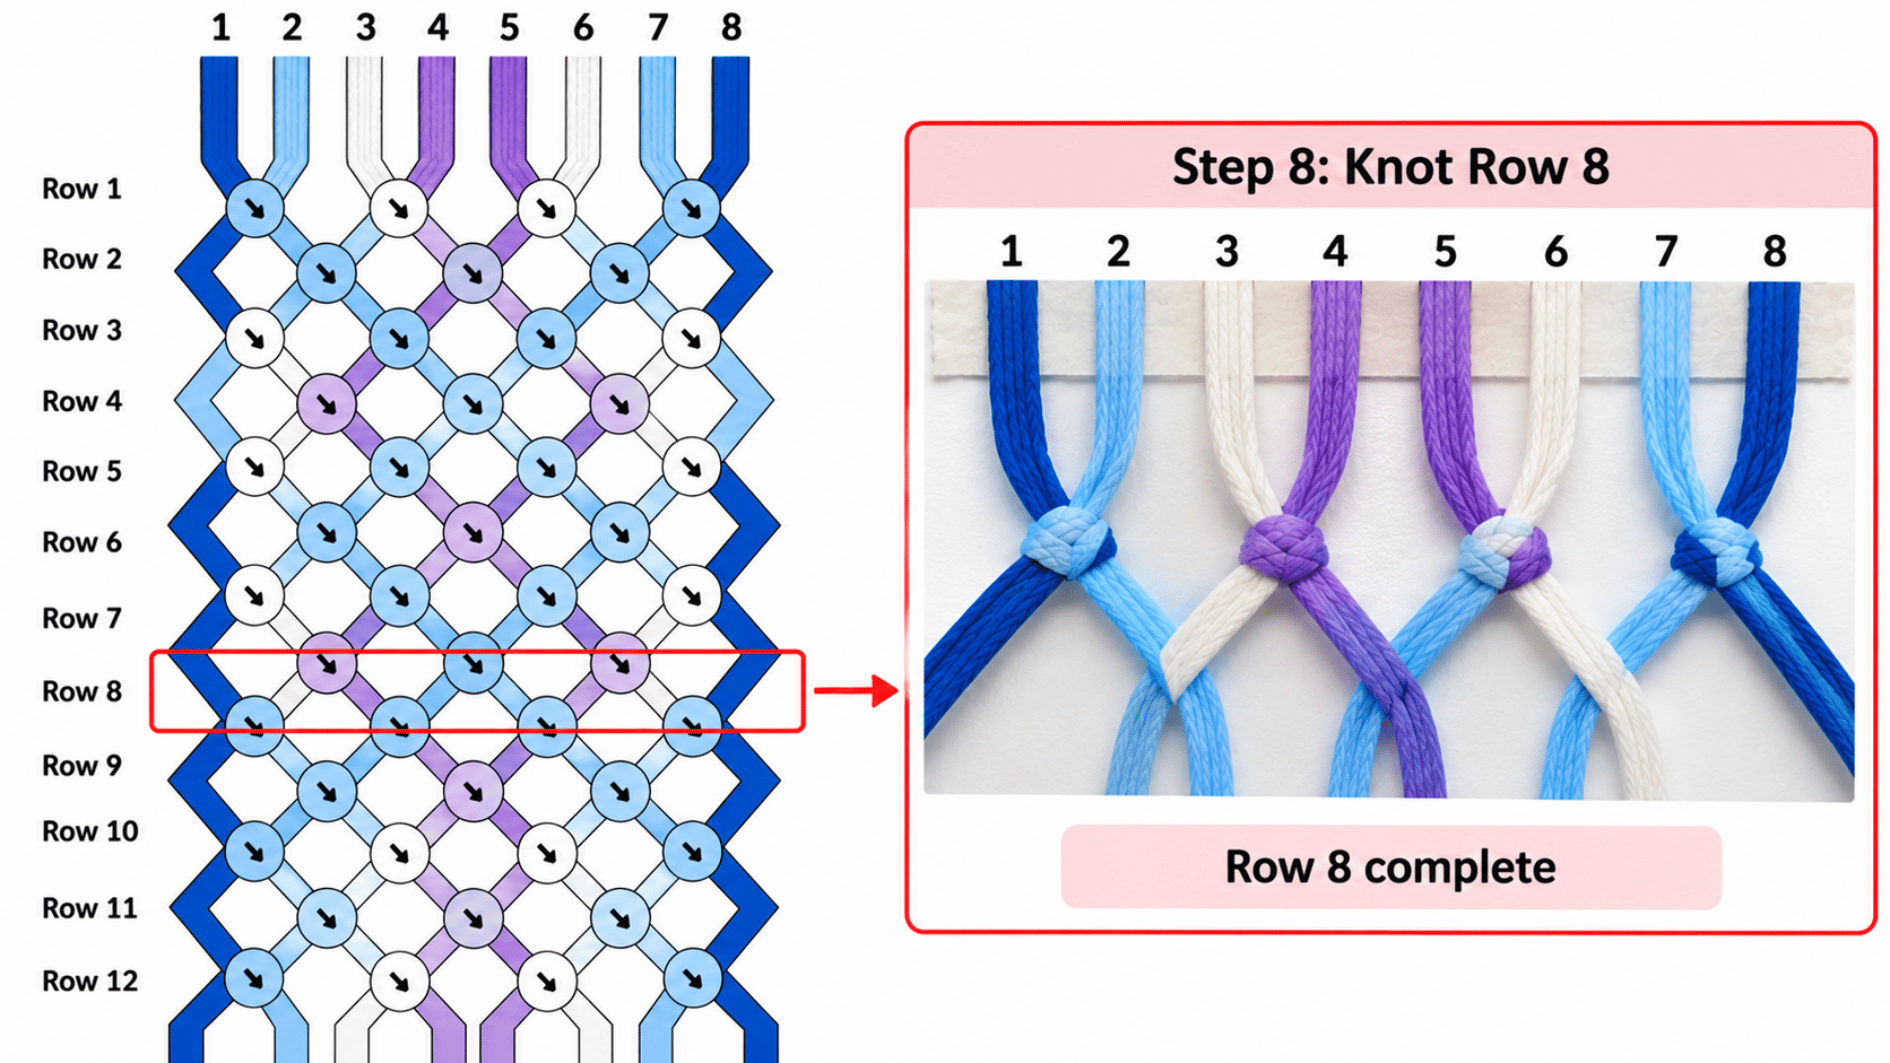
Continue downward in order, completing one row before starting the next. The image uses Row 8 as an example, showing how a row on the full chart connects to the strings and knots you are actually working with.
I like to check the thread positions after every completed row. Catching one wrong knot at this point is much easier than finding the problem several rows later.
- Find the Row: Locate the next numbered line on the chart.
- Check the Symbols: Confirm each knot before tying it.
- Complete the Row: Work across all the shown pairs.
- Check Your Strings: Straighten them before moving down again.
9. Repeat the Pattern From the Beginning
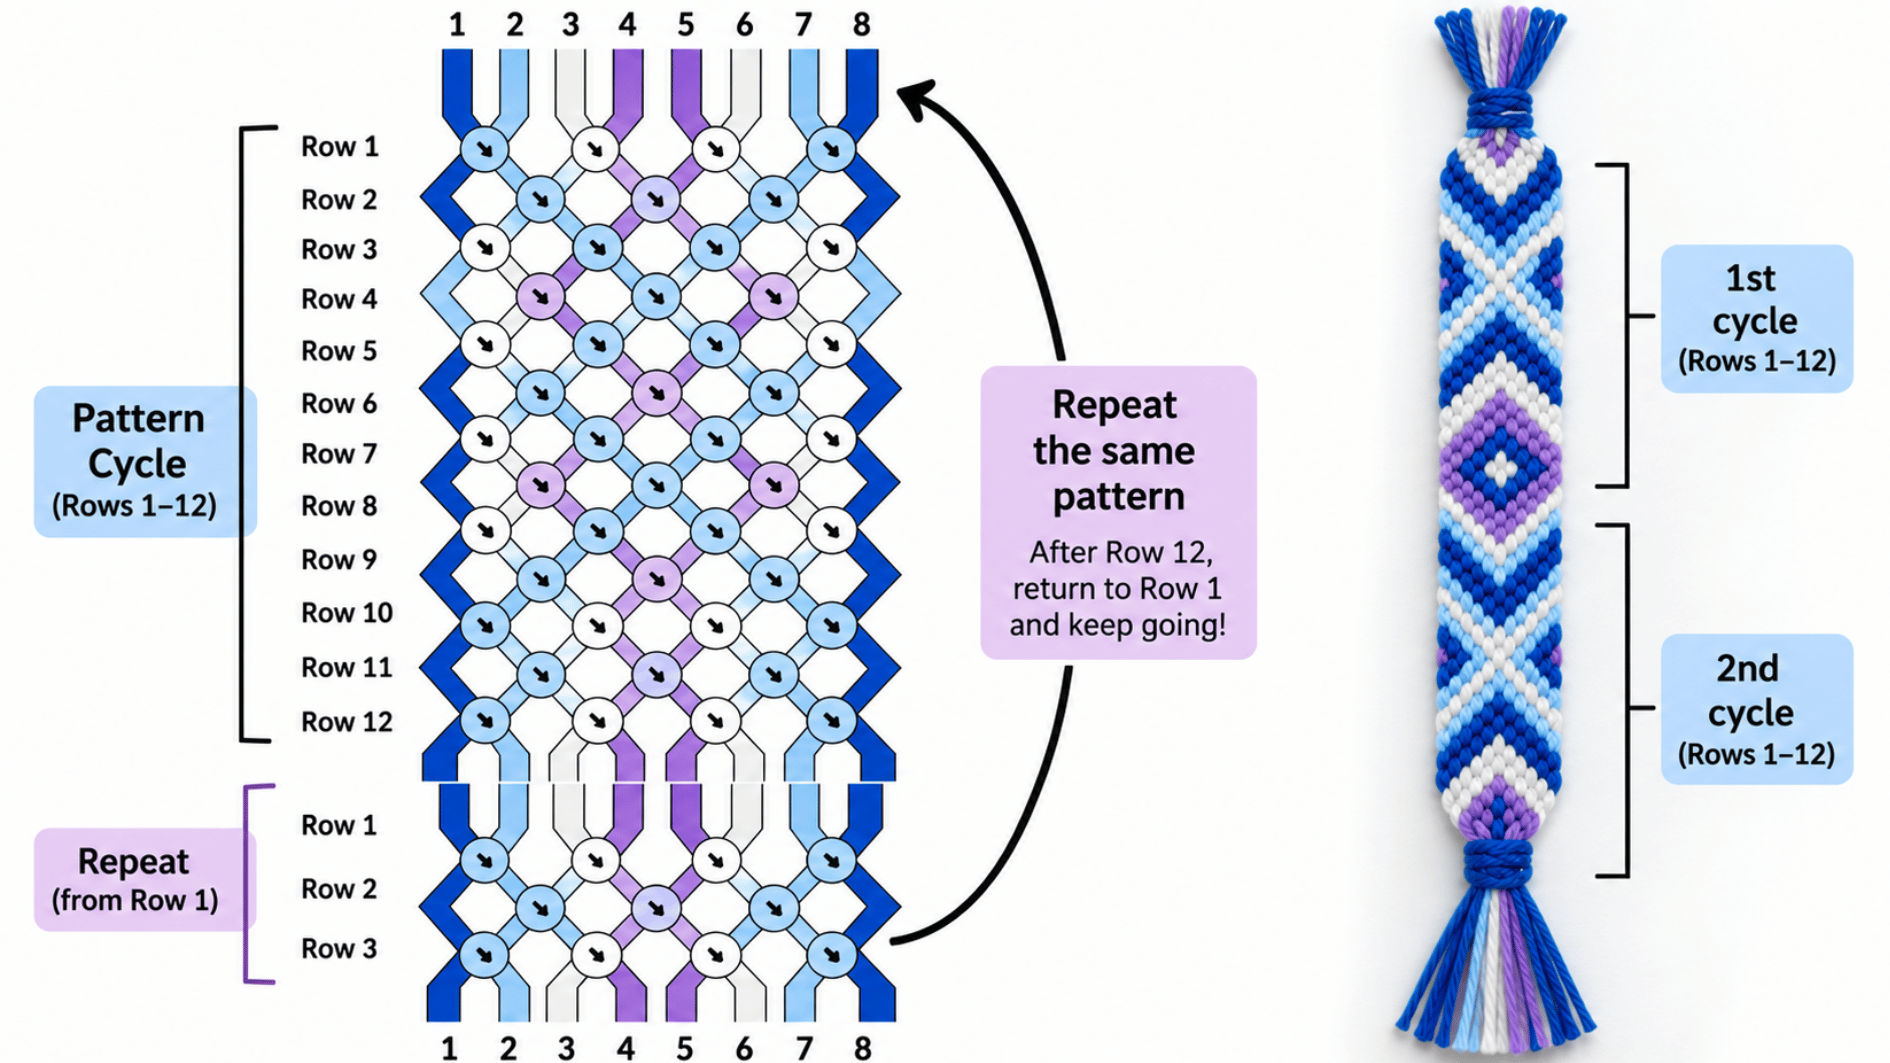
Reaching the bottom row completes one full pattern cycle. Instead of stopping there, return to Row 1 and begin following the same knot sequence again.
The image shows the first 12-row cycle followed by the opening rows of the next repeat. On the finished bracelet, repeating that same sequence builds the design farther down the band.
- Finish the Cycle: Complete the final row shown on the chart.
- Return to Row 1: Start the same sequence again.
- Continue the Repeat: Follow the chart as the bracelet grows.
- Trust the Pattern: I would keep following the symbols rather than manually rearranging the strings.
Normal Patterns vs. Alpha Patterns
|
Feature |
Normal Pattern |
Alpha Pattern |
|---|---|---|
|
Chart appearance |
Diagonal string lines |
Pixel-like grid |
|
String movement |
Threads move through the design |
Base threads mostly stay in place |
|
Main use |
Stripes, chevrons, geometric shapes |
Letters, words, images |
|
Knotting style |
Four basic knot types |
Commonly forward and backward knots |
|
Beginner approach |
Follow neighboring thread pairs |
Work across base strings row by row |
|
How it is read |
Follow knot symbols and string paths |
Follow colored squares across each row |
How Can You Keep Your Place On a Pattern?
When you’re working through cool friendship bracelet patterns, keeping track of each row can make the whole process feel less confusing. A few simple habits help longer charts stay much easier to follow.
- Mark Finished Rows: Cross off each row after completing it, so your eyes don’t drift back to something already done.
- Use a Ruler: Position it under the row you’re currently working on to keep your focus contained.
- Stop Between Rows: Finish one full row before taking a break, rather than pausing mid-row.
- Separate Unused Strings: Move them away from the pair you need next, so nothing gets tangled.
- Count Before Continuing: Check that the string order still looks right before moving to the next row.
- Take a Photo: Save your progress before putting the bracelet away, especially on longer projects.
- Use a Sticky Note: Slide it down the chart row by row as you work through the pattern.
Best Beginner-Friendly Friendship Bracelet Patterns
|
Pattern |
Why It’s Beginner-Friendly |
What It Helps You Practice |
|---|---|---|
|
Candy Stripe |
Uses a simple repeating sequence |
Forward knots |
|
Basic Chevron |
Follows a clear mirrored shape |
Forward and backward knots |
|
Two-Color Arrows |
Keeps color tracking simple |
Direction changes |
|
Simple Diamonds |
Uses an easy repeating shape |
Reading repeated sections |
|
Zigzag Pattern |
Has a predictable back-and-forth flow |
Switching knot directions |
|
Small Wave Pattern |
Adds movement without too many strings |
Following repeated shapes |
|
Geometric Repeats |
Uses short, repeated sections |
Reading pattern cycles |
Do You Have to Use the Colors Shown In the Pattern?
No. You can change the colors in most friendship bracelet patterns as long as you keep the same starting order. The chart controls the string placement, not the exact shades you choose.
For example, if a pattern shows A B B A, you could use Purple Yellow Yellow Purple or Blue White White Blue. The letters work more like position markers than fixed colors.
I usually keep the same order and only swap the shades. That makes it easy to personalize the design without changing how the pattern works.
It is also a simple way to make cool friendship bracelet patterns feel more personal while keeping the chart easy to follow.
Wrapping It Up
A bracelet pattern feels far less complicated once you stop viewing the whole chart at once.
Focus on the starting order, one knot symbol, and one row at a time. Keep checking where each string finishes before moving forward.
With a few simple patterns, the arrows and crossings quickly become familiar. Choose an easy design, secure your threads, and practice following the chart from top to bottom.
Frequently Asked Questions
Are Friendship Bracelet Pattern Symbols the Same on Every Website?
Not always. Arrow-based knot symbols stay similar, but colors and layout shift from site to site. Check the legend first if anything looks unfamiliar.
Can Left-Handed Beginners Read the Same Friendship Bracelet Patterns?
Yes. Charts show string direction, not hand preference.
Can You Read a Friendship Bracelet Pattern Backward?
Not for beginners. Reversing the chart changes both the knot directions and how the finished bracelet actually looks.
What Is the Difference Between a Friendship Bracelet Pattern and a Tutorial?
A pattern shows the knot sequence and string paths. A tutorial walks through the technique itself, step by step.