Showing posts with label Paper Crafts. Show all posts

Thursday, February 10, 2011

Vintage Paper Ball Tutorial

So this project, may look like a breeze at first glance, but this little stinker took me forever!!! I had to redo it 2 times before I finally figured out how to keep the paper on the ball.

My first attempt I was using a bigger styrofoam ball and I was pushing the paper into the styrofoam. Well 2 hours later I only had half of the ball done and my hand was throbbing from pushing the paper down into the ball. Then, the paper started falling out the other side because I was pushing too hard on the opposite side.

Attempt 2: I got a WAY smaller ball and did the same thing, but the paper kept falling out!

Attempt 3 I finally figured it out. The tutorial is below. :)

Photobucket

Supplies Needed:

Styrofoam Ball (i used 2.5")
An old book
Hot Glue
Pencil

Some tips before you start:

1. Cut out A LOT of paper. I kept running out and I had to recut more paper like a hundred times! :)

2. Have someone help you. It will go TONS faster if you have someone controlling the hot glue gun. This way you don't have to keep putting your glue down and your pencil and paper every single time.

Step 1: cut out your papers. I did mine about 2" x 2" Try and get them roughly the same size

Step 2: Wrap your paper around your pencil (don't use the sharpened side)
Step 3: Put some hot glue on your styrofoam ball

Step 4: Put your paper down and hold down with pencil until it will stay in place


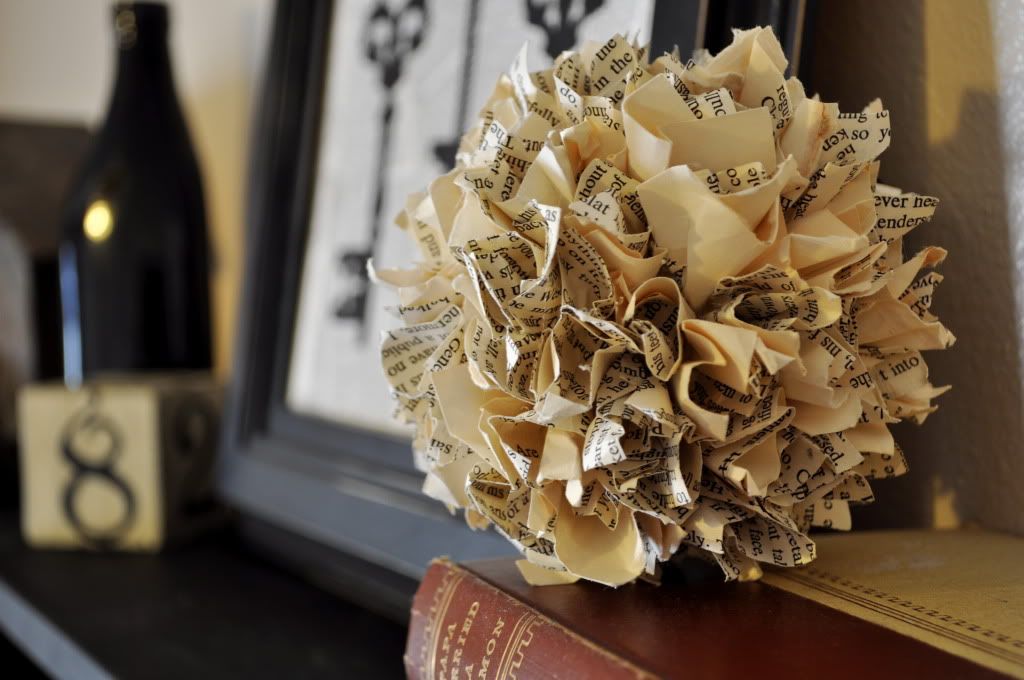
Step 5: continue step 4 until your whole ball is covered. The more papers you do the more full it will be. I tried to get mine as full as possible


That's it! It really isn't that hard, but it took a lot longer than expected. If you have someone to help you, then it will go by WAY faster! :)


Photobucket

I am participating in


Wednesday, January 19, 2011

Paper Fan Heart Wreath .: Tutorial :.


I may be a little obsessed with making things with old book pages. My last craft projects have all consisted of old book pages. I love them! They are just so vintage looking and I love old vintage looking things!

Can I just say that this project took way longer than necessary!!! But with two little munchkins, I didn't really have a choice! :) This took me two days to complete. If you know me, you know I that when I start a project I like to finish it the same day. I just hate having projects laying around the house. So it was killing me when I had to stare at it for two days on my table unfinished!

I got my inspiration from one of my previous projects.....you can find it here and you can also find the instructions on how to make a paper fan.


Tutorial:

Supplies:
Old book pages
11 red hearts (different sizes)
Distressing ink
11 black buttons
Hot Glue
Large piece of cardboard
Paint
Twine
Mini clothespin clips
Scrap paper

Step 1. Make your paper fans. Make 2 different sizes!
I made about 12, but only ended up using 11. You can find my tutorial here.


Step 2. Make a frame to glue your fans to. Map out your heart than draw a hear onto your cardboard


Step 3: Cut out your frame


Step 4: Paint your frame. I only did this because I didn't want brown cardboard showing through.


Step 5: Hot glue your fans to your frame. (it's easier to map it out first so you know what you are doing when you are glueing)


Step 6: Make the word "love" out of scrap pieces of paper. I actually printed on some scrapbook paper the word love and then cut it out and glued it to some red cardstock.


Step 7: Tie your twine to your frame from one side to the other


Step : Hang your letters with the mini clothespins.


That's it! Super easy and super affordable. I didn't have to go out and buy anything for this project, which is a good thing because who knows when I would have made it to the store! :)

I have mine hanging on an angle--like in the picture. I like it better this way rather then straight up and down.


I am linking up at:

Thursday, July 8, 2010

Mini Love Album with Love Coupons


It was my Husband's Birthday this week and I was really having a hard time figuring out what to get him. I finally decided I would make something homemade and romantic. (he is a very romantic person--way more than i am!)

I made him a mini love album with pictures of us when we were dating and married. I also wanted to include some "love coupons" :)
Some of the coupons were:

1 Romantic Candlelight Dinner
1 Breakfast in bed
25 kisses (in the location of your choice)
1 Romantic date night
1 Romantic Movie Night

I got a lot of my ideas from the internet and made up some myself. I did eight coupons in all.


I really loved how it turned out and best of all he loved it! :)

This is the cover ( i haven't put a ring in it to hold it all together yet because I wasn't strong enough to punch the wholes in it! so if you are going to make one just punch a whole in each page and then use a binder ring or ribbon to bind it all together.)


For the second page, I made a pocket that holds all of the coupons!
On every page I tried to put a love quote on it and I tried to keep it simple.


I really love how it turned out! It was so easy, it took me a couple of hours to make and it will be something we can look at for years to come!

Tuesday, June 22, 2010

Patriotic Star Frame

I grew up in a home where my mom decorated the house for each holiday. I always loved to help her get out the decorations and find places for them each year. Now that I have my own home to decorate, I try to decorate for every holiday just like my mom did when i was growing up.

My collection is still very small and every year I try to add something to each of my holiday collections! It can get expensive if you just buy things that are already made, so that is why I try really hard to make things that are cute but really inexpensive! And this brings me to my next craft project!

This project is so easy! It only took me about an hour! It would have taken less if I didn't have to watch paint dry! :) (i hate watching paint dry!)

This seriously is the perfect patriotic project! It was so easy and it is small enough it could go just about anywhere and make your house look so cute and festive! This would also be a great project for your kids to help you with!


Supplies Needed:
1 Wood frame (4 x 6)
Paint
Rub n' buff
Coordinating scrapbook paper
hot glue
mod podge

Here is the tutorial!


Step 1: Paint your frame. I used a dark blue paint and then I went over it with some Rub n' Buff and then sanded it to make it look older.


Step 2: Cut out your main piece of paper to fit to the size of your frame and then mod podge the paper onto the cardboard.


Step 3: Cut out 2 stars that can be layered on one another.


Step 4: Use a piece of ribbon or decorative tape and glue to the middle of your main piece of paper.


Step 5: Mod Podge your stars onto the paper

Step 6: Cut out your letters that say USA or anything else you like! Then mod podge them on your frame.


Step 7: hot glue a couple of buttons on your frame and embellish with anything else you like!

And you're done!


See how easy that was!! This project only cost me a dollar! I bought the frame at Michael's a long time ago and it cost me a buck! I had all of the other supplies on hand! I love how it turned out and it looks really festive! You could definitely make this project your own by adding different embellishments! I hope you like it! :)


Monday, March 29, 2010

Mod Podged Bird House with Frame

Hey Everyone, if you weren't able to check my tutorial out at Mod Podge Rocks, here it is!
So here it is! My Mod Podged Bird House with frame!


Let's get started!


Supplies Needed

1 wood bird house
1 8 x 10 black frame. (i had an old frame i painted black)
antique white paint
Scrapbook paper
Mod Podge
Distressing Ink
Hot glue


Step 1: If your frame isn't black, paint it!

Step 2: While your frame is drying, Paint your bird house with the paint of your choice, I used antique white


Step 3: After your house is dry, distress it with some distressing ink! And then it's time to measure the dimensions of the sides, front, and top of your house! Once you have measured these, cut your paper to fit


Step 4: Apply a thin layer of mod podge on your house then lay your paper over that and apply another layer of mod podge to seal the edges.


Step 5. After your mod podge is dry, hot glue the rope to the back of your frame!!


How easy is that! Only 5 steps!!!!
I love how it turned out and it was so simple anyone can do this!!